Showing posts with label sewing for kids. Show all posts

Thursday, February 27, 2020

Being Real

Scrappy Linen Log Cabin Quilt by Heidi Staples of Fabric Mutt

Last week I talked by phone with my friend Stephanie who asked me to do an episode of her popular Modern Sewciety podcast about what brought me to the decision to retire from professional sewing. As someone who had struggled with these issues herself, she felt that it was an important conversation to have, and I'm so glad she did. We spent over an hour sharing our hearts about the joys and challenges of this work. Being real . . . it seems to be the theme that's guiding this new season. Real conversations about real things with real people in real life. It's messy and difficult sometimes, but it's what we've got. It's who we are. And it's so much better to look at that reality than to try to be something we're not. So pour yourself a cup of tea, pick up your favorite slow sewing project, and settle in with the link right here for some good, honest conversation with friends.

Scrappy Linen Log Cabin Quilt by Heidi Staples of Fabric Mutt

On another note, it's been almost a year since I started working on my scrappy linen log cabin quilt (Sunny Day Supply is actually getting ready to host another round of their annual log cabin sew along that got me started on this one!), but I finally finished it last week just in time to gift it to my niece for her first birthday today. I absolutely love this quilt, and as hard as it is to let it go, I'm so happy that it's going to her.

For months, I was stumped on the quilting. I tried both machine and hand quilting several times, but I always wound up pulling the stitches out when they didn't look quite right. After getting so much wonderful encouragement from friends on Instagram to finish it up, I decided to do the simplest quilting possible on my machine, and it finally worked. The linen had to be handled carefully at times, as it does like to stretch a bit, but it came together in the end.

Scrappy Linen Log Cabin Quilt by Heidi Staples of Fabric Mutt

The back of the quilt is a Melody Miller print, back from her solo Ruby Star days, which I've always loved. I added a tag on the back with my niece's name and mine, which I embroidered by hand. It takes a little extra time, but for something special and personal like this, it's so worth it. The quilt is bound in a rainbow striped canvas print from IKEA that I've been saving for years. I like the touch of whimsy that it adds to the border, and it makes a wonderful frame for the whole project.

Scrappy Linen Log Cabin Quilt by Heidi Staples of Fabric Mutt

This quilt is absolutely packed full of favorite prints that I've been collecting since my very first year of sewing. It almost feels like a time capsule of the past eight years. I love it so much. I hope that every time my niece wraps herself up in it, she'll remember -- as I've always told my girls since they were little -- that she's all wrapped up in our love too.

Monday, September 2, 2019

That Handmade Touch


It's been a crazy start for school this year thanks to a flock of unwelcome germs that descended on our house just days after we started classes. Bunny was the first to get sick, followed closely by Bear. I thought for sure that we were finished with it all after making it through last week with no new symptoms until Mouse came down with a fever last night...just in time for her birthday next weekend, of course. She's devastated at the thought of missing out on all the fun we've planned, and I'm trying to get her over this as quickly as possible.


The only thing that made her eyes light up was the sight of this bag that I made over the weekend. I've known my friend Svetlana for so many years now, all the way back to when I first started blogging and sewing. She has such a clear sense of her own style; I can look at a project in my Instagram feed and instantly know that it's hers even before I see the name. Her new book That Handmade Touch is so perfectly her from beginning to end, full of useful projects that are beautiful yet simple.


I chose to make the On-the-Go Project Bag, mostly because I can never have enough of this sort of bag in my life. It's a sturdy bag in a great size that will be perfect for carrying all sorts of things. The leather handles are a nice touch, and I love the drawstring opening. I used linen and canvas for both the exterior and lining, and to keep the bag soft yet structured, I used batting, which has become my favorite interfacing these days.

The only changes I made to the pattern were to box the lower corners instead of folding them up and to make the handles just a bit wider. I really like that it includes an inside slip pocket as well for corralling small things, always helpful for someone like me who is constantly digging in the bottom of her purse for that one thing I can't find.


I'll be perfectly honest with you, friends: this bag was going to be mine. I had every intention of using it for travelling sewing projects this year, and I was looking forward to all the adventures we were going to take together, this bag and I. And then I saw Mouse's eyes when she saw me carrying it into the family room. "Are those llamas?" she asked excitedly. And I knew I just couldn't keep this one to myself.


So I've decided that this will be the gift bag for Mouse's birthday present from all of us. My daughter is obsessed with three things these days: llamas, swimming, and Disney's Zorro television show from the 1950's. I used to watch reruns on the Disney channel when I was a kid (Zorro and Davy Crockett were my heroes back then), and I've loved sharing it with my girls. We've managed to watch a few episodes on YouTube and the old Sign of Zorro movie on Amazon, which is really just clips from the first season all put together. Happily, I was able to find a set of dvds from the first and second seasons on Ebay that wouldn't clean out our bank account, and I'll tuck those into this bag so that we can give it to her on Sunday.

I can't wait to see her face.

Monday, August 26, 2019

Birthday Sewing


Birthdays are a big deal in our family. Even though we keep our parties simple and small, the girls are always allowed to choose a theme, and they literally start talking about next year's party before their big day is even finished. My little Mouse is turning 9 next month and decided long ago that she wanted a pool party with a tropical feel. For weeks she's been coming up to me with her big eyes and cheeky grin, asking, "Can we talk about my birthday?" So we spend time looking at pictures on Pinterest and talking about cupcake flavors and pretending that we're planning the party of the year when really it's all a great big excuse to spend time cuddling and chatting together, giving her special one-on-one time with Mommy that we both love so much.


When she told me that she wanted to do little candy favor bags, I decided that these adorable animal prints from Under the Canopy by Citrus & Mint Designs for Riley Blake would be perfect. My girls are especially crazy about sloths right now, but the leopards and birds were also a big hit.


I sewed these drawstring bags together in less than an hour. The striped baker's twine was perfect for the finishing touch. (I buy several spools of it every time I see it in the dollar section at Target since it goes with just about anything!) These bags are just the right size, and I love that the girls can use them after the party for other things.


Speaking of Riley Blake, I want to take a moment to say thank you. I've spent the last few years as a designer for them, and it's been an absolute joy. They've been generous to me in so many ways. Not only did they give me the chance to create three collections, but they've given me fabric to use for so many special projects. They sent me prints to use in both Sew Organized for the Busy Girl and Patchwork USA as well as in the next book that I'm working on right now. When I asked them if they could donate material so that I could make burp cloths for a local pregnancy clinic that I support, they sent me a huge box packed to the brim with soft flannel goodness that allowed me to sew the stack above and still have plenty leftover to give to the clinic for future needs. Working with these staff members and designers has been such a privilege, and I've learned so much through this chance to do something that I honestly never thought I would get to do. So to everyone from the RBD office who has been so kind and helpful to me these past three years, and to all the amazing RBD designer friends who have blessed my heart with love and encouragement -- thank you . . . with all my heart.

Saturday, December 15, 2018

A Quilt for Snuffy

Miniature Doll Quilt & Pillow by Heidi Staples of Fabric Mutt

Oh my friends, what a week it's been. Little Mouse came down with what we thought was a stomach bug last Saturday night. Unfortunately it was a more serious virus than we knew, culminating in a long day at the emergency room on Thursday so that she could be treated for dehydration. I'm very grateful to say that she's on the mend, but we're still taking it a day at a time. She's in that delicate place right now where she's getting her strength back but still needs to stay quiet (no easy feat for this little bundle of energy), and it's a challenge to keep her calm so that she doesn't relapse. The hardest part of all is that our church is having it's Christmas children's program and festival tomorrow morning, which she'll have to miss. Breaking the news to her last night was painful, after her long week of hoping against hope that she'd get well in time. After she spent a while sobbing in my arms and then in her Daddy's, I told her that maybe we could sew something special this weekend together to make up for it, perhaps a quilt for her beloved stuffed dog Snuffy.

Miniature Doll Quilt & Pillow by Heidi Staples of Fabric Mutt

It was a game changer. There were more tears before the day was over, but it was definitely the turning point. I sit here now and think back on how many times the prospect of "sewing time with Mommy" saved the day with my girls. It has so often been a way to help them through difficult moments.

Miniature Doll Quilt & Pillow by Heidi Staples of Fabric Mutt

So while the rest of the family went to Saturday lunch at our favorite Mexcian restaurant, Mouse and I went upstairs to sew. Miniature doll quilts are such a wonderful project when you want to sew something with a child. You don't even really need a pattern. Just pick the fabrics, choose a shape or design, sew the top, and then cut a backing print to fit. I like to use a piece of muslin or cotton fabric instead of batting so that the quilt isn't too stiff. Instead of binding, I just sew the front and back together, leaving an opening for turning, and then once it's turned right side out, I tuck the raw edges inside and stitch 1/8" from the edge all around. So simple!

Miniature Doll Quilt & Pillow by Heidi Staples of Fabric Mutt

We made a little pillow to go along with the quilt, adding pom-pom trim at Mouse's request. She was absolutely delighted with the finish, and immediately wanted to tuck Snuffy in for a nap.

Miniature Doll Quilt & Pillow by Heidi Staples of Fabric Mutt

She's spent the rest of the day resting on the couch in the family room cuddling with her little pup and watching old episodes of the Beverly Hillbillies. I love to hear her giggling from the next room.

After a week like this one, it's the most beautiful music in the world.

Thursday, November 8, 2018

Fairy Garden Craft Kit


After months tied up in a crazy busy schedule, I'm so happy to be able to get back into sewing for fun with my friends' beautiful new collections. This week I sat down with a few cute prints from Lori Whitlock's new Fairy Garden line.


These prints are so sweet and girly -- just the sort of thing my daughters love!


For ages now I've been wanting to make a miniature version of the Double-Zip Clutch from my book Sew Organized for the Busy Girl which could work as a craft kit for a child, and this was my chance. I added a few extra slots to the inner pockets for crayons or colored pencils. The pockets are perfect for holding extra goodies or tools like pom-poms, brads, erasers, scissors, washi tape, or glue sticks. Tuck one of these in a bag with a coloring book or sketch pad, and you'll have something to keep a little one busy on everything from a family vacation to an afternoon at Grandma's house. I love quick gifts like this that take me an hour or less to make!

Melissa Mortenson (PolkaDot Chair), Christopher Thompson (The Tattooed Quilter) & me

Speaking of trips, last weekend we headed off to Houston so that I could be at Quilt Market, and what a joy it was to visit everyone there! Getting the chance to see all the new fabrics up close is so much fun, but it's the people that I love most. My husband was a sweetheart and took our daughters to the space center AND the American Girl store while I was working. What a guy. I honestly don't know who had more fun this year -- me or the girls.


My third collection, Shortcake, made its debut in the Riley Blake Designs booth, and I love it so much. I'm counting the days until February when it will be out in the world for all of you to make beautiful things! Be sure to ask your local quilt shop to carry it. I'm so excited to share more with you about the story behind these prints in the months ahead...

If you haven't yet, be sure to hurry over to Riley Blake Designs' Instagram feed (@rileyblakedesigns), where they're giving away a full half bundle of my Date Night collection to one lucky winner. Entries are welcome from all over the world, but the giveaway closes tonight at 9pm MDT, so run -- don't walk -- to get your name in the hat. And definitely stop by the RBD blog here to read a little more about me in their Meet This Maker feature. I had a whole lot of fun answering their prompts for this one!


Happy week to you, dear friends!

Tuesday, August 16, 2016

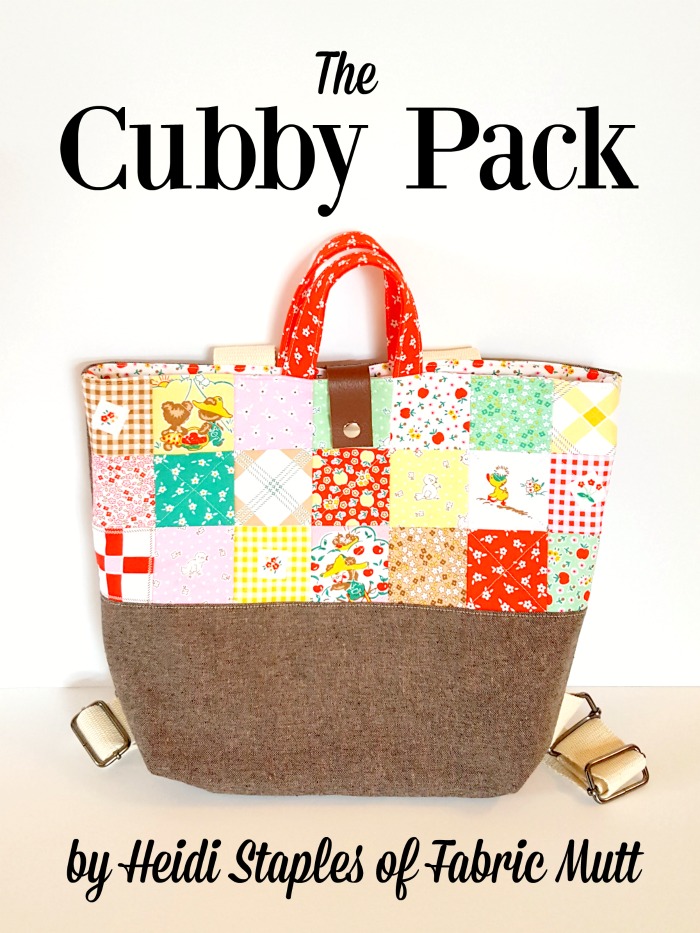
The Cubby Pack Tutorial

The Cubby Pack backpack tote sewing tutorial by Heidi Staples of Fabric Mutt

We had our first official day of school yesterday, and I'm so happy to slip back into our homeschooling routine again. No babies in this house any more -- everyone's in elementary school now, with my oldest entering fifth grade this year. There was a time when I missed my life in an actual classroom, feeling a bit lost and left behind here at home. Not any more. I think I feel more content with life than I ever have before. These days spent working, teaching, sewing, designing, helping, sharing -- they are so full, so good.

The Cubby Pack backpack tote sewing tutorial by Heidi Staples of Fabric Mutt

The beginning of a new school year has always been one of my favorite things, and what better way to celebrate than with a free tutorial? I've been promising a pattern for this combination backpack/tote bag for a while, and who better to model the Cubby Pack for you but my own little Bear. She was so excited to wear it for the first time today!

This pattern is meant for a child, but you could easily make it work for an adult by just making the straps longer. It's actually a surprisingly simple project to sew. The most complicated part is probably threading the backpack straps, and rather than reinvent the wheel, I just send you over to a brilliant tutorial by the clever folks at Colette Patterns who have explained things far more clearly than I ever could.

The Cubby Pack backpack tote sewing tutorial by Heidi Staples of Fabric Mutt

I'm giving you just the basic backpack pattern here, but this is so easy to customize. Add an inner pocket or zipper pouch for smaller items. Ditch the patchwork and use just one fabric for the exterior to make it a quicker finish. Add one or two more leather closures to the top to keep things buttoned up even more firmly. For me, a tutorial is a launching pad for even more great ideas. I love to see how people play with my patterns to make just what they need!

Wouldn't this be a fun project to sew for (or even with!) your favorite student? If you make one, be sure to share a picture with all of us on Instagram -- tag it #cubbypack and tag me too @fabricmutt!

Okay, here we go!

Materials and Measurements

Finished size: 9 1/2" wide x 10" tall x 3 1/2" deep

Fabric:
For:
Cutting:
21 cotton print scraps or 1 mini charm pack
Front exterior panel patchwork
21 squares 2 1/2 x 2 1/2”
1/2 yard linen
Front ext. panel
Back ext. panel
1 rectangle 7 x 14 1/2"
1 rectangle 13 x 14 1/2”
1/2 yard batting
Exterior interfacing
2 rectangles 13 x 14 1/2”
1/2 yard white apple print
Lining
2 rectangles 13 x 14 1/2”
1/4 yard red floral print
Tote handles
1 rectangle 3 x 16”
1/4 yard Pellon Craft Fuse fusible interfacing
Tote handles interfacing
1 rectangle 3 x 16”
1 1/2  yards 1 1/2” wide cotton webbing
Main straps
Buckle straps
2 pieces 24” long
2 pieces 3” long
Leather scrap
Bag closure
1 strip 1 x 2 3/4”
Findings: 4 metal slides (1 1/2” wide), 1 metal snap, adhesive basting spray, chopstick or turning tool, binding clips, ruler, rotary cutter

Sewing Notes

All seams are 1/4" unless otherwise stated.
Press seams toward the darker fabric or open if you prefer.
RST = right sides together
WST = wrong sides together

Tutorial Instructions


1. Sew the 21 patchwork squares together in 3 rows of 7 as shown in the photo above. Sew the 7 x 14 1/2" linen piece to the lower long edge of the patchwork piece to form the exterior front.

2. Use the adhesive basting spray to fuse the wrong side of the exterior front and back panels to the 13 x 14 1/2" batting pieces. Topstitch 1/8" below the seam between the patchwork and linen on the exterior panel. Quilt as desired.


3. Place the two lining panels RST and trim a 2 1/2" square from both of the lower 14 1/2" edge corners. Sew the two panels together along the sides and lower edge, but do not stitch along the open corners. Also be sure to leave an opening of 6-7" along the lower edge for turning later on. Cut 2 1/2" squares out of the lower edge corners of the exterior panels also, but do not sew them together just yet.


4. Box the corners of the lining. Push down on a side seam so that it lies directly on top of the seam that holds the lower edges together, creating a triangle of batting on that side. Use your ruler to measure off a 4" line down the side of that triangle facing the lining (the side seam should be resting at the 2" line). Use a pencil or fabric marker to trace that 3" line and then use your ruler to measure and cut a 1/4" seam just beyond that (which will measure 3 1/2" long). Check that your seams match up before stitching down the pencil line. Repeat on the other side of the lining.


5. Make the tote handles just as you would make double fold bias tape. Fuse the wrong side of the handle piece to the Craft Fuse interfacing (following the manufacturers instructions). Fold the piece in half lengthwise, press, and then unfold. Now fold the long sides of the rectangle in toward the center fold and press again. Fold along that center fold again, sandwiching those raw edges in the middle, and stitch 1/8-1/16" from the edge along both long ends of the resulting 3/4" wide handle. Cut the piece in half so that you have two pieces, each 8" long.


6. On the exterior front panel, place the raw ends of one handle piece along the top edge of the panel so that the inside edge of each end lines up with the right and left sides of the center patchwork square (see above photo). Baste in place 1/8" from the top edge. Repeat with the back panel and other handle, using the placement on the front panel as a guide.


7. Attach one half of the metal snap to a short end of the leather strap according to the manufacturer's instructions, centering it about 1/2" from the short end. Center the other short end of the strap on the top edge of the back exterior panel, RST, and baste in place 1/8" from the top edge. Save the other half of the metal snap for later.


8. Make the backpack straps using the Colette tutorial found here. (Even though this tutorial uses a longer length for the long strap, it will still work for this project.) Place the finished straps RST against the back exterior panel, tightening them up so that they are as short as possible while still lying flat against the panel and not wrinkling up the fabric (see photo above -- this will keep them out of the way while you sew). Baste the ends of the long straps in place on the top edge of the panel just to the right and left of the handles. Baste the ends of the short straps in place on the right and left sides of the panel, about 1/2" above the cut out square in each corner. (BTW the photo above is after I sewed together the panels in the next step but before I boxed the corners. I had forgotten to take a photo of the strap placement and wanted to make sure you could see it before I moved on!)


9. Sew the exterior panels together along the sides and lower edge, leaving the cut out squares open just as you did with the lining -- though without the opening in the lower edge for turning. Box the lower corners of the exterior as you did in step 4 above. Turn the exterior piece right side out.


10. Slip the exterior piece inside the lining piece with RST, matching up the side seams and holding them together around the top opening with binding clips. Sew all the way around the opening. Reach in through the gap in the lining and pull the exterior of the bag out through the lining, pushing out the corners gently with a chopstick and pressing them.


11. Tuck the raw edges inside the lining gap and stitch them closed 1/8-1/16" from the edge. Push the lining down into the bag and carefully press it one last time.


12. Center the other half of your metal snap about 1/2" from the lower edge of the top middle patchwork square on the exterior front panel and fasten it in place according to the manufacturer's instructions. Finish the bag by topstitching 1/8" from the upper edge all the way around the top opening. (I recommend that you start on the back behind the left strap so that you can make it all the way around without having to stop and move straps out of the way.) Fill up your Cubby Pack with school supplies and send your student off to class!

The Cubby Pack backpack tote sewing tutorial by Heidi Staples of Fabric Mutt

Happy sewing, my friends!

Friday, December 4, 2015

Pocket Picture Book Tutorial

Pocket Picture Book Tutorial by Heidi Staples for Fabric Mutt

My little Mouse has been absolutely fascinated by the stack of Pocket Mending Books that's been growing on my sewing table. She begs to look through them every day as soon as she finishes her kindergarten classes, wanting to pore over them by herself -- and then again on the pretext of showing them to her stuffed dog Snuffy. Since it's been tricky to empty the needles and scissors out of the books each time she wants to see them, my husband suggested that I make a special kid-friendly version that the girls can enjoy without any worries of pricked fingers.

Pocket Picture Book Tutorial by Heidi Staples for Fabric Mutt

These books are actually pretty nifty gifts for the little people in your life. Not only are they small and soft, but they can teach colors, letters, animals, etc. My girls are already planning to use these books when they're playing school or restaurant with their dolls.

Pocket Picture Book Tutorial by Heidi Staples for Fabric Mutt

I've included two sizes -- one the same as my Pocket Mending Book and the other a little smaller. This is such a fun project for scraps, and it's also perfect for making with your kids. Mouse helped me with some of the sewing on the smaller version. It's also a great last minute present, easily sewn up in an hour. Keep in mind that the more pages you include, the trickier it is to sew (especially on the smaller version). I wouldn't try to fit more than 4 pages in here, but if you're brave enough to add more, go for it!

Pocket Picture Book Tutorial by Heidi Staples for Fabric Mutt

So here's a tutorial for you, my friends. If you make one, please share it on Instagram with me @fabricmutt, and be sure to tag it #pocketpicturebook.

Have fun!

Supplies & Cutting Instructions

Large Version (finished size: 3 7/8" square)
grey pig print -- 1 square (4 3/8 x 4 3/8") for front cover
orange patchwork print -- 1 rectangle (4 3/8 x 4 3/4") for back cover
batting -- 1 rectangle (4 3/8 x 8 7/8") for exterior
various prints -- 6-12 squares (3 3/4 x 3 3/4" each) depending on how many pages you want (2 per page)
purple calico print -- 1 rectangle (4 3/8 x 4 3/4") for inside of front cover and 1 rectangle (4 3/8 x 4 1/2") for inside of back cover

Small Version (finished size: 3 1/4" square)
border print -- 1 square (3 3/4 x 3 3/4") for front cover
yellow text print -- 1 rectangle (3 3/4 x 4 1/4") for back cover
batting -- 1 rectangle (3 3/4 x 7 1/2") for exterior
various prints -- 6-8 squares (3 x 3" each) depending on how many pages you want (2 per page)
floral print -- 1 rectangle (3 3/4 x 4 1/8 ") for inside of front cover and 1 rectangle (3 3/4 x 3 7/8 ") for inside of back cover

For Both Versions
thread
adhesive basting spray
chopstick or turning tool
pins or binding clips

*All seams 1/4" unless otherwise noted.

Make the Book Cover


1. Sew the left side of the front cover to the right short side of the back cover.

2. Attach the wrong side of the fabric to the batting with adhesive basting spray and quilt as desired.

Make the Pages & Lining


1. Decide what order you want your pages to be in, and then pair up your pages with the right sides of the fabric together. Sew around the top, side, and bottom of the page, leaving one side open.


2. Turn the page right side out, poking out the corners with a turning tool, and press. Stitch 1/8" all the way around the sewn sides, still leaving that last side open.


3. Stack the pages together in the order you want them and baste them together along the open sides, 1/8" from the edge. Sew from the center to the top and then from the center to the bottom of the stack to keep the pages from moving around too much.


4. Place your stack of pages (front down) on top of the front lining piece, so that the basted edge lines up with the right edge of the piece and baste it in place 1/8" from the edge, again sewing from the middle to the top and then bottom.


5. Stack the front and back lining pieces on top of each other with the pages sandwiched between them, checking to make sure that when you open them, they'll be in the correct positions, and stitch 1/4" from the same side where you basted the pages in place. Press the lining open.

Assemble the Book


1. Pin or clip the exterior and lining on top of each other, right sides together.


2. Sew 1/4" all the way around the outside of the rectangle, backstitching at the start and finish. Leave an opening of about 2 1/2" on the short end next to the back exterior piece. Trim the corners without cutting through the stitching.

3. Carefully turn the book right side out through the opening on the short end, using a turning tool to push the corners out, and give the book a good pressing with your iron. Tuck the edges back inside the opening, and topstitch 1/8" from the edge all the way around the outside of the book. Be sure not to catch the pages in your stitching. Close the book and press carefully around the binding to help your book stay closed properly.

Enjoy!
Related Posts Plugin for WordPress, Blogger...