Showing posts with label Sew Organized for the Busy Girl. Show all posts

Thursday, July 23, 2020

All the Buttons Quilt Tutorial


It's been ages, friends, I know...


Back in the middle of June I shared on Instagram that I was taking a break from social media for the summer, and it has been the BEST THING EVER. Don't get me wrong -- I love chatting with so many lovely people on Instagram and getting to see all the beautiful projects they're working on. But I've been trying to focus my attention on what's right in front of me these days, the family and friends I love who need me the most right now. After running through my days at breakneck speed for so long, becoming numb to everything except the demands of my to-do list, I almost thought it wasn't possible to live life any other way.


I'm so happy to tell you that I was wrong about that. Life has become a hundred times simpler, slower, quieter, and more peaceful than it's been for years. Suddenly I have time again to read, to talk with my husband, to sew with my girls, to play, to think, to dream. It's been a balm to my soul and a treasure that I can't imagine giving up lightly. So for now, I'm continuing my break from social media, though I did want to drop by this space to say hello, catch up with a little news, and share a quilt tutorial that I promised myself I would give you before the summer was over.


Little Joe the kitten by Heidi Staples at Fabric Mutt
Little Joe at 2 weeks

If you follow me on Instagram, you'll remember Little Joe, the tiny tabby kitten I found abandoned in the middle of the parking lot at my local Target. He was about two weeks old, lame in his back paw, and very near death when I rescued him that day and took him home.


Little Joe the kitten by Heidi Staples at Fabric Mutt
Teeny tiny Joey


At the time, I had no clue how much care and commitment is involved with raising young orphaned kittens. It's truly like taking in a newborn baby. I spent weeks bottle feeding him through the days and nights, keeping him warm, massaging his back legs, relying heavily on videos by The Kitten Lady and on help from my vet to face each new challenge.


Little Joe the kitten by Heidi Staples at Fabric Mutt
Joey at 3 months


I promised Joey's many fans that I would give an update on his progress during the summer so that you could see how much he's grown. He's now 3 months old, and not only are his legs perfectly healed, but thankfully we've also been able to set up a room for him inside our house despite my parents' and husband's cat allergies. A special air filter in the room and weekly baths have kept the dander at bay. My husband loves to have coffee with Joe every morning while he feeds him his breakfast, and Dad pops in to cuddle with Joey every afternoon. Watching my men together with this cat just melts my heart. I'll always be his mama, but I think he saves his loudest purrs for the guys.


Little Joe the kitten by Heidi Staples at Fabric Mutt

Joey is still a rambunctious little goofball who loves to climb and play with his toys and my girls every day. But my favorite moments are when he climbs up into my lap and touches his wee nose to mine just to say "I love you." We are so incredibly grateful to have him in our family, and seeing him happy and playful in his special room just brings me all kinds of joy.


Double-Zip Clutch Travel Sewing Kit from Sew Organized for the Busy Girl by Heidi Staples of Fabric Mutt

I also wanted to share with you these sewing kits I made for my girls, who all wanted to practice sewing hexagons this summer. I let them each choose their main fabric from my stash, and then I picked coordinating prints to go along with that.


Double-Zip Clutch Travel Sewing Kit from Sew Organized for the Busy Girl by Heidi Staples of Fabric Mutt

The pattern is the Double-Zip Clutch from my first book Sew Organized for the Busy Girl which I shrank down to about half size. It makes an absolutely perfect travel sewing kit. I made one for myself years ago which I've taken on plane trips for easy-to-pack sewing on the go. I love that it has a spot for all the supplies and every tool I need to bring along. Right now the girls are sewing Laundromat Coin Pouches from my book Patchwork USA, and they're having so much fun.


And now on to the pattern! This quilt was originally going to be published in my abandoned Carnival of Patchwork book. I had dreamed for ages of making a quilt with a ton of little button blocks on it, and it was so much fun to see that dream become reality in this project. It took me three long months to sew this one together, but I'm absolutely crazy about it. My friend Jennifer at Farm Fresh Stitches did the gorgeous quilting in a classic baptist fans motif. This block would look darling on so many other projects too: a tote bag, a zipper pouch, a pillow. Even if you don't feel like making a whole quilt, try it out on something small and have fun with it!


All the Buttons Quilt Tutorial

Finished Size: 53’’ x 60’’

Finished Block Size: 3 1/2" x 3 1/2"


Materials


From 97 5’’ squares of various colored prints, cut from each:

- (2) rectangles, 1’’ x 2’’ for button blocks (A)

- (2) rectangles, 1 1/2’’ x 2’’ for button blocks (B)

- (2) rectangles, 4’’ x 1 1/2’’ for button blocks (C)


From 2 yards of white solid, cut:

- (2) rectangles, 1’’ x 2’’ for button blocks (D)

- (4) squares, 1 1/2’’ x 1 1/2’’ for button blocks (E)

- (98) squares, 4’’ x 4’’ for alternating squares (F)

- (4) rectangles, 4’’ x 53’’ for borders (G)


From 2 yards of wide batting, cut:

- (1) square, 70’’ x 70’’ for interfacing (H)


From 2 yards of 108’’ wideback fabric, cut:

- (1) square, 70’’ x 70’’ for quilt backing (I)


From 1/2 yard of pale blue floral fabric, cut:

- (6) rectangles, WOF x 2 1/2’’ for quilt binding (J)


Make the Blocks


1. Sort the pieces for each button block into 100 stacks. Each stack should include 2 A rectangles, 2 B rectangles, and 2 C rectangles from a single Colored Print. It should also include 2 D rectangles and 4 E squares from the White Solid

All the Buttons Quilt Free Tutorial by Heidi Staples of Fabric Mutt

2. Sew a D rectangle to either long edge of an A rectangle. Cut the resulting piece in half through all 3 rectangles as shown in the illustration above.


3. Sew the pieces from step 2 to the upper and lower edges of the remaining A rectangle. Sew the B rectangles to the right and left edges of the block.


4. Sew the C rectangles to the upper and lower edges of the block. Use the E squares to snowball the 4 corners of the block, to yield a finished block as shown above.


5. Repeat steps 2-4 with the pieces for the remaining blocks, giving you a total of 97 blocks. 

All the Buttons Quilt Free Tutorial by Heidi Staples of Fabric Mutt

Make the Quilt


1. Arrange the button blocks and F squares as shown above, organizing the colors in whatever order you like best. Sew the blocks and alternating squares together in rows. Then sew the rows together.


2. Sew a G rectangle to the right and left edges of the quilt top. Then sew a G rectangle to the upper and lower edges.


3. Quilt and bind as desired.


All the Buttons Quilt Free Tutorial by Heidi Staples of Fabric Mutt
All warm and crinkly after coming out of the wash...


If you make anything with this tutorial, please share your photos! You can use the tags #fabricmutt and #allthebuttonsquilt. I'll be back on Instagram sometime in the fall to check in, so be sure to tag me @fabricmutt so I can see it then.


I hope you're all having a beautiful summer and doing the things you enjoy best. Most of all, I hope you're getting time with the people you love. Enjoy every minute of it!

Monday, April 13, 2020

Over 20 Fun Ideas for Organizing Your Sewing Space

Over 20 Fun Ideas for Organizing Your Sewing Space by Heidi Staples of Fabric Mutt

One of the big projects I wanted to tackle during this time at home has been reorganizing my sewing area. After months of going full speed on one project after the next, my work space was a complete disaster area, and it's taken me weeks to get things back into shape. I'm not finished yet, but the changes I've been able to make so far have already made me ten times happier every time I walk in the room. It's always amazing to me how a pretty space makes me feel so much more excited about sewing. I know that some of you are working on organizing your creative space too, so today I'm sharing some of my favorite tips with you.

Over 20 Fun Ideas for Organizing Your Sewing Space by Heidi Staples of Fabric Mutt

Your sewing space and how you organize it are completely dependent on who you are, how you sew, and what you love to make. If you want a detailed plan on how to give your room a total overhaul, check out my book Sew Organized for the Busy Girl, but if you just need a quick refresh, making one or two changes can be enough to make a real difference. When it comes to any of the organizational ideas you pick up from me or anyone else, I can’t stress enough how important it is to:
  • Be honest about what your organizational needs are and what you can actually maintain given your time and situation.
  • Find a solution that looks like a good fit.
  • Give that system a test run of at least a week or two.
  • Be willing to adjust or start from scratch if it isn’t working.
It’s tempting to give up when something you try doesn’t work the way you thought it would, but you probably just haven’t hit on the right answer yet. Don’t stop looking for it. The time you take to find the best solution for your situation is more than worth the satisfaction you’ll have when sewing becomes a pleasure instead of a chore.

Over 20 Fun Ideas for Organizing Your Sewing Space by Heidi Staples of Fabric Mutt

A sewing space is usually divided into four main stations: storage, cutting, sewing, and pressing. The more room you have, the more clearly separate these stations probably are. If you’re working with a small area, however -- maybe in the corner of your family room or on a desk in your bedroom -- things get tricky. It’s even more difficult if you have no real space to call your own. I remember my early days of sewing on the dining room table, timing myself so that everything could be cleared away in time for dinner and scrubbing the table after each meal so that my fabric wouldn’t end up with spaghetti sauce all over it!

Challenging situations are always a great opportunity to see how creative you can be. I’ve learned that it’s helpful to have some portable options for organizing your sewing materials whether you have a lot of room to work with or not. Listed below are some ideas for making your work space more organized and, yes, more fun. A lot of these can be done using things you already have around the house, so there's no need to buy something new unless you really want to. I personally like to use family antiques and vintage finds in my sewing room because I love them so much Wherever I can, though, I've included links to special items that I've bought myself and found useful. Ideas are classified according to the four stations above, but there’s definitely overlap, so adjust these as needed to make them work for you in any part of your creative space.

Storage 
  • Picnic baskets and small suitcases can hold a surprising amount of fabric, and some even come with special pockets where you can store your notions. Best of all, they have a handle for carrying and a lid that shuts everything away from view. These can be really helpful if you're working in a smaller space.
Over 20 Fun Ideas for Organizing Your Sewing Space by Heidi Staples of Fabric Mutt
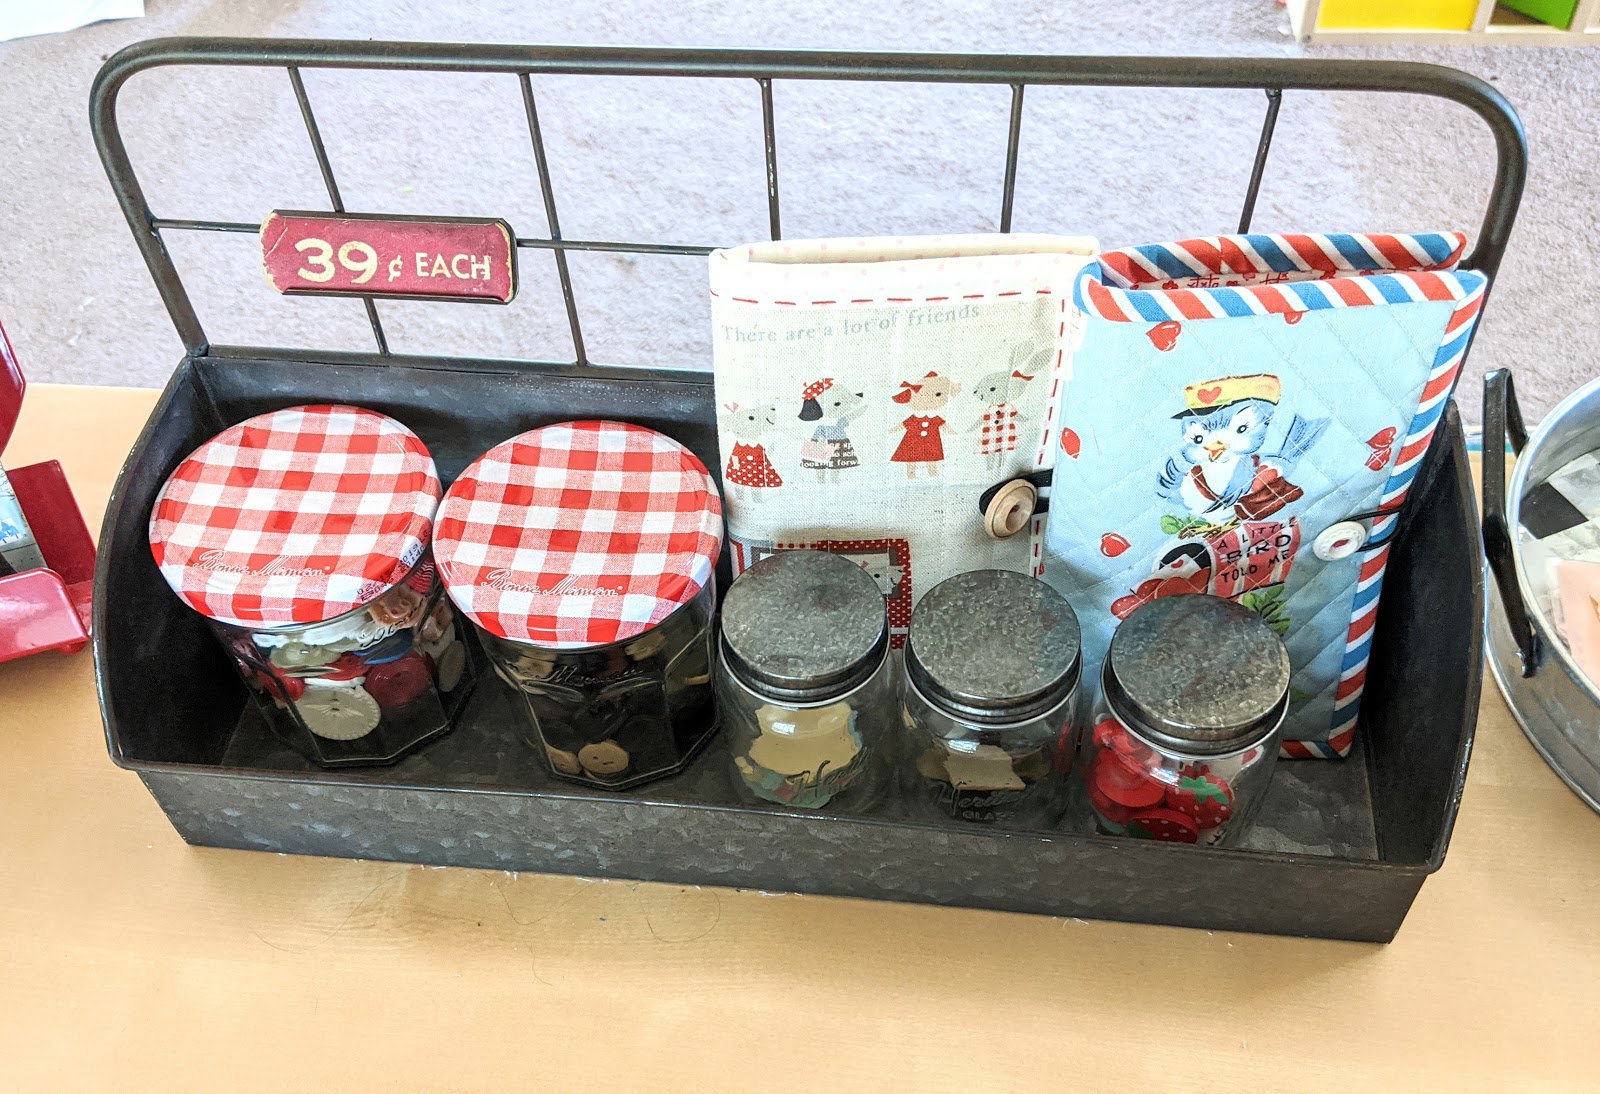
  • Spice jars are the perfect size for storing buttons and small pieces of hardware like magnetic clasps, rings, snaps, and zipper pulls. (Bonus points if you store them in a cute spice rack!) I also like to repurpose our jam jars for this job too, because who can resist a red and white gingham lid?
  • Old photo drawers or card catalogs are a great fit for fabric scraps, notions, and small precuts. I use one for my charm squares, and it's the perfect size. You can easily label the drawers too, giving you the chance to sort materials by style, color, designer, or manufacturer.
  • Mason jars and clear candy or cookie jars will store anything from scissors to thread, and they will always look beautiful while doing it. Best of all, you can see at a glance what supplies you have on hand.
Over 20 Fun Ideas for Organizing Your Sewing Space by Heidi Staples of Fabric Mutt
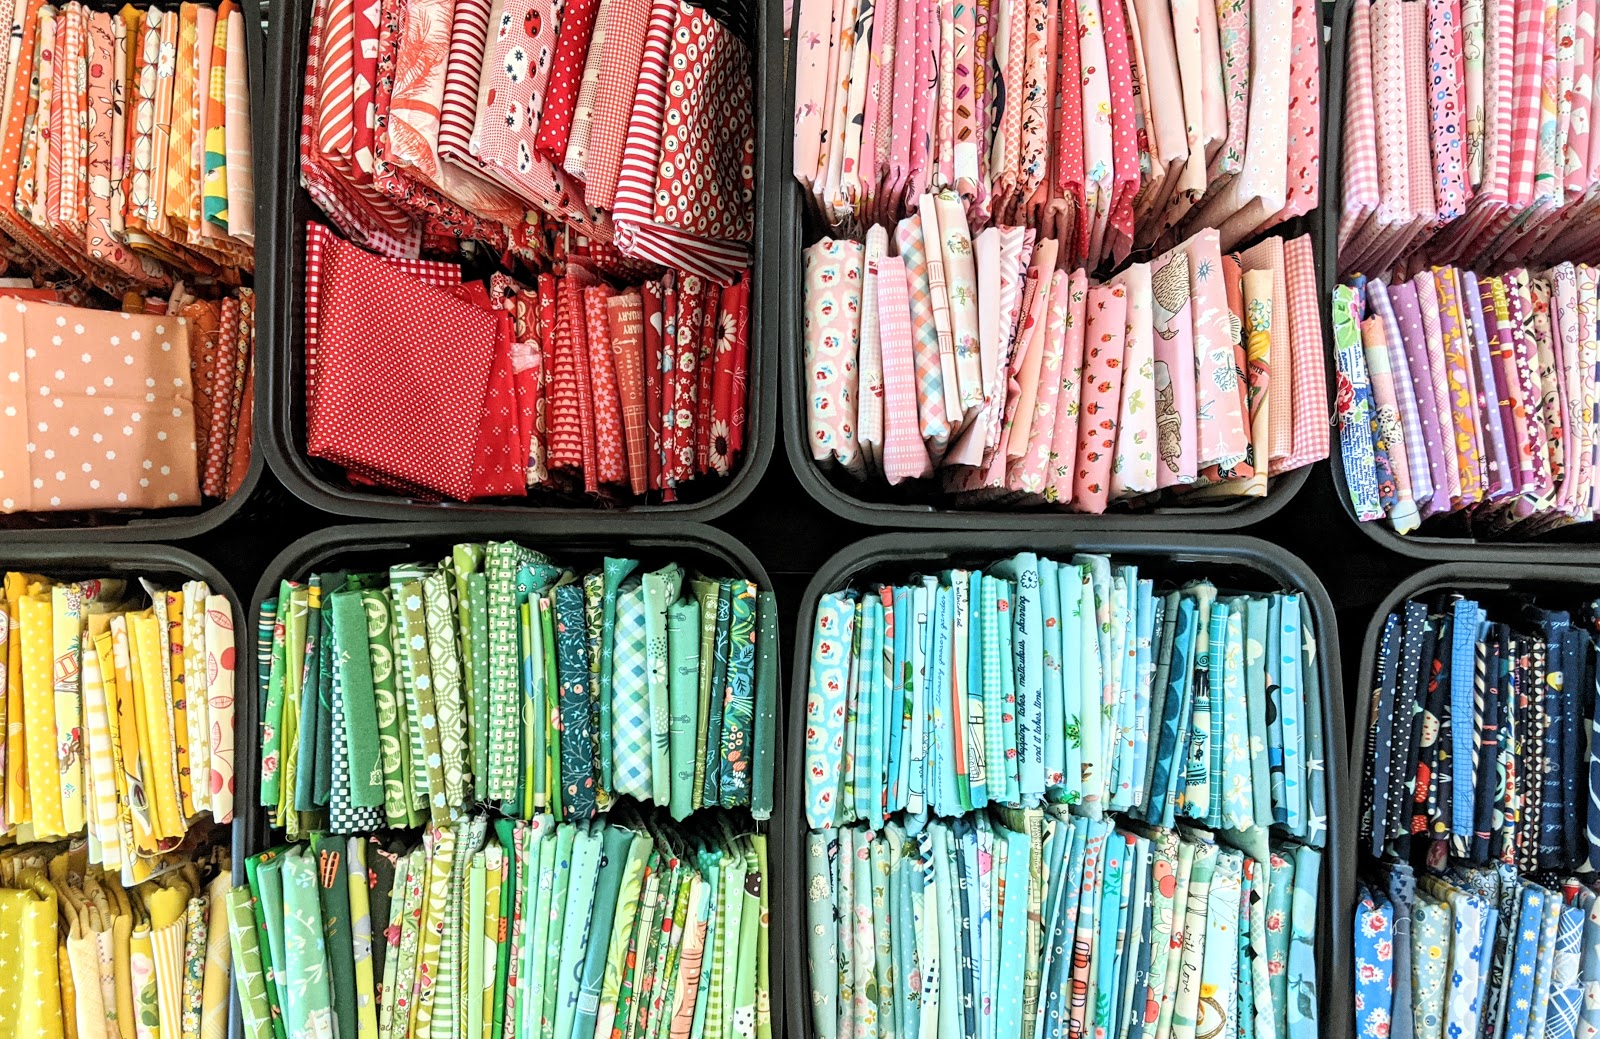
  • It took me years to find the best system for storing and organizing my quilting fabric, but I couldn’t be happier with the results. I prefer to organize my quilting cotton prints by color in identical tall woven plastic baskets measuring approximately 15” x 12” x 9”. Every print (usually half a yard or less) is folded to a width of about 5” and placed in the basket with other prints of the same color (red, orange, yellow, etc.). I can fit 2 layers of 2 long rows in each container, and I can always start a new basket if one fills up. The containers are stored on a pair of long, double shelf carts in my sewing room right beside my cutting table. It’s like having my own personal fabric shop right there whenever I need it! I also keep a reproduction soda crate for storing my solid fabrics, a metal cart with drawers for my linen and canvas prints, and a larger drawer unit for quilt backings and other special substrates like rayon and lawn. Almost all of my fabrics are arranged by color because that’s how I like to choose fabrics for my projects. This system makes finding what I need easy and fun, and that’s exactly how I like it.
Over 20 Fun Ideas for Organizing Your Sewing Space by Heidi Staples of Fabric Mutt

Cutting 
  • A desktop office supply organizer makes a fabulous tool center for your cutting station. Rulers can be sorted by size in the larger sections, and there’s usually a small compartment that’s just right for your rotary cutter and extra blades.
Over 20 Fun Ideas for Organizing Your Sewing Space by Heidi Staples of Fabric Mutt
  • Have a return basket for your cutting table. Once you finish cutting what you need from a larger piece of fabric, fold it and place it in the basket. Take five minutes each week -- or every other day, depending on how often the basket gets full -- to return all the folded fabrics to their proper spots in your fabric stash.
  • Keep a scrap basket on your cutting table for all the little pieces that are too small to stash but too big to throw away. Whenever the basket gets full, find a home for the contents. Share them with a friend who loves scraps, hold a giveaway on social media or at your sewing guild, or celebrate a full basket by using them to make a scrappy project of your own.
Over 20 Fun Ideas for Organizing Your Sewing Space by Heidi Staples of Fabric Mutt

Sewing 
  • Wire baskets are a wonderful way to showcase bundles of fabric that you don’t want to separate. I also love using them to hold sets of fabric that I want to keep together for upcoming projects, including ones that are labeled by number so I can easily organize them in the order that I need to finish them. Just recently I ordered a rolling cart with removable wire trays that I can slide out and set on my sewing table while I'm working, and I absolutely love it. When it’s time to start working on a project, I just grab the tray and get to work. If I need to take a break, everything goes back in the tray so I don’t lose anything while the work is in progress, and it slides easily back into the cart, leaving my sewing table clean.
  • Ceramic containers for kitchen utensils are the perfect place to store packaged zippers.
  • I keep a small cutting mat just to the left of my sewing machine so that I can do quick seam trimming without having to get up and walk over to my main cutting table. This really comes in handy when I’m working on blocks like half square triangles.
Over 20 Fun Ideas for Organizing Your Sewing Space by Heidi Staples of Fabric Mutt
  • Tins and lunch boxes make fantastic travel sewing kits. The hard sides of the box keep everything inside from being crushed, and there’s plenty of room for all your supplies. 
  • I keep a small ceramic basket filled with stuffing next to my machine for projects like pincushions and stuffed animals. It takes up less room than a full bag of stuffing (which I store elsewhere), but is nice to have at hand when I need it.
  • A pretty soap dish makes a quick landing spot for embroidery scissors and binding clips next to your machine.
  • A lap desk with a lid is the perfect organizational accessory for English paper piecing or hand quilting. I keep one in my bedroom so that in the evenings I can pull out my latest project, have a nice flat surface in my lap for sewing while I watch a movie with my husband, and then slip everything back inside when it’s time for bed. A small serving tray will work just as well in a pinch when balanced on a pillow in my lap.
Over 20 Fun Ideas for Organizing Your Sewing Space by Heidi Staples of Fabric Mutt
  • Trays of all kinds are wonderful for organizing block pieces or small notions. My daughters gave me a retro cafeteria lunch tray for Christmas, and I keep it stocked with all the little things that I want to be able to find in a hurry when I'm at my machine.
  • Vintage glass measuring cups are wonderful places to corral binding clips or basting pins, and I love that they come with a handle that's easy to grab when I'm working.
  • I love using a tin picnic utensil caddy to store larger tools like scissors, chopsticks, pencils, notepads, and my sewing machine accessory kit.
Over 20 Fun Ideas for Organizing Your Sewing Space by Heidi Staples of Fabric Mutt

Pressing 
  • Use a small homemade ironing board for most of your pressing needs. There are great tutorials online for making both tabletop and TV tray versions of this little gem, and it allows you to keep your full size ironing board stored away unless you need it for a larger project. All you need is a board, batting, fabric, and a staple gun.
  • I like to keep a small tray or basket next to my pressing board filled with spray starch, the small flask I use to pour water into my iron, a seam ripper, a hera marker, and fabric pens. It’s amazing how much time you can save when you get in the habit of grouping items together that you use at each station so that you can find them when you need them.
Over 20 Fun Ideas for Organizing Your Sewing Space by Heidi Staples of Fabric Mutt
  • After I finish pressing my strips of fabric for quilt binding and sewing them together, I wind the long strip into a small circle and place it into a heavy, clear glass cookie jar, pulling one end out of the jar to start sewing. The jar keeps the binding from unrolling and spilling all over the floor under my feet as I slowly feed it out and sew it onto the quilt. When I’m done, I put the leftover binding back in the jar. It’s not only a great storage spot for these extra pieces (which make fantastic scrappy binding), but it also makes a colorful display on my shelf. 
Finally, always remember that spotless and organized are not the same thing. We often think that our space isn't organized unless everything in it is perfectly clean, but a workspace is actually organized if it's arranged so that you can find everything you need quickly and easily. Discovering new creative ways to do it is just part of the fun!

Tuesday, January 14, 2020

A New Plan


As a girl who lives by her lists, it helps me to have a place to keep them together so I don't wind up with post-it notes all over the house. I talked about keeping a sewing calendar in Sew Organized for the Busy Girl, which has been really helpful to me in my creative work. Nowadays I keep a lot of that information in a monthly calendar on my phone, but I also like have something on paper where I can write down the daily steps that get me to those weekly goals. I spent the last week of 2019 looking for the perfect planner to carry me into the new year, but after several hours spent combing through what was available both online and in stores, I came up empty. So this year I decided to try something new: I made my own planner pages from scratch on Adobe Illustrator.

I had originally planned to bring the file to the local office store and have it printed and spiral bound, but my mom encouraged me to live with the pages in a binder for a few weeks first so that I could make adjustments as needed. It was good advice. I've found a few ways to streamline the page as I go along.

While I often have special appointments in my schedule, most of the items on my to-do list fall under a recurring set of categories: cleaning, cooking, homeschooling, writing, and sewing. There are some things that I need to do every single day, but can easily forget to do (feed the dogs) or forget whether or not I've done them (take my allergy medicine) if they're not on a list in front of me. I love having these daily chores already built into the page so that all I have to do is check them off. There's also room to write down extra tasks that come up as well as a spot at the top for special activities or important things that need my attention right away.

In my drive to work through a checklist, it's easy for me to forget about the small everyday things that are going on in my life, so I added room at the bottom of the page to keep track of those too. There's a place to list what I'm reading, listening to, and watching every other day. I like that this will not only help me stay faithful in keeping my annual list of what books I've read, but it will also let me see what's influencing my thinking throughout the year.

My favorite feature, though, is the small section in the lower right corner for moments that I want to remember -- little victories, quirky happenings, funny things that the girls say. Just looking back over the pages I have already, I can't help but smile at the memories I'm recording, things that could have so easily been forgotten otherwise. The time we were watching White Christmas for a family movie night, and James declared that the pale yellow socks that Danny Kaye was wearing were the height of fashion...so of course I had to track down a pair for him online (he loves them!). The day that Bunny scored a 98% on both her history AND science semester finals. The night when Bear lost a tooth not five minutes after the girls were talking about how much they wanted ice cream (we celebrate every lost tooth with ice cream in our family; it's a tradition). The morning that Mouse came to me excited because she had actually enjoyed a math lesson for the first time ever. "Because," she added (I kid you not), "multiplication and division are the death of all good things." I ran right over to my planner to write that one down before I could forget it, let me tell you...

I love hearing what other people are doing when it comes to planners and organization. What do you use to stay on top of your daily, weekly, and monthly schedule? Do you like using a planner or not? Have any of you tried making your own? What are the most helpful tricks you've found when it comes to getting your to-do list done each day? Please share!

Thursday, November 29, 2018

Little Red Deluxe Pincushion

Little Red in the Woods Deluxe Pincushion by Heidi Staples from Sew Organized for the Busy Girl for Fabric Mutt

I get to share one of my favorite new collections with you today: Little Red in the Woods by my talented friend Jill Howarth.


These fabrics . . . oh my goodness . . . the cuteness is beyond words. Not only do they share darling illustrations of the classic story, but this collection also includes some fabulous small scale prints which are just perfect for the tiny patchwork I love to do.

Little Red in the Woods Deluxe Pincushion by Heidi Staples from Sew Organized for the Busy Girl for Fabric Mutt

While I'm stashing these prints for future projects, I knew that I wanted to make a Deluxe Pincushion right away from my book Sew Organized for the Busy Girl. The nine patch block on the front pocket is the perfect place to turn a spotlight on all the sweet details Jill features in her designs, and Riley Blake Designs Swiss Dot in teal made a perfect frame for it.

Little Red in the Woods Deluxe Pincushion by Heidi Staples from Sew Organized for the Busy Girl for Fabric Mutt


I also carefully fussy cut a picture of Red and the Wolf to be peeking over the pocket on the main body of the pincushion. For the tag on the side, I used a bit of twill tape that I had custom printed featuring a design from my upcoming Shortcake collection. I was delighted that it matched the fabrics so well!

I'm completely in love with this project, and it's been sitting on the little shelf above my sewing table where I can look at it every day. Jill's illustrations are always so full of joy, and I love to add more of that to my sewing space with her fabric!

I hope you all had a wonderful holiday last week. Thanksgiving vacation was pure bliss at our house. Eating amazing food, sleeping in every morning, getting out the Christmas decorations, spending hours of fun with my beautiful family -- I couldn't have asked for more. It's moments like these that remind you how blessed you really are, and I definitely want to hold that thought close to my heart as we finish out this year and get ready to start a new one.


Thursday, November 8, 2018

Fairy Garden Craft Kit


After months tied up in a crazy busy schedule, I'm so happy to be able to get back into sewing for fun with my friends' beautiful new collections. This week I sat down with a few cute prints from Lori Whitlock's new Fairy Garden line.


These prints are so sweet and girly -- just the sort of thing my daughters love!


For ages now I've been wanting to make a miniature version of the Double-Zip Clutch from my book Sew Organized for the Busy Girl which could work as a craft kit for a child, and this was my chance. I added a few extra slots to the inner pockets for crayons or colored pencils. The pockets are perfect for holding extra goodies or tools like pom-poms, brads, erasers, scissors, washi tape, or glue sticks. Tuck one of these in a bag with a coloring book or sketch pad, and you'll have something to keep a little one busy on everything from a family vacation to an afternoon at Grandma's house. I love quick gifts like this that take me an hour or less to make!

Melissa Mortenson (PolkaDot Chair), Christopher Thompson (The Tattooed Quilter) & me

Speaking of trips, last weekend we headed off to Houston so that I could be at Quilt Market, and what a joy it was to visit everyone there! Getting the chance to see all the new fabrics up close is so much fun, but it's the people that I love most. My husband was a sweetheart and took our daughters to the space center AND the American Girl store while I was working. What a guy. I honestly don't know who had more fun this year -- me or the girls.


My third collection, Shortcake, made its debut in the Riley Blake Designs booth, and I love it so much. I'm counting the days until February when it will be out in the world for all of you to make beautiful things! Be sure to ask your local quilt shop to carry it. I'm so excited to share more with you about the story behind these prints in the months ahead...

If you haven't yet, be sure to hurry over to Riley Blake Designs' Instagram feed (@rileyblakedesigns), where they're giving away a full half bundle of my Date Night collection to one lucky winner. Entries are welcome from all over the world, but the giveaway closes tonight at 9pm MDT, so run -- don't walk -- to get your name in the hat. And definitely stop by the RBD blog here to read a little more about me in their Meet This Maker feature. I had a whole lot of fun answering their prompts for this one!


Happy week to you, dear friends!

Wednesday, March 14, 2018

Pillows & Pouches

Heather Ross Book Nook Pillows from Sew Organized for the Busy Girl by Heidi Staples for Fabric Mutt

One of my favorite presents to make for both new parents and little children is a small version of the giant Book Nook pillow from my book. I shrink the pattern down to fit a 12" or 14" pillow form and tuck a card in the pocket for a sweet gift.

Heather Ross Book Nook Pillows from Sew Organized for the Busy Girl by Heidi Staples for Fabric Mutt

As a new mom, I always liked having lots of pillows nearby to help me get into a comfortable position when I was feeding the baby, and that pocket is a great place to stash a book or snack pack or anything else I might want when I'm up by myself in the middle of the night. For a child's gift, you can still tuck little books or toys in the pocket, and it's perfect for travel. My girls and I will be making a mini Book Nook for each of them to take on our family road trip this summer.

Heather Ross Book Nook Pillows from Sew Organized for the Busy Girl by Heidi Staples for Fabric Mutt

I decided to pull out my Heather Ross stash for these pillows, carefully choosing my prints since one is for a girl and the other for a boy. It was so much fun to pick out the fabrics for these! I paired them both with different shades of linen on the pocket background fabric for a nice contrast.

I've started sewing up my own gift bags lately, riffing on the 5-Minute Party Pouch from Ruby Star Wrapping by Melody Miller & Allison Tannery. I just change up the size as needed. It's a great way to use fabric from my Five & Dime stash, and it makes the gift so much more personal. And frankly, considering how expensive gift bags are becoming, I think I'm at least breaking even on the cost!

Retro Mama Notions Pouch by Heidi Staples for Fabric Mutt

I also had the chance to host a week of my friend Kim's sew along for her new Notions Pouch pattern. Kim is also known as Retro Mama, and she makes the most adorable things!

Retro Mama Notions Pouch by Heidi Staples for Fabric Mutt

This is just the cutest little pouch you ever saw, and I had so much fun making one in each of the two sizes she offers. The sew along is just wrapping up on Instagram -- just check out the hashtag #notionspouchsal to see all the amazing makes.

Speaking of Instagram, I'm trying to keep up with the annual Instagram Quilt Fest hosted by Amy of Amy's Creative Side this month. There's a photo prompt for each day of March to share with the hashtag #igquiltfest, and it's given me the chance to go back and revisit some favorite makes as well as share a behind-the-scenes look at my own sewing studio. Check it out if you get the chance. These are the kind of events that really bring out the friendly spirit that I love most about the online quilting community.

Happy sewing, friends!

Tuesday, August 29, 2017

Quilt' N' Things Scrappy Projects


I've been chatting with Lana Norton, owner of Quilt' N' Things in Montrose, California, this summer, talking about the joys and challenges of running a quilt shop. She's been wanting to work more closely with designers to help promote our work and draw people to her shop. As a part of that process, she sent me three of her wonderful scrappy sixteenth bags to make a handful of projects that she can display in her shop. I added some scraps of my own and had a wonderful time relaxing with patchwork this week!


The first project I made was a toy wallet, altering the Manicure Set pattern from my book, Sew Organized for the Busy Girl.


My girls are always bringing little miniature toys with them or collecting small items like bottlecaps wherever they go. This wallet is the perfect place to keep them!


I absolutely had to make a Deluxe Pincushion from my book. I've never made one of these that I didn't love. They're so quick and fun and perfect for showcasing tiny scraps!


The last thing I made was a Road Trip Pillow from the Fast Fabric Gifts booklet I wrote for Love Patchwork & Quilting last year. This is such a simple project, but I love how it lets the fabrics shine. I wound up with a light, happy rainbow of prints, and it all feels so summery to me.


For the envelope closure on the back, I used a canvas print with gold metallic accents that I've been saving for a while.

These projects are on their way to California right now, and as hard as it was to let them go, I'm so happy that they'll be enjoying a special spot in Lana's shop. Be sure to drop by Quilt' N' Things if you're in the area!

Monday, July 10, 2017

Little Dolly Sewing Kit

Little Dolly Jet-Set Case from Sew Organized for the Busy Girl by Heidi Staples of Fabric Mutt

Everything my friend Elea Lutz makes is magical, and her latest collection, Little Dolly, is no exception.


Vintage florals, dapper birds, loopy swirls that belong on top of a chocolate cupcake -- it's all so incredibly sweet. And with the project book and adorable accessories that Elea has created to go with these prints, there's a very good chance that I'll be sewing some dolls for my daughters before the year's out.

Little Dolly Jet-Set Case from Sew Organized for the Busy Girl by Heidi Staples of Fabric Mutt

For my project, I decided to make a half size version of the Jet-Set Case from my book Sew Organized for the Busy Girl -- just perfect for a traveling sewing kit. I switched out the extra zipper pouch inside for a pincushion and made the exterior of the case out of patchwork squares. I also added a fun tape measure twill tape accent inside and changed the closure to a simple button and elastic. I'm so happy with how it all turned out!

Little Dolly Jet-Set Case from Sew Organized for the Busy Girl by Heidi Staples of Fabric Mutt

To give things an extra handmade touch, I quilted both the case exterior and the pincushion top by hand, using a thick craft & button thread from Coats to add more texture to the piece. I also stitched the binding on by hand to give the case a more finished look.

Little Dolly Jet-Set Case from Sew Organized for the Busy Girl by Heidi Staples of Fabric Mutt

Did I enjoy this project? Let's just say that my husband was quite amused to hear me repeating over and over while I worked, "I love this so much!"

Little Dolly Jet-Set Case from Sew Organized for the Busy Girl by Heidi Staples of Fabric Mutt

You won't want to miss a single stop on the Little Dolly tour:

7/10 Heidi Staples @fabricmutt
7/11 Casey Putney @sewstitchhappy
7/12 Jennie @cloverandviolet
7/13 Lauren Nash @transientart
7/14 Minki Kim @zeriano
7/15 Elea Lutz @elealutz

Happy sewing, friends!
Related Posts Plugin for WordPress, Blogger...