One of the fun things about designing a fabric collection is creating a quilt pattern to go with
it. My Date Night collection reminds me of so many evenings getting ready for dates with my
husband, so I thought it would be fun to create a quilt displaying the kinds of perfume and makeup
containers that would be found on a vintage vanity table. My grandmother, great grandmother,
and great aunt all loved to display old perfume bottles and canisters in their bathrooms, and I
remember being fascinated by them when I was a little girl. It was so much fun to bring some of
those ideas into this quilt design!
For this pattern, I've given you the option of two quilt sizes -- mini quilt or lap quilt. I’m also
giving you cutting requirements by row and then will include cutting requirements for finishing
the quilt. I hope this will give you more options as you use these blocks on pillows, runners, or
other fun projects. If you make one, be sure to share a few pictures online with the hashtag
#vintagevanityquilt -- and don't forget to tag me @fabricmutt!
Vintage Vanity Quilt Pattern
Mini Quilt Size: 26 1/2 x 35 1/2”
Lap Quilt Size: 52 1/2 x 70 1/2”
Fabric Requirements for Mini Quilt Top
Fat eighth bundle of Date Night
Fat eighth of yellow solid
2 1/2” square of red solid
2 1/2” square of pink solid
1 yard white solid
1 yard batting
1 yard for backing fabric
1/2 yard for binding fabric
Fabric Requirements for Lap Quilt Top
Fat quarter bundle of Date Night
Fat quarter yellow solid
5” square of red solid
5” square of pink solid
2 yards white solid
1 1/2 yards batting
1 1/2 yards wideback for backing fabric
1 yard for binding fabric
Notes
1. RST: right sides (the pretty, printed sides) together
2. Snowball the Corner: Mark a diagonal line across a square, either by tracing one with a pencil
or by folding the square in half and pressing a line with your iron. Unfold and place it RST in the
corner of another shape, making sure that the diagonal line cuts across the corner of that shape. Stitch
along that line, trim the seam down to 1/4”, and press open, creating a half square triangle in the corner
of the original shape.
3. All seams are 1/4”.
Row #1: Perfume Bottles
Fabric
|
Mini Quilt Cut
|
Lap Quilt Cut
|
Sweet Nothings in Green
|
1 rectangle 2 1/2 x 3 1/2” (A)
|
1 rectangle 4 1/2 x 6 1/2” (A)
|
Candy Box in Green
|
1 square 1 1/2 x 1 1/2” (B)
|
1 rectangle 2 1/2 x 2 1/2” (B)
|
Corsage in Pink
|
4 squares 1 1/2 x 1 1/2” (C)
2 strips 1 1/2 x 4 1/2” (D)
|
4 squares 2 1/2 x 2 1/2” (C)
2 strips 2 1/2 x 8 1/2” (D)
|
Bouquet in White
|
1 rectangle 3 1/2 x 4 1/2” (E)
|
1 rectangle 6 1/2 x 8 1/2” (E)
|
Bouquet in Blue
|
1 square 2 1/2 x 2 1/2” (F)
1 square 1 1/2 x 1 1/2” (G)
|
1 square 4 1/2 x 4 1/2” (F)
1 square 2 1/2 x 2 1/2” (G)
|
Main in Blue
|
1 rectangle 3 1/2 x 5 1/2” (H)
|
1 rectangle 6 1/2 x 10 1/2” (H)
|
Date Book in Green
|
2 strips 1 1/2 x 3 1/2” (I)
1 square 3 1/2 x 3 1/2” (J)
|
2 strips 2 1/2 x 6 1/2” (I)
2 squares 6 1/2 x 6 1/2” (J)
|
Yellow Solid
|
1 square 1 1/2 x 1 1/2” (K)
1 strip 1 x 1 1/2” (L)
|
1 square 2 1/2 x 2 1/2” (K)
1 strip 2 x 2 1/2” (L)
|
Cufflinks in Pink
|
1 square 3 1/2 x 3 1/2” (M)
|
1 square 6 1/2 x 6 1/2” (M)
|
Sweet Nothings in Pink
|
1 square 1 1/2 x 1 1/2” (N)
|
1 square 2 1/2 x 2 1/2” (N)
|
Posies in White
|
1 rectangle 2 1/2 x 3 1/2” (O)
|
1 rectangle 4 1/2 x 6 1/2” (O)
|
Posies in Pink
|
1 rectangle 2 1/2 x 3 1/2” (P)
|
1 rectangle 4 1/2 x 6 1/2” (P)
|
Main in White
|
1 strip 1 1/2 x 2 1/2” (Q)
|
1 rectangle 2 1/2 x 4 1/2” (Q)
|
Bouquet in Pink
|
1 square 4 1/2 x 4 1/2” (R)
|
1 square 8 1/2 x 8 1/2” (R)
|
White Solid
|
37 squares 1 1/2 x 1 1/2” (S)
6 strips 1 1/2 x 3 1/2” (T)
4 strips 1 x 1 1/2” (U)
2 strips 1 x 2 1/2” (V)
4 strips 1 1/2 x 4 1/2 (W)
1 rectangle 2 1/2 x 3 1/2” (X)
1 rectangle 2 1/2 x 5 1/2” (Y)
3 strips 1 1/2 x 9 1/2” (Z)
|
33 squares 2 1/2 x 2 1/2” (S)
6 strips 2 1/2 x 6 1/2” (T)
4 strips 2 x 2 1/2” (U)
2 strips 2 x 4 1/2” (V)
4 strips 2 1/2 x 8 1/2” (W)
1 rectangle 4 1/2 x 6 1/2” (X)
1 rectangle 4 1/2 x 10 1/2” (Y)
3 strips 2 1/2 x 18 1/2” (Z)
|
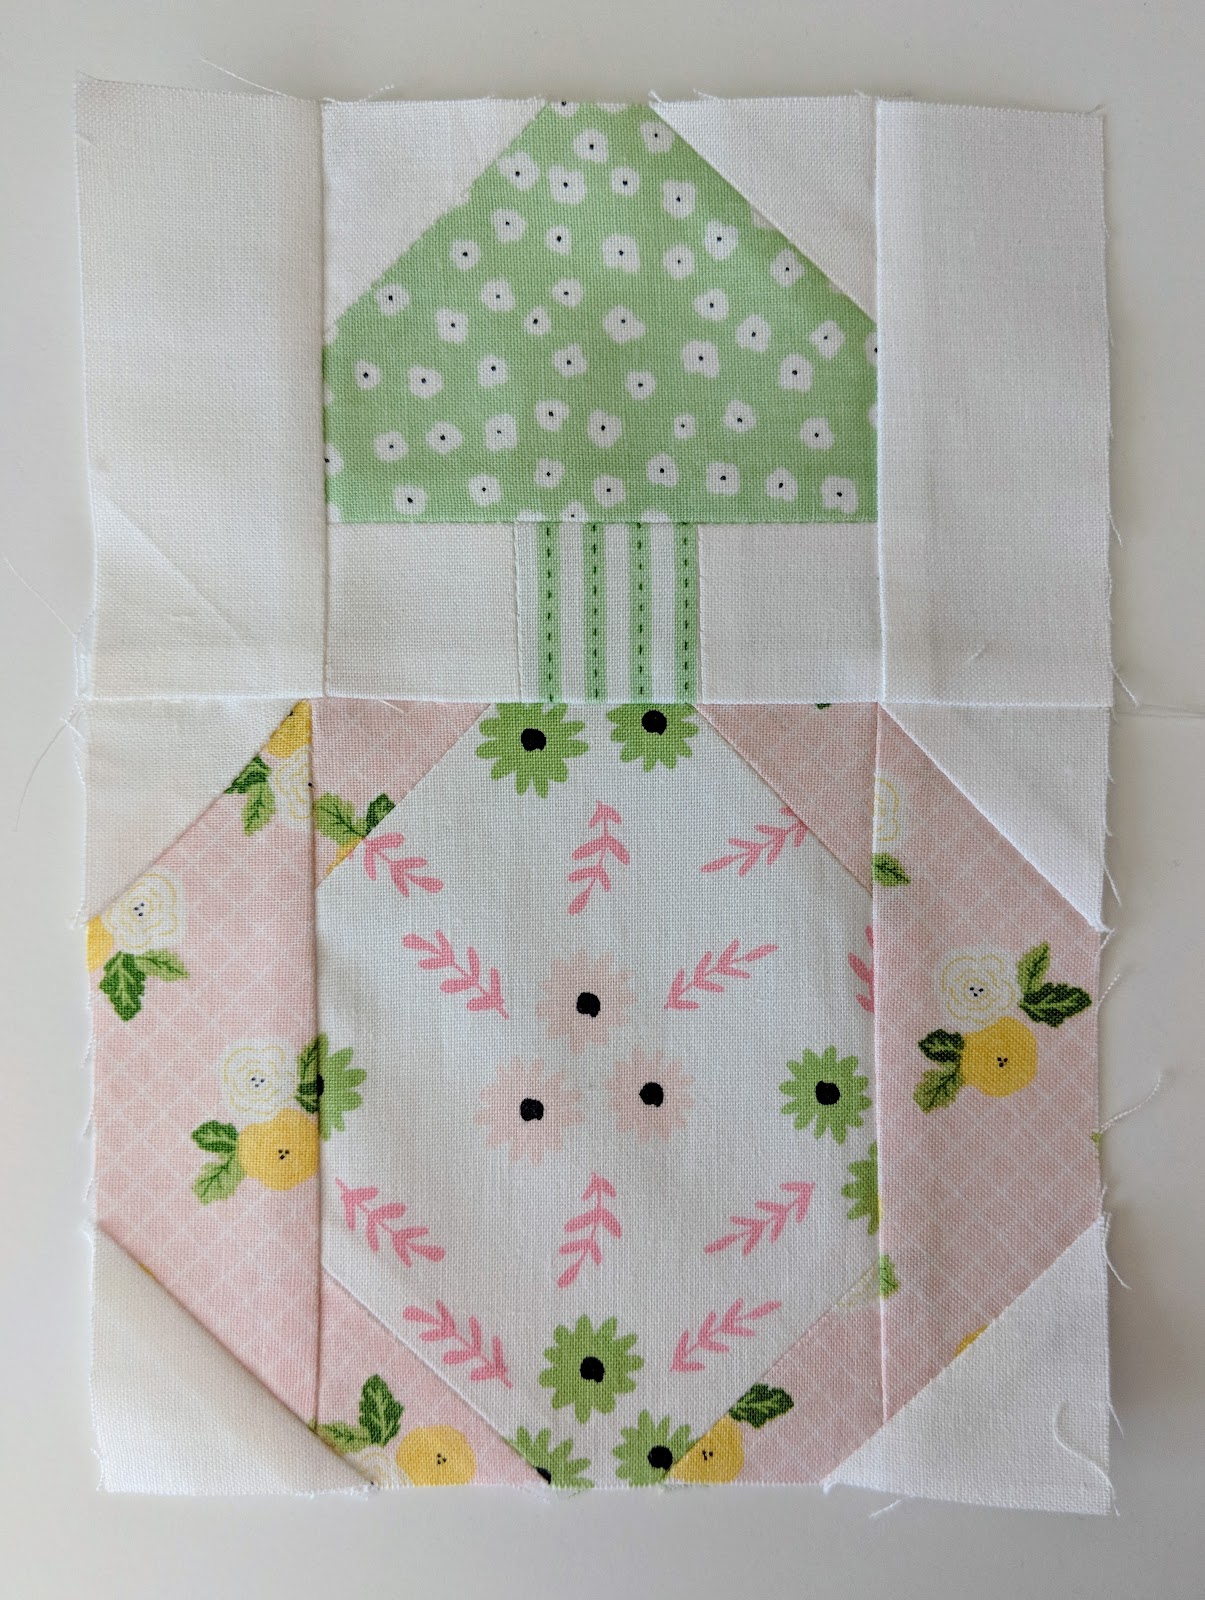
Block #1
1. Use 2 S squares to snowball both corners of rectangle A’s upper long side.
2. Sew an S square to either side of square B. Sew upper edge of unit to lower edge of unit in step 1.
3. Sew a T strip to right and left edges of unit in step 2.
4. Use 4 C squares to snowball all corners of rectangle E.
5. Sew C strips to the right and left edges of unit.
6. Use 4 S squares to snowball all 4 corners of unit.
7. Sew upper edge of unit in step 6 to lower edge of unit in step 3.
8. Sew rectangle Y to upper edge of unit.
Block #2
1. Use 4 S squares to snowball all 4 corners of square F. Sew 2 V strips to left and right edges of unit.
2. Sew an S square to either side of square G. Sew upper edge of unit to lower edge of unit in step 1.
3. Use 4 S square to snowball all 4 corners of rectangle H. Sew upper edge of unit to lower edge of
unit in step 2.
4. Sew strip T to upper edge of unit.
Block #3
1. Sew U strips to either side of L strip. Trim unit to 1 1/2 x 1 1/2”, centering L strip. Sew to right
edge of K square (keeping L strip horizontal) and sew an S square to the left edge of K square. Sew
T strip to upper edge of unit.
2. Use 4 S squares to snowball all 4 corners of J square. Sew upper edge of this unit to lower edge
of unit in step 1.
3. Sew a T strip to right and left edges of I strip. Sew upper edge of this unit to lower edge of unit in
step 2 (keeping I strip vertical).
4. Use 2 S squares to snowball ends of remaining I strip, making sure that both diagonal lines point
toward center of strip’s upper edge (see photo). Sew upper edge of unit to lower edge of unit in step 3.
5. Use 4 S squares to snowball all 4 corners of M square. Sew X rectangle to the lower edge of this unit.
6. Sew U strips to left and right edges of N square. Sew upper edge of O rectangle to lower edge of
unit. Sew W strip to left edge of unit.
7. Sew upper edge of unit in step 6 to lower edge of unit in step 5.
8. Sew left edge of unit in step 7 to right edge of unit in step 4.
Block #4
1. Use 4 S squares to snowball all 4 corners of P rectangle. Sew Q strip to lower edge of unit.
2. Sew 2 W strips to right and left sides of unit in step 1. Sew last W strip to top edge of unit.
3. Use 4 S squares to snowball all 4 corners of R square. Sew upper edge of unit to lower edge of unit
in step 2.
Finish the Row
1. Sew a Z strip to the right edge of Blocks 1, 2, and 3.
2. Sew blocks together in numerical order from left to right.
Row #2: Canisters, Mirror & Lipsticks
Fabric
|
Mini Quilt Cut
|
Lap Quilt Cut
|
Posies in Pink
|
1 rectangle 2 x 2 1/2” (A)
|
1 rectangle 4 x 4 1/2” (A)
|
Candy Box in Pink
|
1 strip 1 1/2 x 5 1/2” (B)
|
1 strip 2 1/2 x 10 1/2” (B)
|
Date Book in Blue
|
1 rectangle 5 1/2 x 7 1/2” (C)
|
1 rectangle 10 1/2 x 14 1/2” (C)
|
Cufflinks in Green
|
1 square 1 1/2 x 1 1/2” (D)
|
1 square 2 1/2 x 2 1/2” (D)
|
Bouquet in Pink
|
1 square 3 1/2 x 3 1/2” (E)
|
1 square 6 1/2 x 6 1/2” (E)
|
Yellow solid
|
4 squares 2 x 2” (F)
2 strips 1 x 6 1/2” (G)
2 strips 1 x 7 1/2” (H)
1 strip 1 x 2 1/2” (I)
1 rectangle 1 1/2 x 3 1/2” (J)
|
4 square 4 x 4” (F)
2 strips 2 x 12 1/2” (G)
2 strips 2 x 14 1/2” (H)
1 strip 2 x 4 1/2” (I)
1 rectangle 2 1/2 x 6 1/2” (J)
|
Candy Box in Blue
|
1 square 6 1/2 x 6 1/2” (K)
|
1 square 12 1/2 x 12 1/2” (K)
|
Red Solid
|
1 strip 1 1/2 x 2 1/2” (L)
|
1 strip 2 1/2 x 4 1/2” (L)
|
Posies in Pink
|
1 strip 1 1/2 x 3 1/2” (M)
|
1 strip 2 1/2 x 6 1/2” (M)
|
Cufflinks in Pink
|
1 square 1 1/2 x 1 1/2” (N)
|
1 square 2 1/2 x 2 1/2” (N)
|
Pink Solid
|
1 strip 1 1/2 x 2 1/2” (O)
|
1 strip 2 1/2 x 4 1/2” (O)
|
Sweet Nothings in Green
|
1 strip 1 1/2 x 3 1/2” (P)
|
1 strip 2 1/2 x 6 1/2” (P)
|
Main in Green
|
1 square 1 1/2 x 1 1/2” (Q)
|
1 square 2 1/2 x 2 1/2” (Q)
|
White Solid
|
4 squares 1 x 1” (R)
10 squares 1 1/2 x 1 1/2” (S)
1 strip 1 x 5 1/2” (T)
2 squares 2 x 2” (U)
2 strips 1 1/2 x 2 1/2” (V)
4 squares 2 1/4 x 2 1/4” (W)
1 strip 1 1/2 x 6 1/2” (X)
2 rectangles 2 1/2 x 3 3/4” (Y)
1 rectangle 3 1/2 x 4 1/2” (Z)
1 rectangle 3 1/2 x 6 1/2” (AA)
3 strips 1 1/2 x 10 1/2 (BB)
|
4 squares 2 x 2” (R)
10 squares 2 1/2 x 2 1/2” (S)
1 strip 2 x 10 1/2” (T)
2 squares 4 x 4” (U)
2 strips 1 1/2 x 2 1/2” (V)
4 squares 4 1/4 x 4 1/4” (W)
1 strip 2 1/2 x 12 1/2” (X)
2 rectangles 4 1/2 x 7 ” (Y)
1 rectangle 6 1/2 x 8 1/2” (Z)
1 rectangle 6 1/2 x 12 1/2” (AA)
3 strips 2 1/2 x 20 1/2” (BB)
|
Block #1
1. Use 4 R squares to snowball all 4 corners of rectangle A. Sew a U square to right and left edges of
unit.
2. Sew strip B to lower edge of unit from step 1. Sew strip T to upper edge of unit.
3. Use 4 S squares to snowball all 4 corners of rectangle C. Sew upper edge of unit to lower edge of
unit from step 2.
Block #2
1. Sew an S square to right and left sides of D square.
2. Sew upper edge of square E to lower edge of unit. Sew rectangle AA to upper edge of unit.
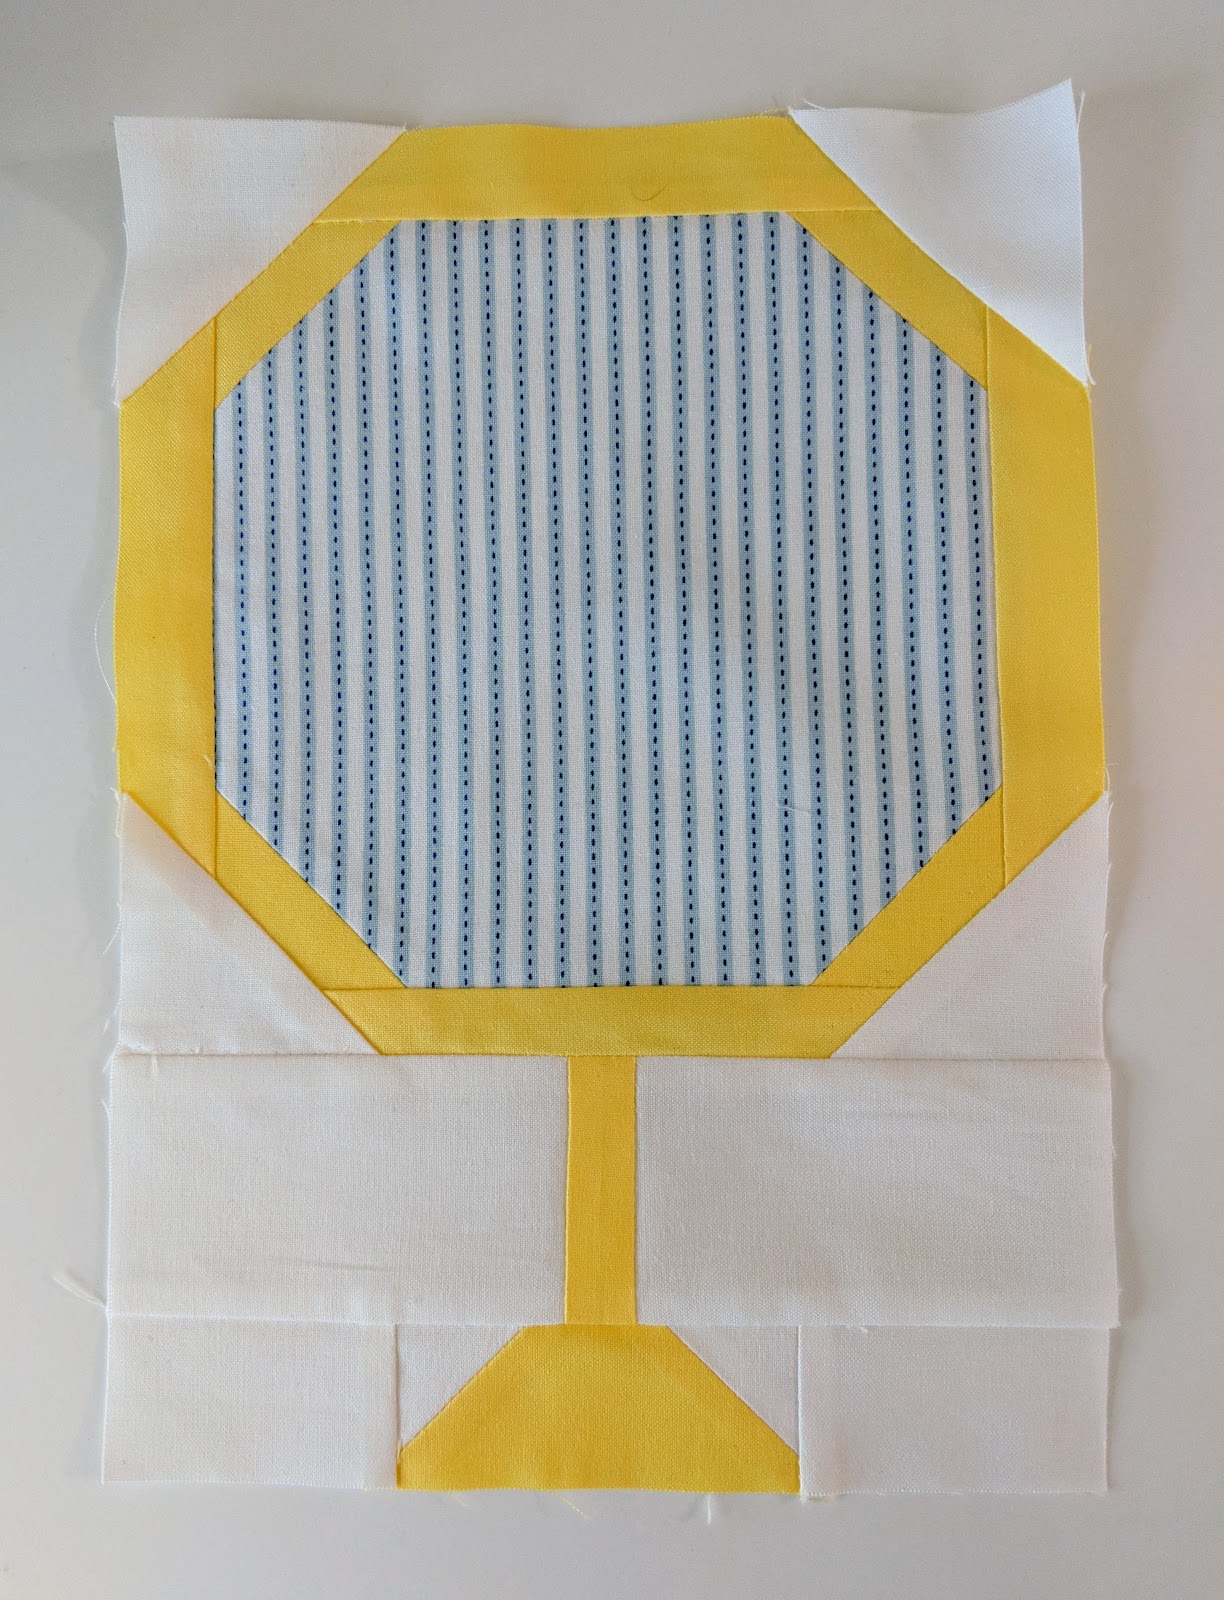
Block #3
1. Use 4 F squares to snowball all 4 corners of square K.
2. Sew G strips to upper and lower edges of unit from step 1. Then sew H strips to right and left edges.
3. Use 4 W squares to snowball all 4 corners of unit from step 2.
4. Sew Y rectangles to left and right edges of strip I. Sew upper edge of this unit to lower edge of unit
from step 3, keeping I strip vertical.
5. Use 2 S squares to snowball ends of rectangle J, making sure that diagonal lines point toward center
of rectangle’s upper edge (see photo). Sew V strips to right and left edges of unit.
6. Sew upper edge of unit from step 5 to lower edge of unit from step 4.
Block #4
1. Use square S to snowball one end of strip L (see photo).
2. Sew upper edge of strip M to unit from step 1. Sew square N to lower edge of unit.
3. Repeat steps 1 and 2 with square S, strip O, strip P, and square Q.
4. Sew strip X between units from steps 2 and 3.
5. Sew rectangle Z to upper edge of unit from step 4.
Finish the Row
1. Sew a BB strip to the right edge of Blocks 1, 2, and 3.
2. Sew blocks together in numerical order from left to right.
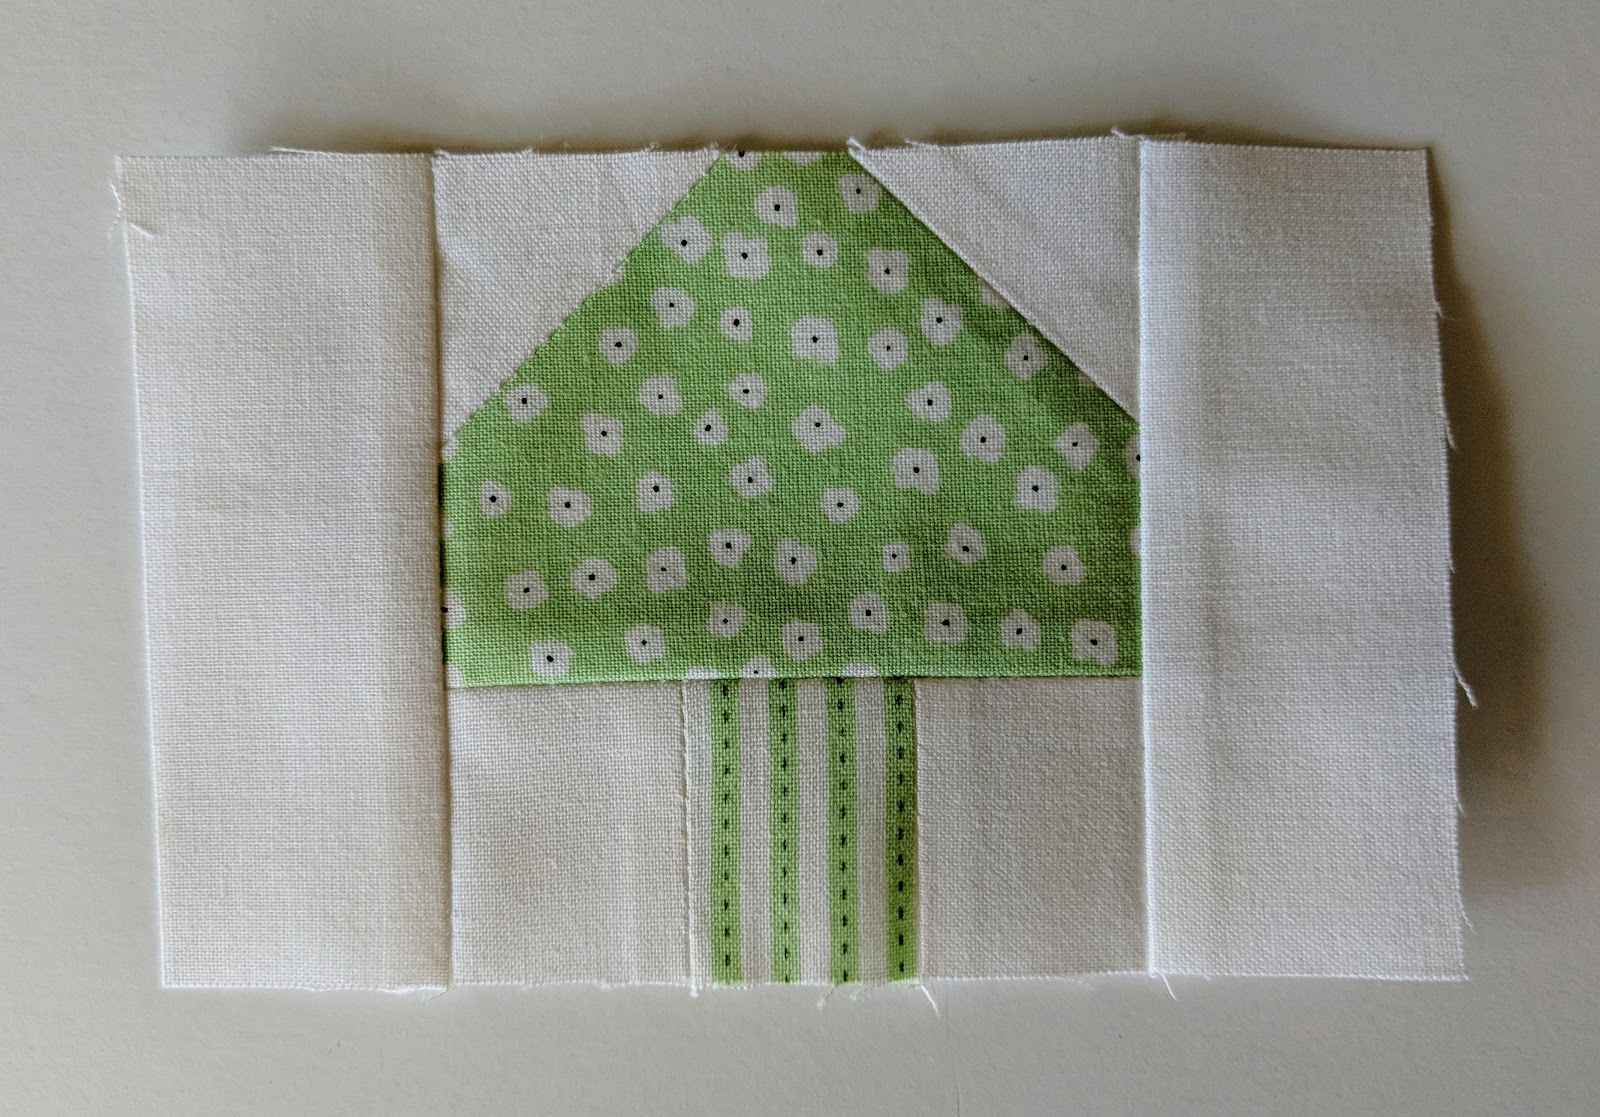
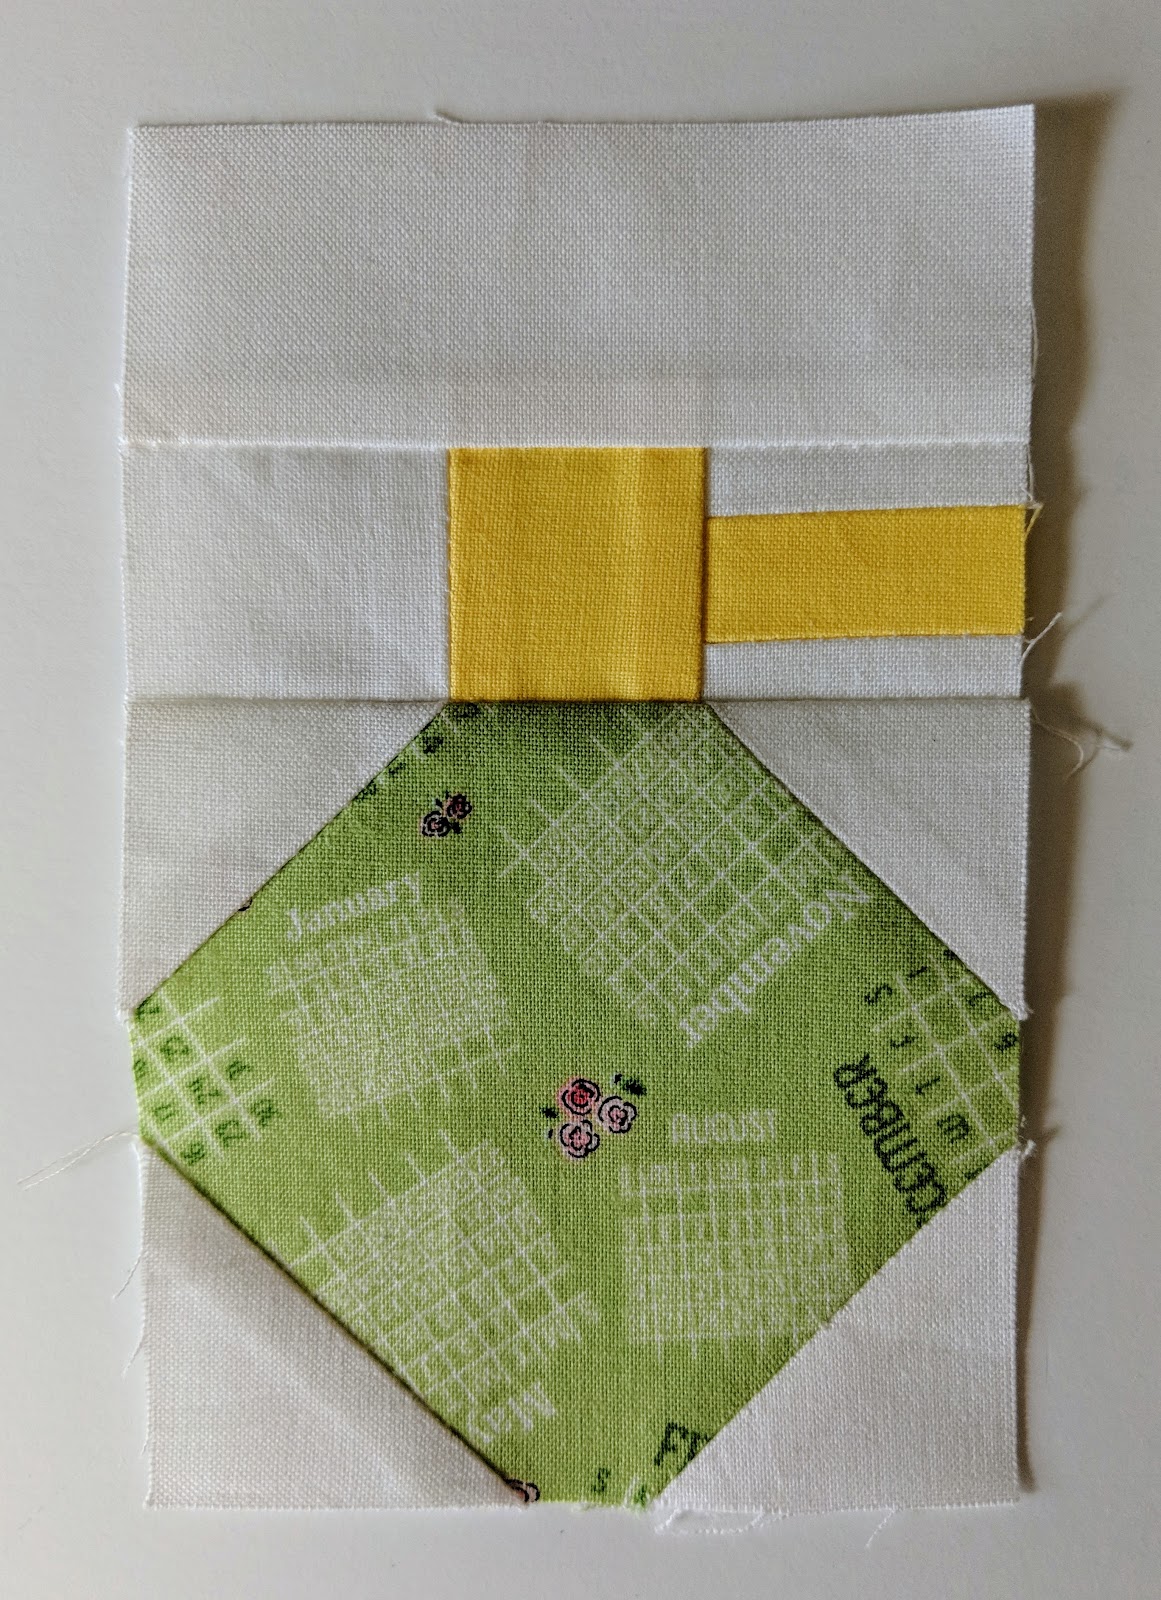
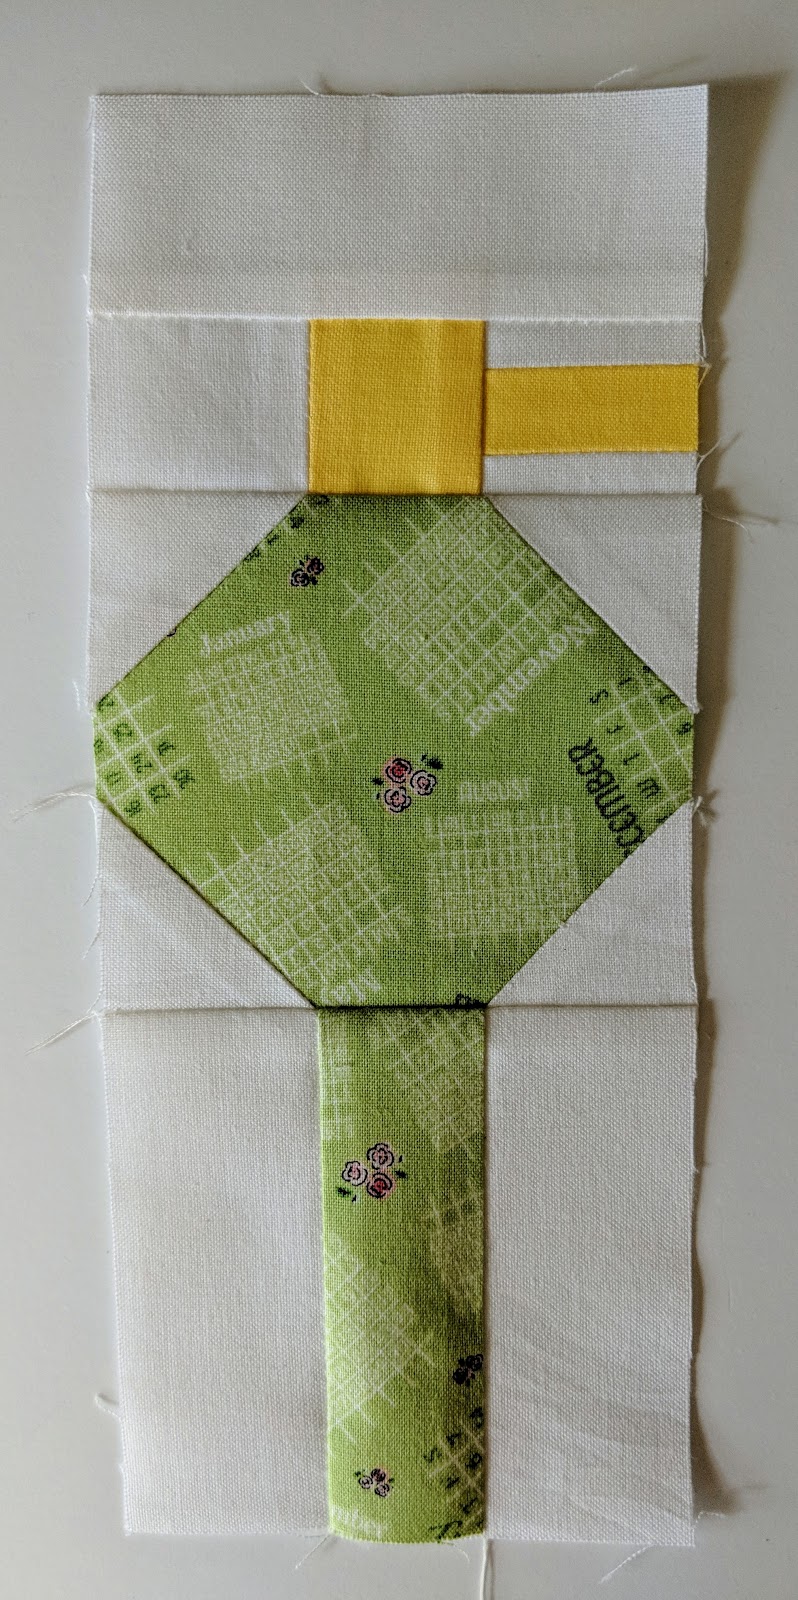
Row #3: Nail Polish and Lotions
Fabric
|
Mini Quilt Cut
|
Lap Quilt Cut
|
Corsage in Green
|
1 strip 1 1/2 x 2 1/2” (A)
|
1 strip 2 1/2 x 4 1/2” (A)
|
Sweet Nothings in Pink
|
1 rectangle 2 1/2 x 3 1/2” (B)
|
1 rectangle 4 1/2 x 6 1/2” (B)
|
Sweeting Nothings in Blue
|
1 strip 1 1/2 x 2 1/2” (C)
|
1 strip 2 1/2 x 4 1/2” (C)
|
Posies in Pink
|
1 rectangle 2 1/2 x 3 1/2” (D)
|
1 rectangle 4 1/2 x 6 1/2” (D)
|
Cufflinks in Blue
|
1 strip 1 1/2 x 2 1/2” (E)
|
1 strip 2 1/2 x 4 1/2” (E)
|
Corsage in Blue
|
1 rectangle 3 1/2 x 4 1/2” (F)
|
1 rectangle 6 1/2 x 8 1/2” (F)
|
Posies in White
|
1 square 1 1/2 x 1 1/2” (G)
|
1 square 2 1/2 x 2 1/2” (G)
|
Main in Green
|
1 rectangle 3 1/2 x 5 1/2” (H)
|
1 rectangle 6 1/2 x 10 1/2” (H)
|
Posies in Blue
|
1 strip 1 1/2 x 4 1/2” (I)
|
1 strip 2 1/2 x 8 1/2” (I)
|
Date Book in Pink
|
1 square 4 1/2 x 4 1/2” (J)
|
1 square 8 1/2 x 8 1/2” (J)
|
White Solid
|
14 squares 1 1/2 x 1 1/2” (K)
4 strips 1 1/2 x 2 1/2” (L)
1 strip 1 1/2 x 4 1/2” (M)
4 rectangles 2 1/2 x 3 1/2” (N)
1 rectangle 2 1/2 x 4 1/2” (O)
4 strips 1 1/2 x 6 1/2” (P)
|
14 squares 2 1/2 x 2 1/2” (K)
4 strips 2 1/2 x 4 1/2” (L)
1 strip 2 1/2 x 8 1/2” (M)
4 rectangles 4 1/2 x 6 1/2” (N)
1 rectangle 4 1/2 x 8 1/2” (O)
4 strips 2 1/2 x 12 1/2” (P)
|
Block #1
1. Use 2 K squares to snowball the upper corners of long edge of B rectangle.
2. Sew an L strip to right and left edges of A strip. Sew lower edge of unit to upper edge of unit from
step 1.
3. Sew N rectangle to upper edge of unit.
Block #2
1. Use 2 K squares to snowball the upper corners of long edge of D rectangle.
2. Sew an L strip to right and left edges of C strip. Sew lower edge of unit to upper edge of unit from
step 1.
3. Sew N rectangle to upper edge of unit.
Block #3
1. Use 2 K squares to snowball upper corners of long edge of F rectangle.
2. Use a disappearing fabric marker to mark a dot 1 1/4” in from lower left corner of unit on lower
edge and another dot 2 1/4” up from corner of unit on left edge. Draw a straight line connecting 2 dots
and cut across line with rotary cutter. Repeat on other side of unit, measuring from lower right corner.
3. Line up a long edge of an N rectangle along trimmed edge, RST, and stitch 1/4” from along the line.
Press open. Repeat with other N rectangle on other trimmed edge. Use ruler and rotary cutter to trim
unit to 3 1/2 x 4 1/2”.
4. Sew 2 K squares to right and left edges of E strip. Sew lower edge of unit to upper edge of unit from
step 3.
5. Sew O rectangle to upper edge of unit.
Block #4
1. Use 2 K squares to snowball upper corners of short edge of H rectangle.
2. Sew 2 K squares to right and left edges of G square. Sew lower edge of unit to upper edge of unit
from step 1.
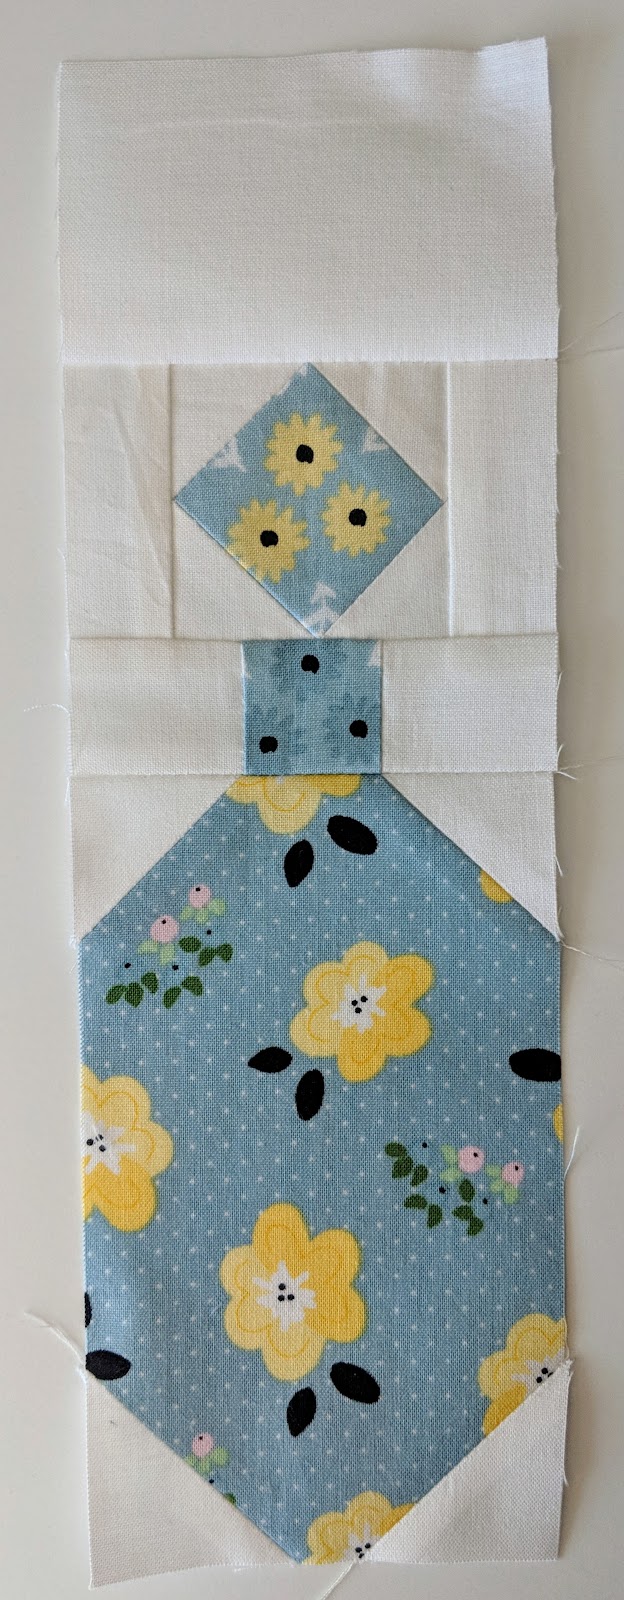
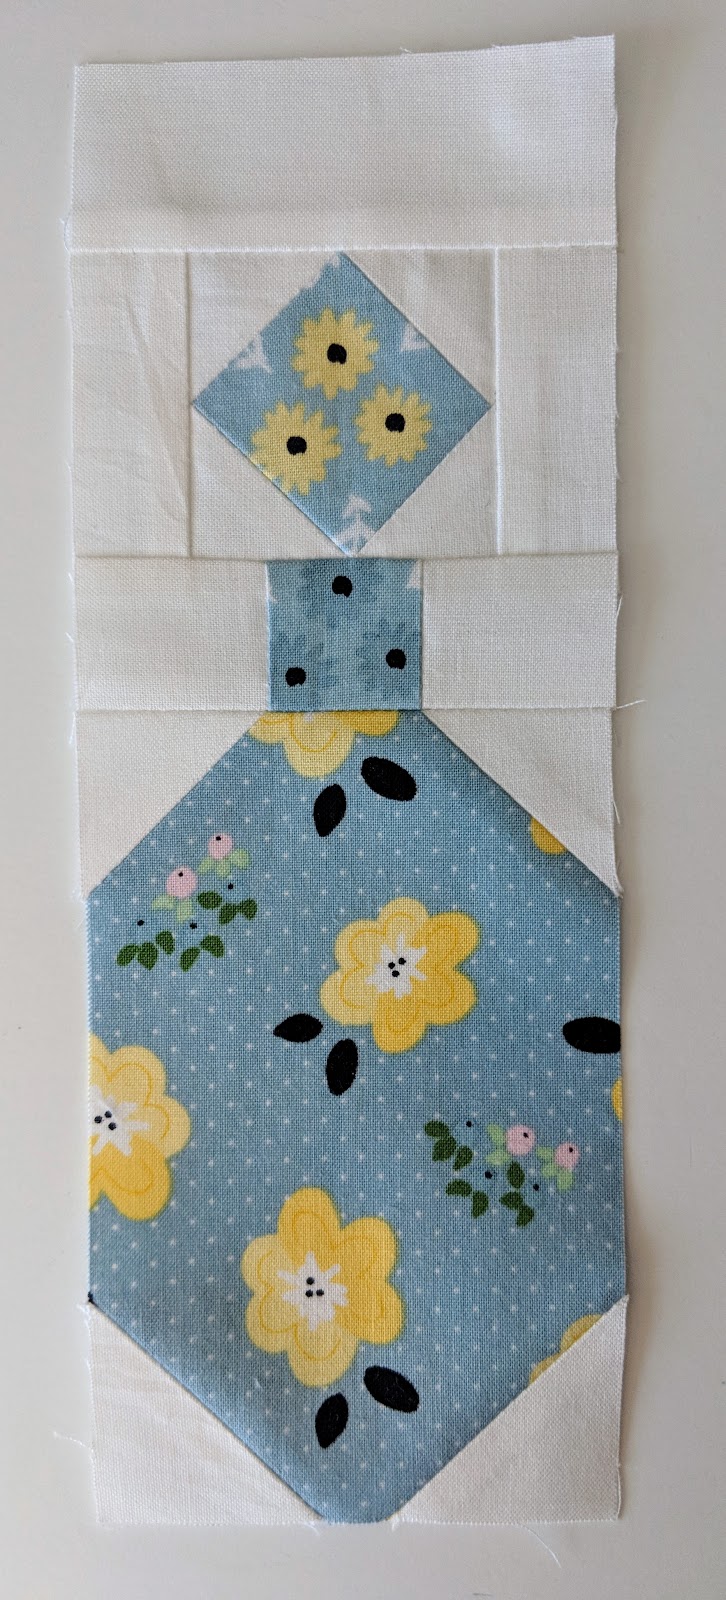
Block #5
1. Use 2 K squares to snowball lower corners of long edge of I strip, making sure that diagonal lines
point toward center of strip’s lower edge.
2. Sew upper edge of J rectangle to lower edge of unit from step 1.
3. Sew M strip to upper edge of unit.
Finish the Row
1. Sew a P strip to the right edge of Blocks 1, 2, 3, and 4.
2. Sew blocks together in numerical order from left to right.
Finishing the Quilt
Fabric
|
Mini Quilt Cut
|
Lap Quilt Cut
|
Various prints
|
52 squares 1 1/2 x 1 1/2” (A)
|
52 squares 2 1/2 x 2 1/2” (A)
|
White solid
|
52 squares 1 1/2 x 1 1/2” (B)
2 strips 2 x 21” (C)*
2 strips 3 x 28 1/2” (D)*
2 strips 1 1/2 x 27” (E)*
|
52 squares 2 1/2 x 2 1/2” (B)
2 strips 4 x 42” (C)*
2 strips 6 x 56 1/2” (D)*
2 strips 2 1/2 x 54” (E)*
|
*Note: I’ve made the white solid strips a bit longer than needed just to give a bit of wiggle room in
case seams are slightly off. Just trim off any extra at the ends so that everything lines up neatly.
Sashing
1. Sew a C strip to the lower edge of Rows 1 & 2.
2. Sew all 3 rows together in numerical order from top to bottom.
3. Sew a D strip to the left and right edges of the quilt top.
4. Sew an E strip to the upper and lower edges of the quilt top.
Upper and Lower 4-Patch Borders
1. Use 2 A squares and 2 B squares to make a 4 patch block, alternating A and B squares. Make 26
units.
2. Sew 13 units together to make the upper border. Repeat with the other 13 units to make the lower
border.
3. Sew the upper border to the upper edge of the quilt top and sew the lower border to the lower edge
of the quilt top to make the lower border.
Quilt & bind the quilt as desired to finish!