Showing posts with label scraps. Show all posts
Saturday, June 9, 2018
Spelling Bee Saturday: Typewriter Pillow
Everyone knows that I love a good typewriter project. I even designed the Typewriter Mini Quilt as a free pattern to go along with the release of Sew Organized for the Busy Girl several years back. This little block from Lori Holt's Spelling Bee book is a great way to play with the theme in a single quilt block.
It's always so fun to choose the fabrics for these blocks. The green dotty print makes a great frame for the scrappy keys -- and who wouldn't choose a polk-a-dot typewriter over a solid one any day! -- and I love pulling in a text print for the paper. The navy blue prints are a nice contrast and give this color scheme a slightly preppy look which I love. And that book print by my friend Jill Howarth from her Once Upon a Time collection for the typebar -- oh my goodness, I adore it!
I knew right away that I wanted to turn this block into a pillow, and I love seeing it on the couch in my bedroom. For the backing, I used striped gray and white linen which goes with everything and makes a sturdy case for the pillow form.
This pillow just makes me happy every time I look at it -- every . . . single . . . time.
Thanks again to the Fat Quarter Shop for setting up this fun sew along, and to Lori, of course, for writing such a fabulous book.
Happy sewing, friends!
Labels:
book,
pillow,
quilt block,
scraps,
sew along
Tuesday, August 29, 2017
Quilt' N' Things Scrappy Projects
I've been chatting with Lana Norton, owner of Quilt' N' Things in Montrose, California, this summer, talking about the joys and challenges of running a quilt shop. She's been wanting to work more closely with designers to help promote our work and draw people to her shop. As a part of that process, she sent me three of her wonderful scrappy sixteenth bags to make a handful of projects that she can display in her shop. I added some scraps of my own and had a wonderful time relaxing with patchwork this week!
The first project I made was a toy wallet, altering the Manicure Set pattern from my book, Sew Organized for the Busy Girl.
My girls are always bringing little miniature toys with them or collecting small items like bottlecaps wherever they go. This wallet is the perfect place to keep them!
I absolutely had to make a Deluxe Pincushion from my book. I've never made one of these that I didn't love. They're so quick and fun and perfect for showcasing tiny scraps!
The last thing I made was a Road Trip Pillow from the Fast Fabric Gifts booklet I wrote for Love Patchwork & Quilting last year. This is such a simple project, but I love how it lets the fabrics shine. I wound up with a light, happy rainbow of prints, and it all feels so summery to me.
For the envelope closure on the back, I used a canvas print with gold metallic accents that I've been saving for a while.
These projects are on their way to California right now, and as hard as it was to let them go, I'm so happy that they'll be enjoying a special spot in Lana's shop. Be sure to drop by Quilt' N' Things if you're in the area!
Sunday, July 17, 2016
Scrappy Improv Runner
I bought a copy of The Improv Handbook for Modern Quilters by Sherri Wood last month and was fascinated by her ideas about quilting. Rather than working from a pattern, she works from a "score," a set of guidelines for the quilt instead of specific measurements and precise directions. So when Mom asked if I would make a small runner for the top of her bedroom dresser, it seemed like the perfect opportunity to give these techniques a try.
For my score, I decided to use rectangles cut by hand with scissors instead of a rotary cutter. For the color scheme, I alternated a rainbow of colors with low volume prints -- a look that I adore. I love playing with fabric to find the right balance of color and light in my projects. This has a cheerful look that's so bright and happy.
I backed the runner in a woven aqua gingham print from the new Checkers line by Cotton + Steel. It's quilted in straight lines about half an inch apart and bound in a low volume text print by Zen Chic.
I have to admit, improv quilting is fun. While I get a lot of pleasure from working with traditional patterns, there's nothing like sewing things together without worrying about matching points or perfect seams. That kind of freedom is so appealing, and I will definitely be doing this again.
Friday, November 27, 2015
Pocket Mending Book Tutorial
What better way to celebrate the start of another Christmas season than with a new tutorial! I've spent the past week sewing up a handful of these little books which I first shared with you here, and it's been so much fun. I warn you, though, they're completely addictive. Every time I make one, I start thinking about the next...
Have fun!
Supplies and Cutting Instructions
various feature prints -- 5 squares (1 1/2 x 1 1/2" each) for X block on cover
white dot print -- 8 squares (1 1/2 x 1 1/2" each), 2 strips (1 x 3 3/8"), and 2 strips (1 x 4 3/8") for X block background
blue print -- 1 rectangle (4 3/8 x 4 3/4") for exterior back
white text print -- 1 rectangle for inside of front cover (4 3/8 x 4 3/4") and 1 rectangle for inside of back cover (4 3/8 x 4 1/2")
floral print -- 1 rectangle (4 1/2 x 5") for inside pocket
batting -- 1 rectangle (4 3/8 x 8 7/8") for exterior and 1 rectangle (2 1/2 x 4 1/2") for pocket
felt - 1 rectangle (3 1/4 x 7") for needle insert
thread
adhesive basting spray
*Shortcut Option: Substitute 1 square (4 3/8 x 4 3/8") for the first two fabrics in the supply list to make a quicker, easier project.
Note: All seams 1/4" unless otherwise stated.
Make the Exterior
1. Arrange your feature squares to form the X in the center of the cover block, placing the white background squares around them.
Sew the squares together in rows.
Then sew the rows together.
Trim the block so that it measures 3 3/8" square.
2. Sew the 1 x 3 3/8" background strips to the top and bottom of the X block, and then sew the remaining background strips to the right and left sides of the block.
3. Sew the left side of the cover to a 4 3/8" side of the blue exterior back piece. Use adhesive basting spray to fuse the cover to the 4 3/8 x 8 7/8" piece of batting. Quilt the cover as desired and then trim the piece to a rectangle measuring 4 3/8 x 8 3/4".
Make the Lining
1. Fold the 4 1/2 x 5" floral rectangle in half, wrong sides of the fabric touching each other, so that the 4 1/2" ends meet. Slip the 2 1/2 x 4 1/2" piece of batting inside the folded piece of fabric and top stitch 1/8" from the fold.
Place the pocket on the back lining piece (4 3/8 x 4 1/2"), aligning it with the bottom and side edges of the fabric, and baste it in place 1/8" from the edge. Divide the pocket in two by stitching a line down the middle, backstitching at the top of the pocket.
2. Fold the felt in half so that the short ends meet. Place it on top of the front lining piece (the one with the pocket) so that the fold lines up with the right edge of the piece and baste it in place 1/8" from the edge.
3. Stack the front and back lining pieces on top of each other with the felt pages sandwiched between them, checking to make sure that when you open them, they'll be in the correct positions, and stitch 1/4" from the same side where you basted the felt pages in place. Press the lining open, being careful not to damage the felt.
Assemble the Book
1. Pin or clip the exterior and lining on top of each other, right sides together.
2. Sew 1/4" all the way around the outside of the 4 3/8 x 8 3/4" rectangle, backstitching at the start and finish. Leave an opening of about 3 1/2" on the short end next to the back exterior piece. Trim the corners without cutting through the stitching.
3. Carefully turn the book right side out through the opening on the short end, using a turning tool or chopstick to push the corners out, and give the book a good pressing with your iron. Tuck the edges back inside the opening, and topstitch 1/8" from the edge all the way around the outside of the book. Be sure not to catch the felt pages in your stitching. Close the book and press carefully around the binding to help your book stay closed properly.
4. Fill the book with pins, needles, buttons, thread, and embroidery scissors.
Enjoy!
Monday, October 5, 2015
Purse Palooza Guest Post
You'll find me over at Sew Sweetness today, helping to kick off Sara's annual Purse Palooza event. I'm reviewing one of my all-time favorite patterns, the Triangle Patchwork Box Pouch from Patchwork, Please! by Ayumi Takahashi. Go check it out!
Monday, July 6, 2015
A New Beginning
It seemed appropriate to finish off the Busy Girl Sews Tour with a look at how I'm setting up my new sewing room in Texas. There's a part of me that wanted to wait until every piece was in place, but I knew that would mean holding off on showing you the room until some time this fall. I'm working slowly through everything, trying to take my time and really organize things instead of just stuffing them in baskets and cupboards. It's time consuming yet so worth it to do things this way. I'll spare you the photo of my unsorted fabrics, notions, and tools, but believe me when I say that there's quite a bit left to be organized before I'm through.
My new sewing space is, quite frankly, a dream come true. Our house has an enormous loft at the end of the upstairs hallway which is large enough to hold my husband's office, our home gym, playtime and library areas for the girls, and a sewing area that is at least twice the size of what I had in California. It gives me plenty of room to spread out as well as add a few new areas to my studio that make it even more friendly.
I'm probably most excited about my new cutting station. Being rather tall (almost 5'11"), it's been a painful thing to lean over my sewing desk and cut fabric over the past few years. The first thing I did after arriving in Texas was purchase a high square pub table from Amazon which is the perfect height for me to work without straining my back. I added an adjustable stool from Target so that I can sit at the desk too whenever I want. Bonus tip: most tabletop desk organizer units are absolutely perfect for storing your cutting tools. I've had this one for months, and I'm absolutely crazy about it!
The area that used to hold my cutting mat will now be my pressing station, and it will be so convenient to sew and press seams at opposite sides of the L-shaped desk that used to belong to my dad. I still have all my tools lined up along the edge in glass and wooden containers as you can see in the picture at the top of this post. Did I mention that this is part of the view outside my sewing room window? I tell you, it's been hard to get any work done since I arrived. All I want to do is gaze out the windows all day long...
Right now I have at least half of my fabric folded and sorted. I decided to go back to my old system of storing linen and canvas prints in this black wire drawer unit, and larger scraps are still being kept in my wooden Melody Miller drawer unit above that. The big plastic tubs to the right are waiting to hold quilt backings and works in progress.
I'm still using my great grandfather's old cabinet to store fabric, and I put my wooden cubbies and my antique scale and typewriter back on display above that where I love to see them. Sometimes I think the non-sewing things we keep in our rooms are just as inspiring as the fabric!
I saw this linen storage bench at Target over the weekend and immediately knew that it belonged in my sewing space. Batting, interfacing, and pillow forms fit perfectly inside, and my sewing files and some inspirational design books are in the baskets to the left. This bench makes a great spot for me and the girls to curl up with a good book or get together for a little mother-daughter chat during the day.
My scrap tins are now lined up along a table that also used to belong to my great grandfather. Having them out on display instead of tucked inside a cupboard makes it so much easier for them to be used. The girls can stand next the table or sit on the storage bench while they sort scraps for me.
Just to the right of my sewing space is the new library that I've set up for my girls. I've long been wanting to create a special reading area for them, and this spot next to a big window couldn't be more perfect. The large book display works as a natural divider between my space and theirs. One side holds their picture books and the other side shows off a good portion of my sewing library.
My husband teases me that I said I was buying it just for the kids, but seriously, how could I resist?!
I can't tell you what it's meant to me to put together this sewing space over the past week. Somehow it's both a new beginning and like coming home. The crazy schedule with our move meant that I had to pack up most of my sewing room back at the beginning of May. I've gone for two months without sewing a stitch, and it was so hard to lose that part of myself. While it's good to know that I can still exist without my sewing, I can honestly say that sewing continues to make my life a happier one. And really, that was the whole point of my book after all.
May you have the happiest of weeks ahead of you, my friends.
Sunday, April 5, 2015
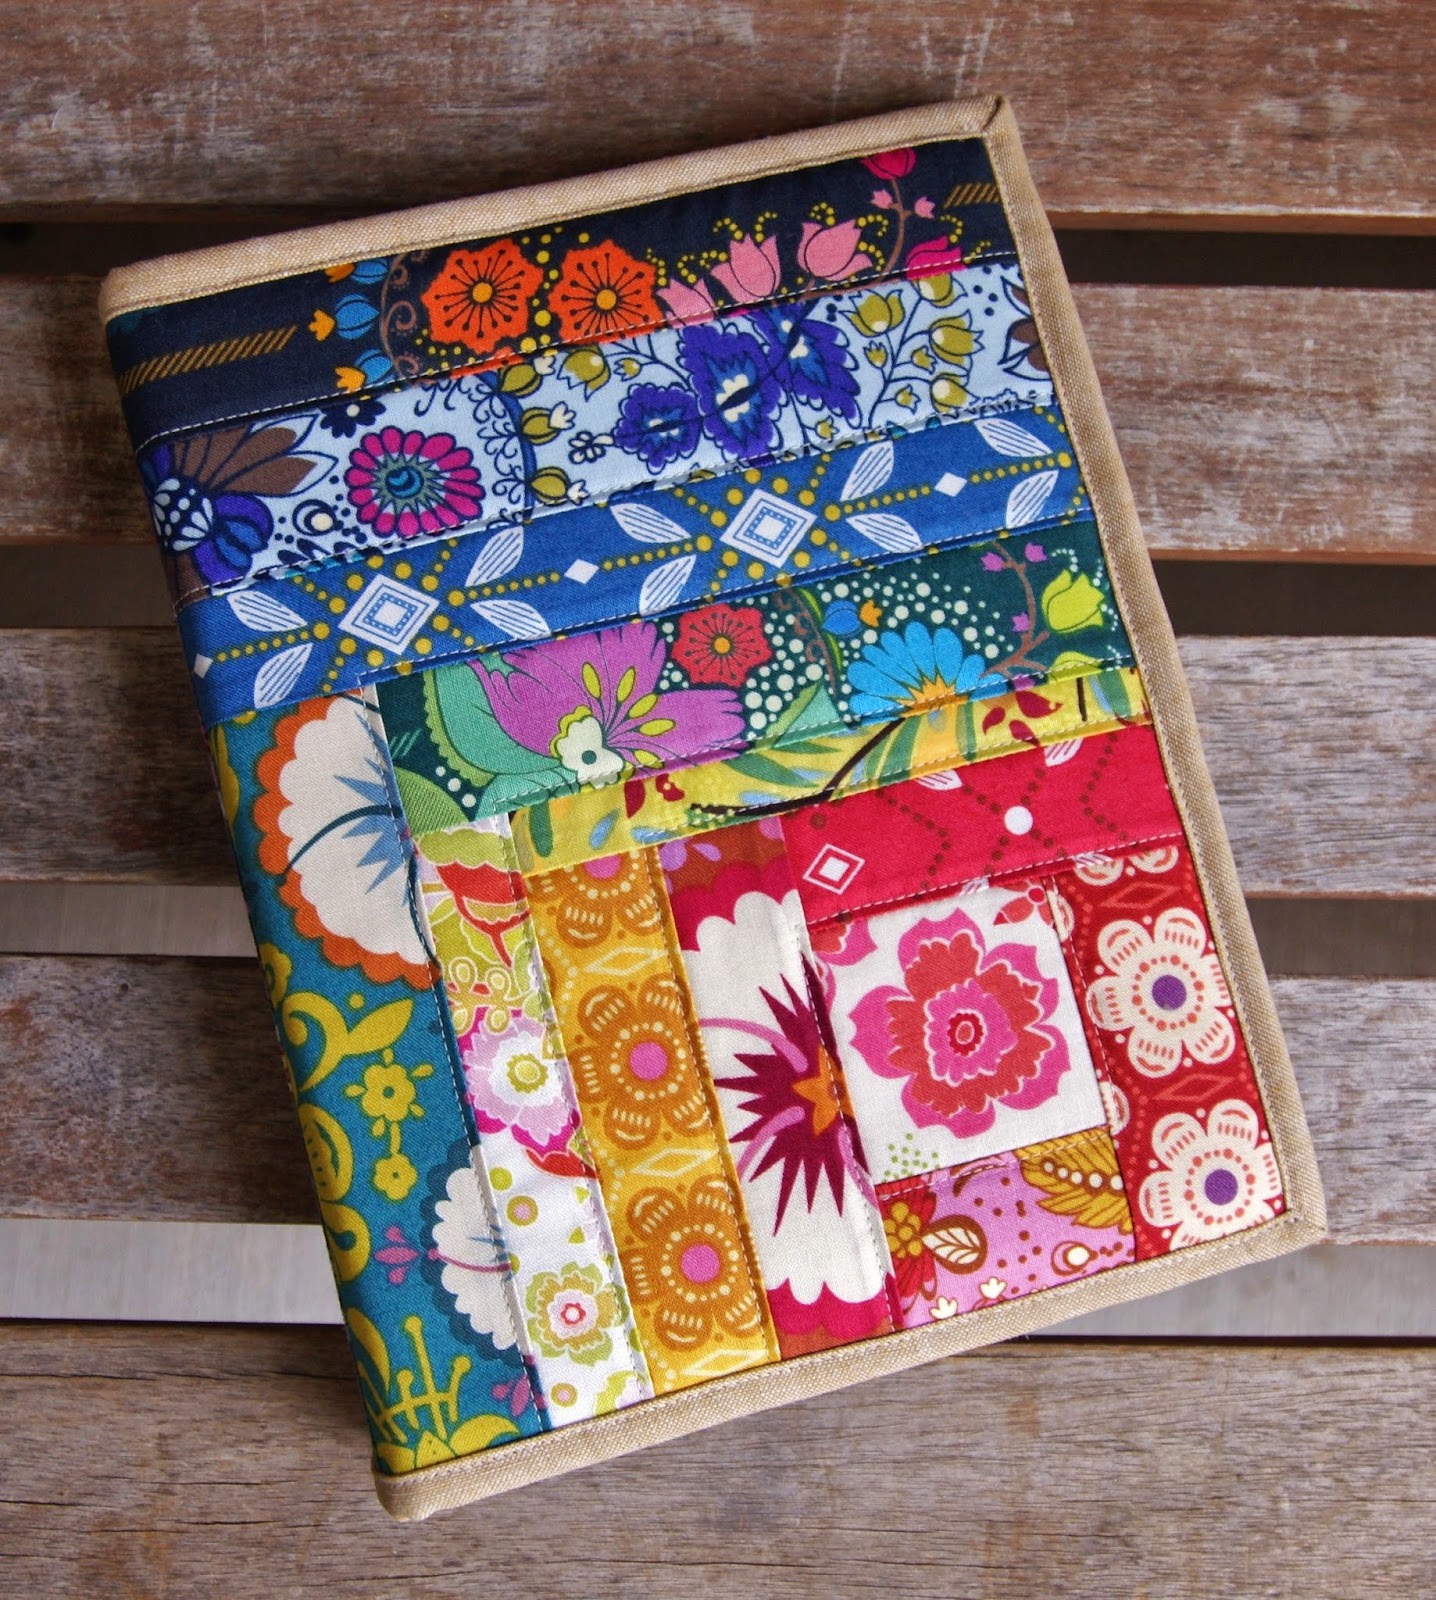
Folk Song Notebook Cover
If I had to pick a favorite collection from 2015 so far, it might very well be Folk Song by Anna Maria Horner. Her beautiful designs and stunning range of colors absolutely make my heart sing, and I knew that I wanted to use these prints to make the cover of my new sewing notebook.
While I designed this particular cover myself, I was heavily influenced by Jennie's adorable Scrappy Little Planner Tutorial which you absolutely must see. Mine is far more simplistic, but it works for what I needed. I added a small amount of quilting to the log cabin design on the front, leaving the fussy cut bouquet on the back to shine all by itself. Every time I look at this cover, my breath catches again at those incredibly saturated colors.
I added an elastic pen holder to the inside of the cover and bound the whole thing in yarn dyed Essex linen in leather. This mini notebook from Target is my latest idea for keeping all my ideas in one spot. Now I have a beautiful place to store my notes on project designs, blogging topics, and sewing classes. If you look closely, you can see that I too am enjoying Creativebug's brilliant series on How to Design Fabric. I'm hoping to sneak in another class tonight along with a cup of tea and a chocolate chip cookie. It's become my favorite way to end the day.
Happy Easter, friends!
Friday, October 17, 2014
Quilt Market Sewing: Wild & Free
Getting the opportunity to sew projects for Quilt Market is never something I take lightly. There's no question that it's exciting to work with fabric that hasn't yet been released, but it comes with a strong sense of responsibility too. These projects are part of what designers are using to sell their fabric, and it's important to me that my work makes their work look good. My friend Maureen has a beautiful limited edition collection coming out with Art Gallery Fabrics this fall, and a few weeks back she gave me the challenge of making projects with pieces of her fabric that were approximately 3 x 4" or smaller. She also sent me some coordinating AGF solids to add to the mix. I had a great time seeing how creative I could get with these little scraps. While most market projects are made entirely from large pieces of fabric, I don't think it hurts to show people how a collection looks on a small scale too, especially since scrappy projects are always a popular choice with quilters.
Maureen's Wild & Free collection is a beautiful mix of bohemian and traditional styles, and it made me immediately run for my stack of linen to use as a background for all the projects. The version of my Agave Clutch above has the largest scraps I used on any of the projects. The yarn dyed Essex linen in leather works as a simple backdrop for the prints, and I also love the leather ties I used on the zippers -- something I repeated on all the projects I made with this collection.
I made a smaller version of my Mosaic Bag to feature the tiniest scraps. The half square triangles on here finish at one inch, and I adore the way they look. It's almost like having a small modern painting on the front of this piece.
Maureen's prints line up nicely along the top of the pocket on the back of the bag. I used Andover's denim colored chambray for the background and braided cream colored cord for the handles.
The last thing I made was a little coin purse out of black Brussels washer linen. All these bags are lined in AGF solids, and this pouch has an interior of saturated gold that looks fabulous against the navy zipper and dark linen. Using a more limited color scheme, I made four tiny half-inch hexagons and hand stitched them to the front. It's a small accessory, but I really like the way this pouch turned out.
Definitely check out Maureen's blog to see the amazing things that she and others have been creating with her fabric. I know her booth is going to be drop dread gorgeous when all of these projects come together in one place!
I'll have more Quilt Market sewing to share with you next week, so stay tuned!
Thursday, April 10, 2014
Saying Goodbye
Every year I look forward to the Umbrella Prints Trimmings Competition. It's not about the prizes really. It's about the challenge of taking these little leftover pieces of fabric and turning them into something new. Working with scraps is always a welcome reminder that the ragged pieces of my life can become something beautiful if I let them, but I had no idea how personal this year's project would turn out to be.
My husband woke me on Wednesday morning to say that my grandmother's assisted living home had called with the news that Grandma was unresponsive. Paramedics arrived, found that her heart had stopped, and resuscitated her. We ended up sitting beside her in a hospital room where she was unconscious and breathing heavily, not knowing whether she would last the next hour or another six months. Mom and I decided that we would spend the night with her, so I went home to pack a bag. I had decided to try a hexagon project this year with my Umbrella Prints trimmings, and it seemed like a good idea to tuck them into a sewing kit and bring them along to keep my hands busy.
I will always remember April 2, 2014 as one of the longest nights of my life. Mom and I sat together in that dimly lit hospital room, keeping a quiet vigil over my grandmother, and it felt as though we lived through a week instead of just hours. We talked and cried, prayed and listened and cried some more. I read your sweet Instagram comments to my mother, and we were both encouraged (thank you, dear friends). I basted my hexagons, laid them out in a pattern, and spent at least an hour rearranging them over and over again on a little table in the corner of the room. Mom held Grandma's hand, reassuring her now and then that it was okay to let go, that we loved her. Through it all, we saw the signs that death was coming closer. As her seizures gave way to peaceful breathing and her heartbeat began to slow down, we set everything aside to focus on my grandmother, to love and pray her through the doorway between life and death. She drew her last breath shortly after noon on April 3rd.
It took me several days to be able to pick up this project again. The feelings from that night were still so raw that I almost couldn't bear opening my sewing kit and staring them in the face. In the end, I decided that finishing this pillow might just be my own way of finding some healing and closure. I added two hexagons made from Japanese prints to the ones from my trimmings packet -- one including the word "life." It seemed appropriate. The hexagons were sewn together by hand and stitched down onto a background of chocolate brown linen by machine. I added one hexagon to the back of the pillow which reminds me slightly of a sun coming up over the horizon. The pillow now sits on the loveseat in my parents' room, a gift to my dear mother who has been amazing through all of this.
As many of you know, my grandmother moved into a nearby assisted living home this past December and quickly went downhill under the debilitating influence of dementia, but when I started sewing and blogging several years ago, she was one of my biggest cheerleaders. It was Grandma who often slipped some money into my hand when I came to visit her, insisting, "Buy yourself some new fabric, Heidi Jean!" (Have I mentioned that Grandma's first name was Jean?) She loved to send me pictures of quilts, asking if I could make the same thing for her, and she insisted on buying me a subscription to Mollie Makes so that I could keep up on the latest inspiration. I think she probably drove people crazy showing them printouts from my blog and pointing out my quilts which she had displayed all over her house. Her gifts and encouragement helped me keep this blog going, especially in those early days, and I wouldn't be where I am if it weren't for her.
Goodbye for a little while, Grandma. We love you.
Subscribe to:
Posts (Atom)