Sunday, August 6, 2017

Storefronts Quilt Pattern (non-pdf version)


I've heard from a few people who are having difficulties opening the pdf file on my previous post for the Storefronts Quilt Pattern. After getting some technical advice, it seems that perhaps not everyone has the necessary support systems to open the document. I originally decided to share this pattern as a pdf because I didn't want it to be such a long blog post and especially since the main cutting chart required such a small font to fit correctly. I want everyone to have access to the pattern, though, so a blog post we will do! Sew and enjoy!
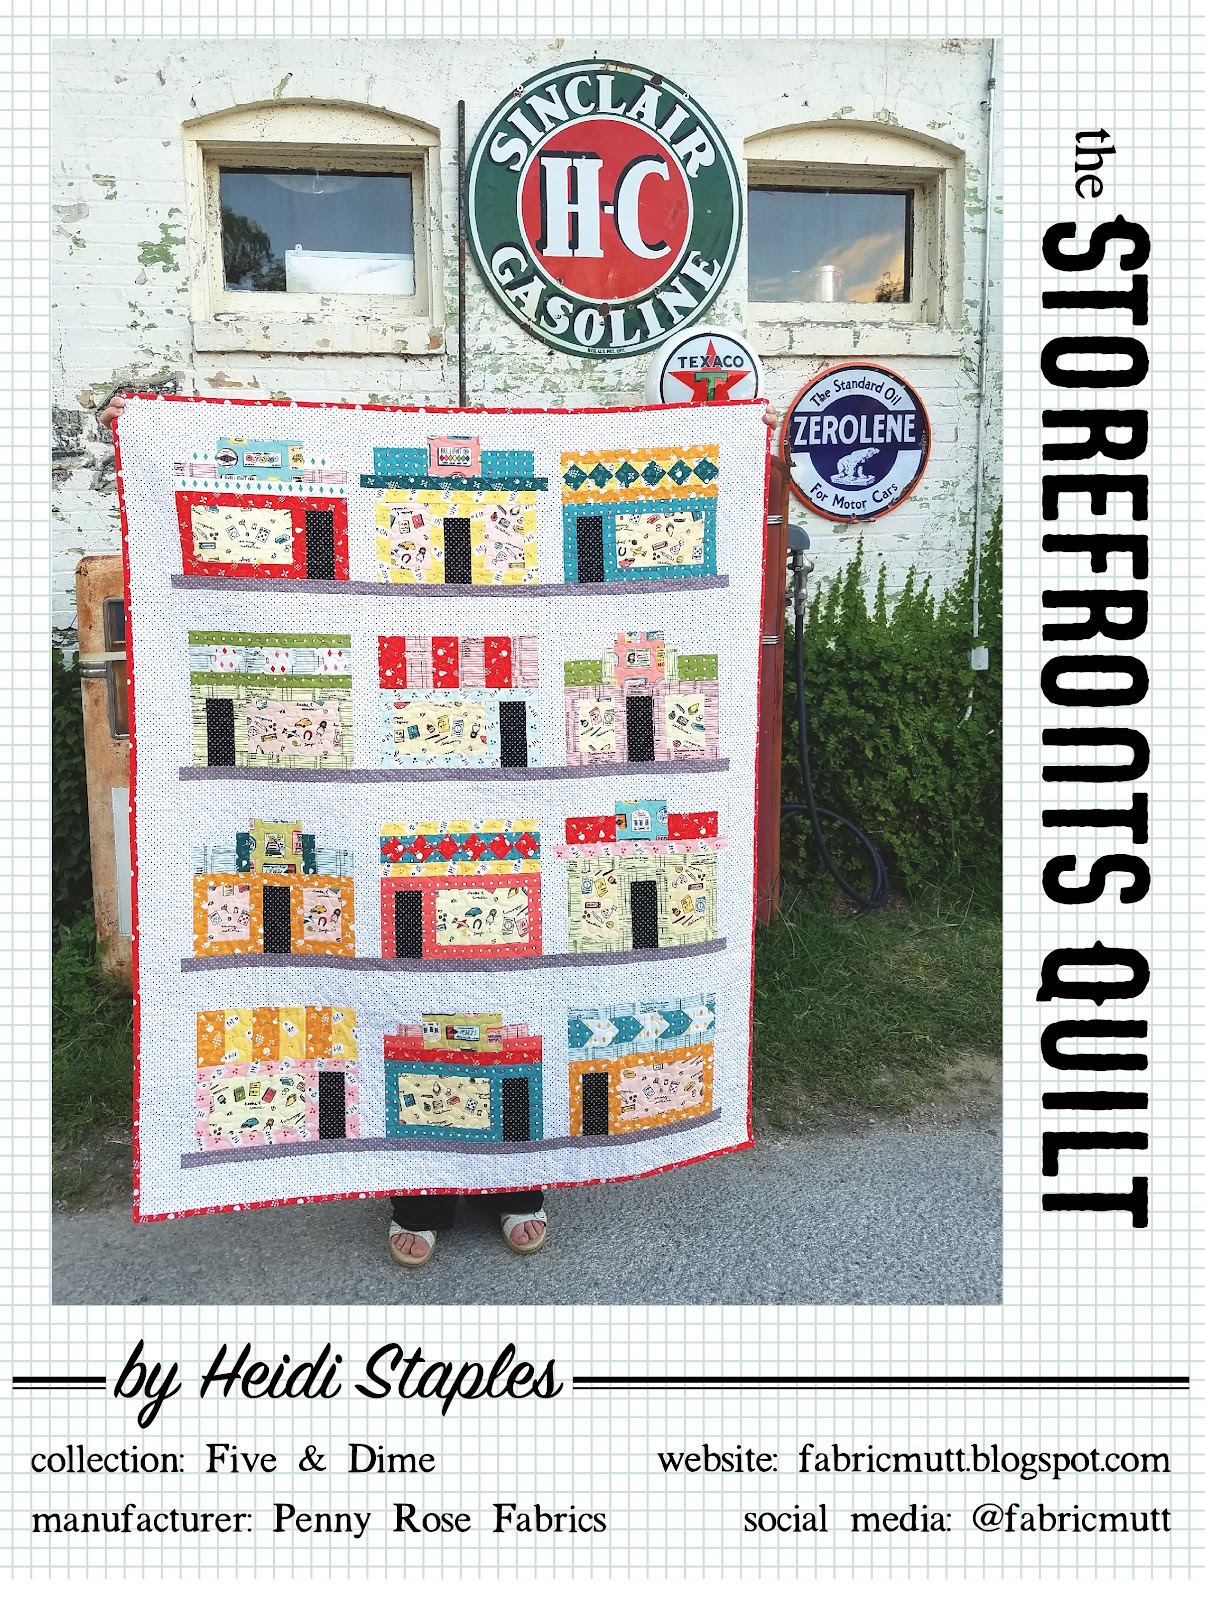
Storefronts Pattern Front.jpg

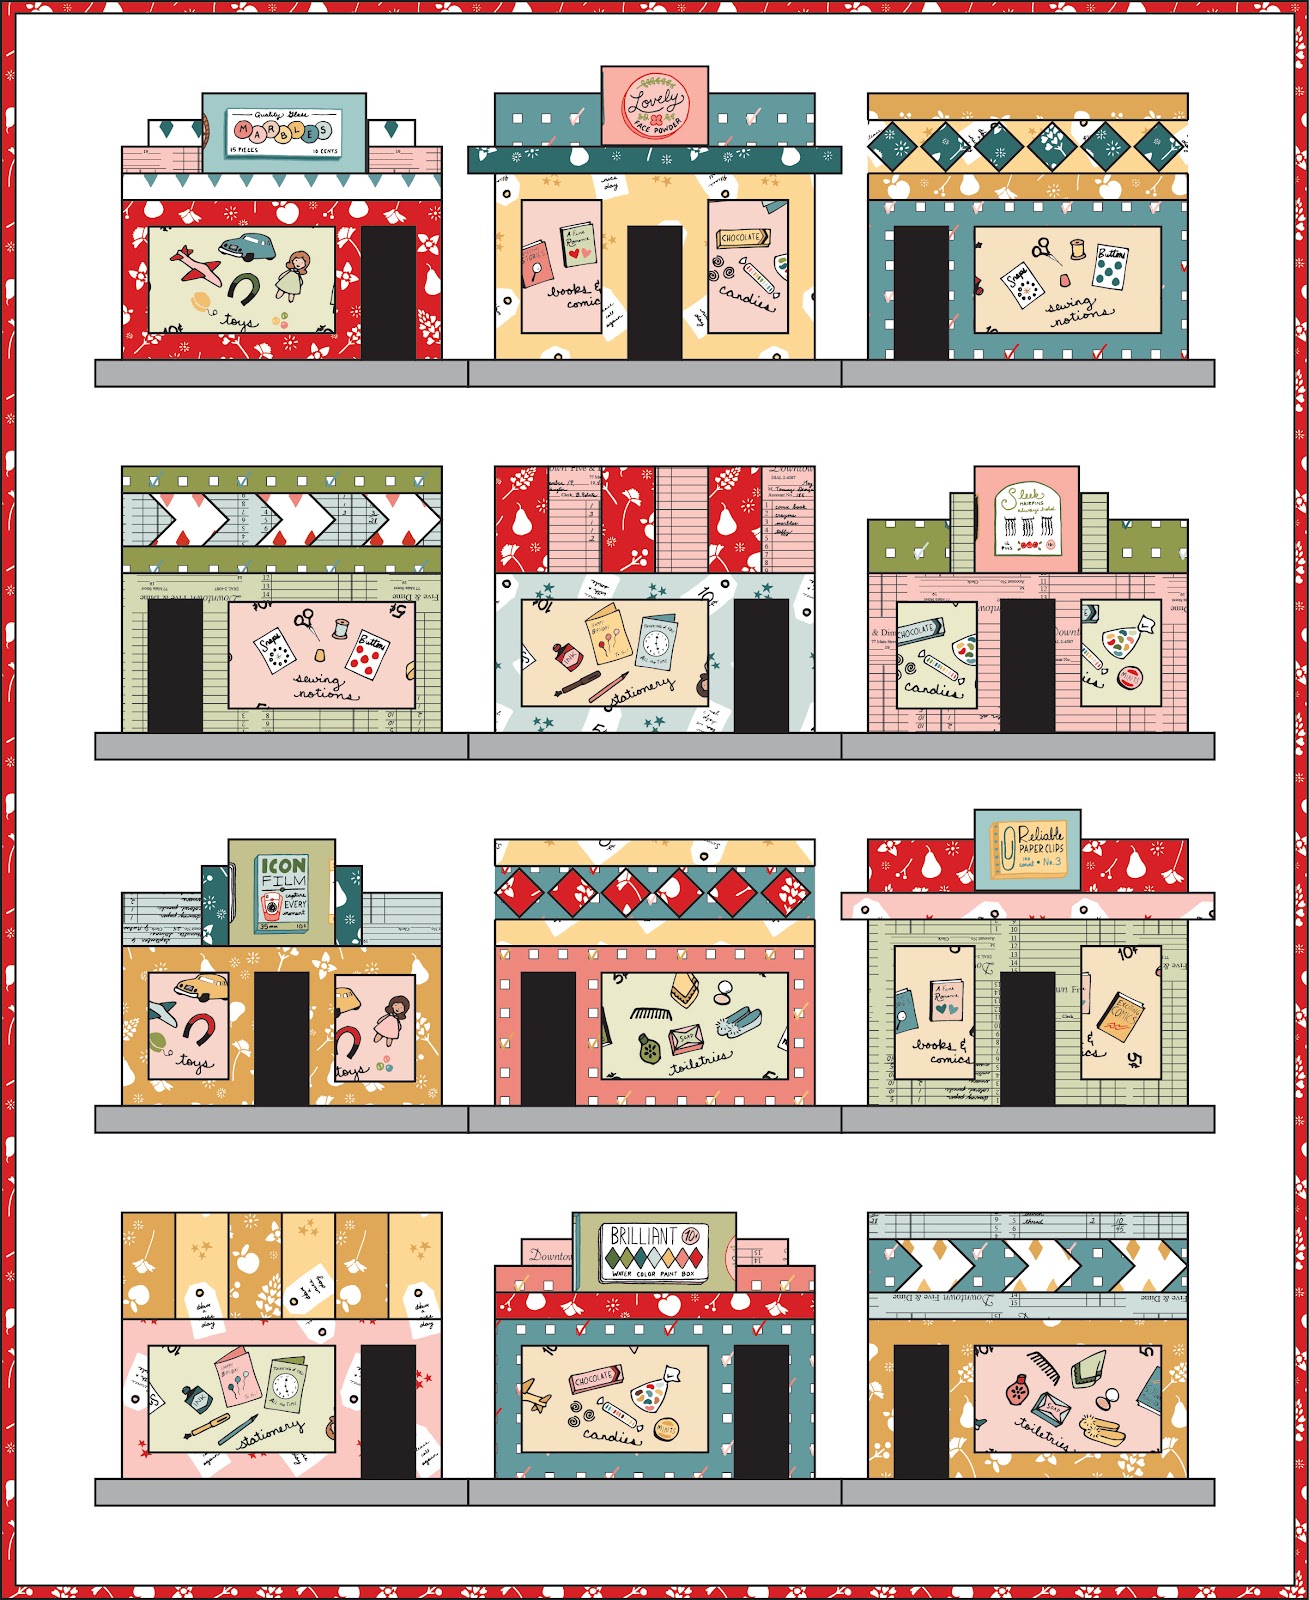
storefronts quilt diagram.jpg


Finished Size: 49 x 60”
Block size: 14” square

Materials & Cutting Requirements
If you have trouble matching up the lines in the "for" column with the "cutting" column, just double check the measurement charts for each separate block further on in the pattern which are larger and easier to read!


Fabric
For
Cutting
Fat quarter Merchandise in Pink
Store #2a windows
Store #4a window
Store #4b window
Store #6b windows
2 rectangles 3 1/2 x 5 1/2”
1 rectangle 4 1/2 x 7 1/2”
2 rectangles 3 1/2 x 4 1/2”
Fat quarter Merchandise in Green
Store #1a window
Store #3b window
Store #5b window
Store #6a window
1 rectangle 4 1/2 x 7 1/2”
2 rectangles 3 1/2 x 4 1/2”
Fat quarter Merchandise in Yellow
Store #1b window
Store #2b window
Store #3a window
Store #5a window
1 rectangle 4 1/2 x 7 1/2”
2 rectangles 3 1/2 x 5 1/2”
1 rectangle 4 1/2 x 7 1/2”
4 yards Packaging in Pink

Store #2a sign
Store #6a sign
Quilt backing
1 rectangle 3 1/2 x 4 1/2”
1 square 4 1/2 x 4 1/2”
2 rectangles 26 x 62”
1/8 yard Packaging in Green
Store #1b sign
Store #6b sign
1 rectangle 3 1/2 x 6 1/2”
1 square 4 1/2 x 4 1/2”
1/8 yard Packaging in Blue
Store #1a sign
Store #2b sign
1 rectangle 3 1/2 x 6 1/2”
1 rectangle 3 1/2 x 4 1/2”
Fat eighth Receipts in Pink
Store #1a roof
Store #5a roof
Store #6a building


Store #1b roof
2 strips 1 1/2 x 3 1/2”
3 rectangles 2 1/2 x 4 1/2”
4 strips 1 1/2 x 4 1/2”
2 strips 1 1/2 x 5 1/2”
1 strip 1 1/2 x 12 1/2”
2 strips 1 1/2 x 2 1/2”
Fat quarter Receipts in Green
Store #4a building

Store #6a roof
Store #2b building
1 strip 1 1/2 x 12 1/2”
1 strip 1 1/2 x 5 1/2”
2 strips 1 1/2 x 4 1/2”
1 strip 1 1/2 x 9 1/2”
2 strips 1 1/2 x 3 1/2”
1 strip 1 1/2 x 12 1/2”
1 strip 1 1/2 x 2 1/2”
6 strips 1 1/2 x 5 1/2”
1/8 yard Receipts in Blue
Store #4a roof


Store #6b roof
Store #4b roof
3 squares 2 1/2 x 2 1/2”
6 squares 1 1/2 x 1 1/2”
2 rectangles 2 1/2 x 3 1/2”
2 strips 1 1/2 x 12”
1/8 yard Price Tags in Blue
Store #5a building
1 strip 1 1/2 x 12 1/2”
1 strip 1 1/2 x 5 1/2”
2 strips 1 1/2 x 4 1/2”
1 strip 1 1/2 x 9 1/2”
1/8 yard Price Tags in Yellow
Store #2a building


Store #3a roof
Store #3b roof
Store #5b roof
1 strip 1 1/2 x 12 1/2”
1 strip 1 1/2 x 2 1/2”
6 strips 1 1/2 x 5 1/2”
24 squares 1 1/2 x 1 1/2”
2 strips 1 1/2 x 12 1/2”
3 rectangles 2 1/2 x 4 1/2”
Fat Quarter Price Tags in Pink
Store #2b roof
Store #5b building

1 strip 1 1/2 x 14 1/2”
1 strip 1 1/2 x 12 1/2”
1 strip 1 1/2 x 5 1/2”
2 strips 1 1/2 x 4 1/2”
1 strip 1 1/2 x 9 1/2”
1/8 yard Vintage Floral in Blue
Store #2a roof
Store #3a roof
Store #6b roof
1 strip 1 1/2 x 14 1/2”
6 squares 2 1/2 x 2 1/2”
2 strips 1 1/2 x 3 1/2”
1/2 yard Vintage Floral in Red
Store #1a building

Store #5a roof
Store #3b roof
Store #2b roof
Store #1b roof
Quilt binding
1 strip 1 1/2 x 12 1/2”
1 strip 1 1/2 x 5 1/2”
2 strips 1 1/2 x 4 1/2”
1 strip 1 1/2 x 9 1/2”
3 rectangles 2 1/2 x 4 1/2”
6 squares 2 1/2 x 2 1/2”
2 rectangles 2 1/2 x 4 1/2”
1 strip 1 1/2 x 12 1/2”
6 strips 2 1/4” x WOF
Fat quarter Vintage Floral in Yellow
Store #3a roof
Store #6b building


Store #5b roof
Store #4b building
2 strips 1 1/2 x 12 1/2”
4 strips 1 1/2 x 4 1/2”
2 strips 1 1/2 x 5 1/2”
1 strip 1 1/2 x 12 1/2”
3 rectangles 2 1/2 x 4 1/2”
1 strip 1 1/2 x 12 1/2”
1 strip 1 1/2 x 5 1/2”
2 strips 1 1/2 x 4 1/2”
1 strip 1 1/2 x 9 1/2”
1/8 yard Checklist in Pink
Store #3b building

Store #1b roof
1 strip 1 1/2 x 12 1/2”
1 strip 1 1/2 x 5 1/2”
2 strips 1 1/2 x 4 1/2”
1 strip 1 1/2 x 9 1/2”
2 strips 1 1/2 x 3 1/2”
1/8 yard Checklist in Green
Store #4a roof
Store #6a roof
2 strips 1 1/2 x 12 1/2”
2 rectangles 2 1/2 x 3 1/2”
1/3 yard Checklist in Blue
Store #2a roof
Store #3a building

Store #3b roof
Store #1b building

Store #4b roof
2 rectangles 2 1/2 x 4 1/2”
1 strip 1 1/2 x 12 1/2”
1 strip 1 1/2 x 5 1/2”
2 strips 1 1/2 x 4 1/2”
1 strip 1 1/2 x 9 1/2”
24 squares 1 1/2 x 1 1/2”
1 strip 1 1/2 x 12 1/2”
1 strip 1 1/2 x 5 1/2”
2 strips 1 1/2 x 4 1/2”
1 strip 1 1/2 x 9 1/2”
3 squares 2 1/2 x 2 1/2”
6 squares 1 1/2 x 1 1/2”
1/8 yard Diamonds in Blue
Store #1a roof
2 strips 1 1/2 x 2 1/2”
1 strip 1 1/2 x 12 1/2”
1/8 yard Diamonds in Pink
Store #4a roof
3 squares 2 1/2 x 2 1/2”
6 squares 1 1/2 x 1 1/2”
1/8 yard Diamonds in Yellow
Store #4b roof
3 squares 2 1/2 x 2 1/2”
6 squares 1 1/2 x 1 1/2”
1 yard Swiss Dot (white background, black dots)
Store #1 background (cut 2 sets)


Store #2 background (cut 2 sets)

Store #3 background (cut 2 sets)
Store #4 background (cut 2 sets)
Store #5 background (cut 2 sets)
Store #6 background (cut 2 sets)


Background sashing for lower edge
Background sashing for side edges
2 squares 1 1/2 x 1 1/2”
2 strips 1 1/2 x 3 1/2”
1 rectangle 3 1/2 x 14 1/2”
2 strips 1 1/2 x 10 1/2”
2 strips 1 1/2 x 7 1/2”
2 strips 1 1/2 x 4 1/2”
2 strips 1 1/2 x 3 1/2”
1 rectangle 2 1/2 x 14 1/2”
2 strips 1 1/2 x 10 1/2”
1 rectangle 3 1/2 x 14 1/2”
2 strips 1 1/2 x 10 1/2”
1 rectangle 3 1/2 x 14 1/2”
2 strips 1 1/2 x 10 1/2”
1 rectangle 3 1/2 x 14 1/2”
2 strips 1 1/2 x 10 1/2”
2 strips 1 1/2 x 3 1/2”
2 strips 1 1/2 x 4 1/2”
1 rectangle 3 1/2 x 14 1/2”
1 rectangle 3 1/2 x WOF
1 rectangle 3 1/2 x 7”
4 rectangles 3 1/2 x 30”
Fat quarter Swiss Dot (black background, white dots)
Store doors
12 rectangles 2 1/2 x 5 1/2”
1/8 yard Swiss Dot (gray background, white dots)
Sidewalks
12 strips 1 1/2 x 14 1/2”
4 yards Batting (or twin size packaged batting)
Quilt sandwich
1 rectangle 51 x 62”


Note: All seams are 1/4”. Press seams either open or toward the darker fabric.


Make the Blocks
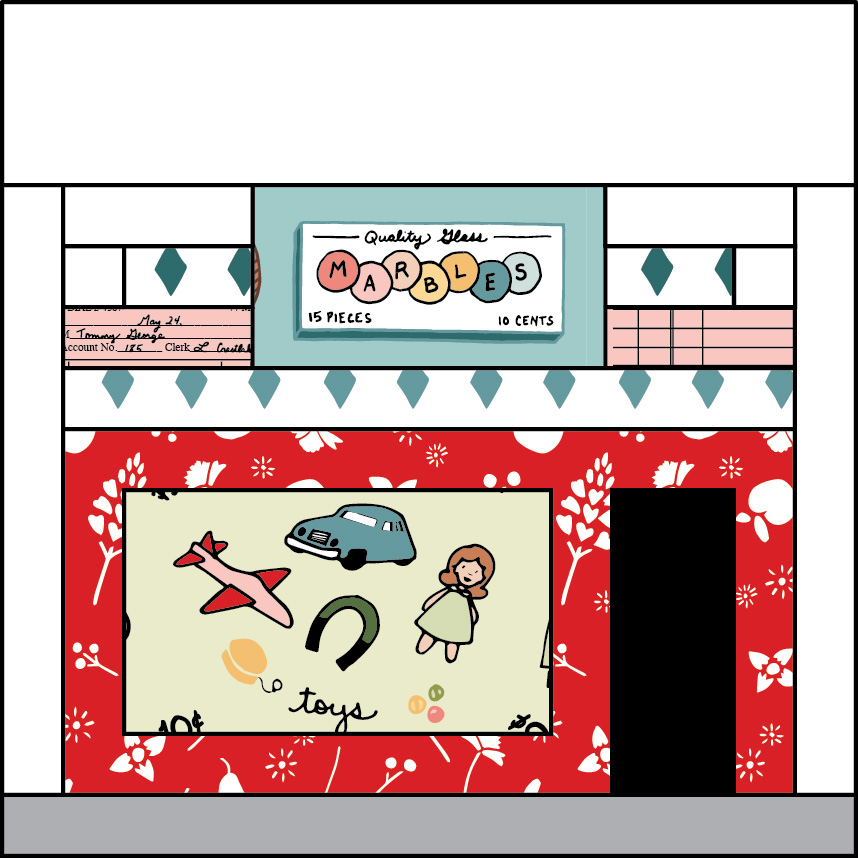

Storefronts Block 1.jpg


Store #1 (Make 2)


Part of Block
Letter
Size of Piece
Building
A
2 strips 1 1/2 x 4 1/2”
B
1 strip 1 1/2 x 9 1/2”
C
1 strip 1 1/2 x 5 1/2”
D
1 strip 1 1/2 x 12 1/2”
Window
E
1 rectangle 4 1/2 x 7 1/2”
Door
F
1 rectangle 2 1/2 x 5 1/2”
Roof
G
1 strip 1 1/2 x 12 1/2”
H
2 strips 1 1/2 x 3 1/2”
I
2 strips 1 1/2 x 2 1/2”
Sign
J
1 rectangle 3 1/2 x 6 1/2”
Sidewalk
K
1 strip 1 1/2 x 14 1/2”
Background
L
2 squares 1 1/2 x 1 1/2”
M
2 strips 1 1/2 x 3 1/2”
N
1 rectangle 3 1/2 x 14 1/2”
O
2 strips 1 1/2 x 10 1/2”


Piecing Instructions


1. Assemble the building.
  • Sew two A strips to either short side of E rectangle.
  • Sew B strip to lower edge of window unit.
  • Sew F rectangle to the right edge of the unit and C strip to the right edge of F.
  • Sew D strip to the upper edge of the unit.
2. Assemble the roof.
  • Sew L square to the left short end of one I strip. Sew L square to the right short end of the other I strip
  • Sew an H strip to the lower long edge of each roof unit (making sure that L squares are pointed toward the outer edges of the block.
  • Sew an M strip to the upper long edge of each roof unit.
  • Sew a roof unit to each short side of J rectangle (see diagram for placement).
  • Sew strip G to the lower edge of the roof unit.
  • Sew the lower edge of roof unit to the upper edge of building unit
3. Finish the block.
  • Sew O strips to right and left edges of building unit.
  • Sew K strip to lower edge of building unit.
  • Sew N rectangle to upper edge of building unit.
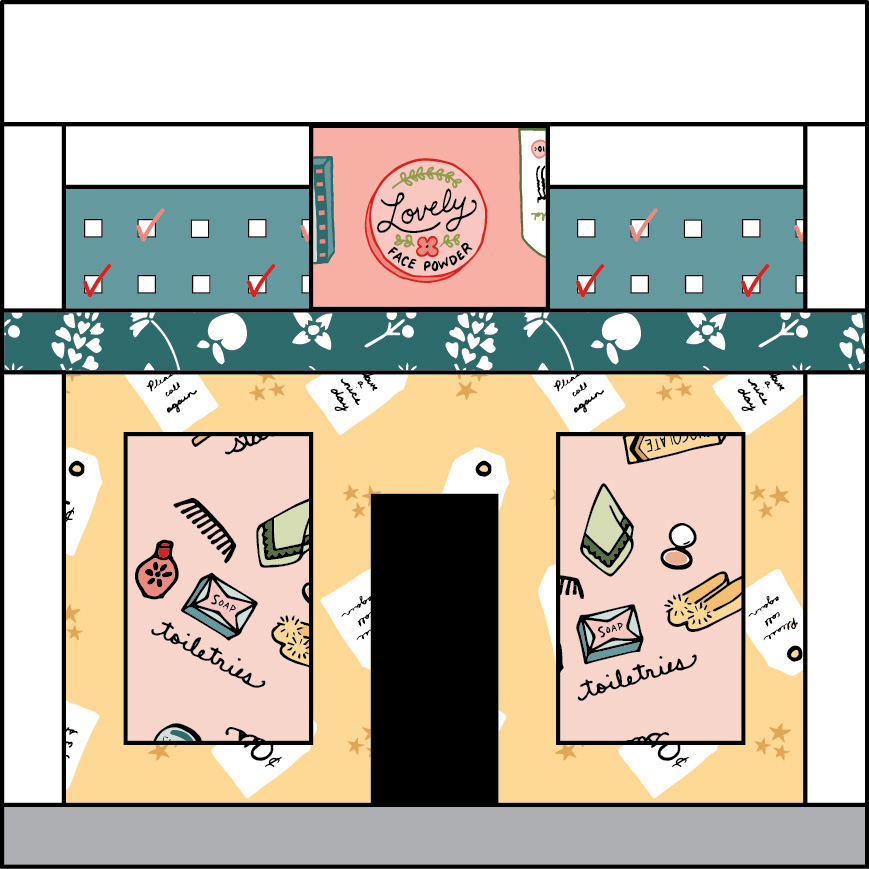

Storefronts Block 2.jpg


Store #2 (Make 2)


Part of Block
Letter
Size of Piece
Building
A
1 strip 1 1/2 x 12 1/2”
B
1 strip 1 1/2 x 2 1/2”
C
6 strips 1 1/2 x 5 1/2”
Windows
D
2 rectangles 3 1/2 x 5 1/2”
Door
E
1 rectangle 2 1/2 x 5 1/2”
Roof
F
1 strip 1 1/2 x 14 1/2”
G
2 rectangles 2 1/2 x 4 1/2”
Sign
H
1 rectangle 3 1/2 x 4 1/2”
Sidewalk
I
1 strip 1 1/2 x 14 1/2”
Background
J
2 strips 1 1/2 x 7 1/2”
K
2 strips 1 1/2 x 4 1/2”
L
2 strips 1 1/2 x 3 1/2”
M
1 rectangle 2 1/2 x 14 1/2”


Piecing Instructions


1. Assemble the building.
  • Sew a strip C on either long side of each rectangle D, giving you 2 window units.
  • Sew the remaining C strips to the lower edge of each window unit.
  • Sew strip B to the upper edge of rectangle E to make the door unit.
  • Sew a window unit to the left and right edges of the door unit.
  • Sew strip A to the upper edge of the building unit.
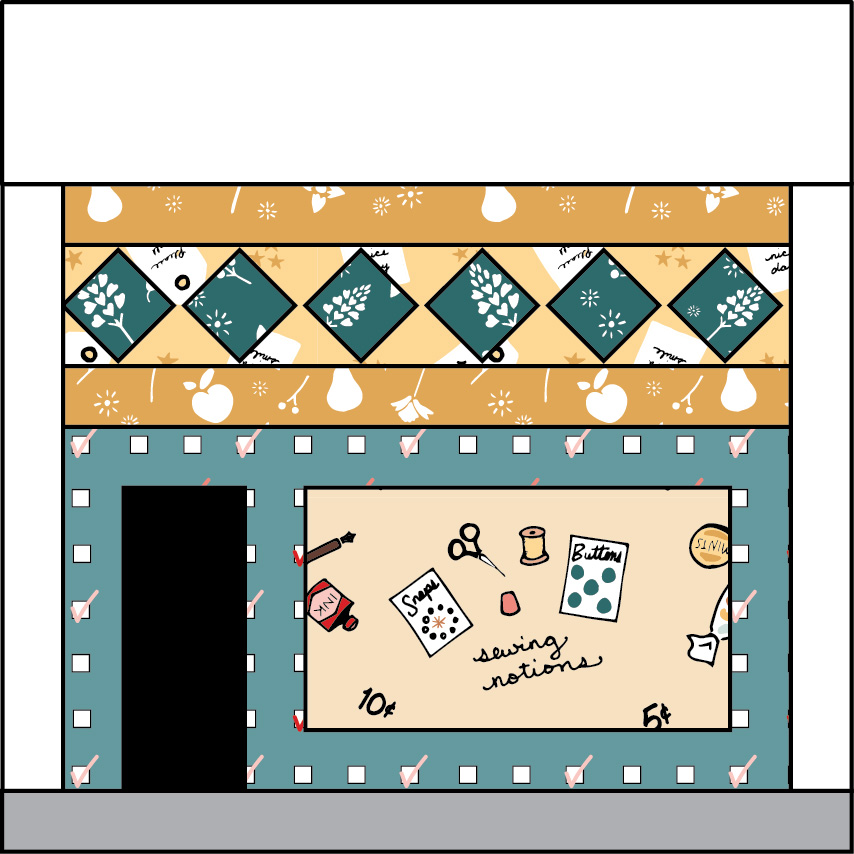
2. Assemble the roof.
  • Sew a strip K to the upper long edge of each rectangle G.
  • Sew a roof unit to the left and right edges of rectangle H.
  • Sew a strip L to the left and right edges of the roof unit.
  • Sew strip F to the lower edge of the roof unit.
  • Sew rectangle M to the upper edge of the roof unit.
3. Finish the block
  • Sew a strip J to the left and right edges of the building unit.
  • Sew strip I to the lower edge of the building unit.
  • Sew the roof unit to the upper edge of the building unit.


Storefronts Block 3.jpg


Store #3 (make 2)


Part of Block
Letter
Size of Piece
Building
A
1 strip 1 1/2 x 12 1/2”
B
1 strip 1 1/2 x 5 1/2”
C
2 strips 1 1/2 x 4 1/2”
D
1 strip 1 1/2 x 9 1/2”
Window
E
1 rectangle 4 1/2 x 7 1/2”
Door
F
1 rectangle 2 1/2 x 5 1/2”
Roof
G
24 squares 1 1/2 x 1 1/2”
H
6 squares 2 1/2 x 2 1/2”
I
2 strips 1 1/2 x 12 1/2”
Sidewalk
J
1 strip 1 1/2 x 14 1/2”
Background
K
2 strips 1 1/2 x 10 1/2”
L
1 rectangle 3 1/2 x 14 1/2”


Piecing Instructions


1. Assemble the building.
  • Sew a strip C on either long side of rectangle E.
  • Sew strip D to the lower edge of the window unit.
  • Sew strip B to the left edge of rectangle F.
  • Sew the door unit to the left edge of the window unit.
  • Sew strip A to the upper edge of the building unit.
2. Assemble the roof.
  • Draw a diagonal line from corner to corner on the back side of each G square or simply press each square in half diagonally, creating that line with your iron.
  • With right sides together, place a G square in the top right corner of an H square. Stitch across the diagonal line, trim a 1/4” seam allowance, and press the seam open. Repeat with 3 more G squares in the remaining 3 corners of the H square. Trim the square to 2 1/2 x 2 1/2”.
  • Repeat the previous step with the remaining G and H squares, giving you 6 square-within-a-square units.
  • Sew the 6 square-within-a-square units together in a row.
  • Sew a strip I to the top and bottom edges of the row of squares.
  • Sew the lower edge of the roof unit to the upper edge of the building unit.
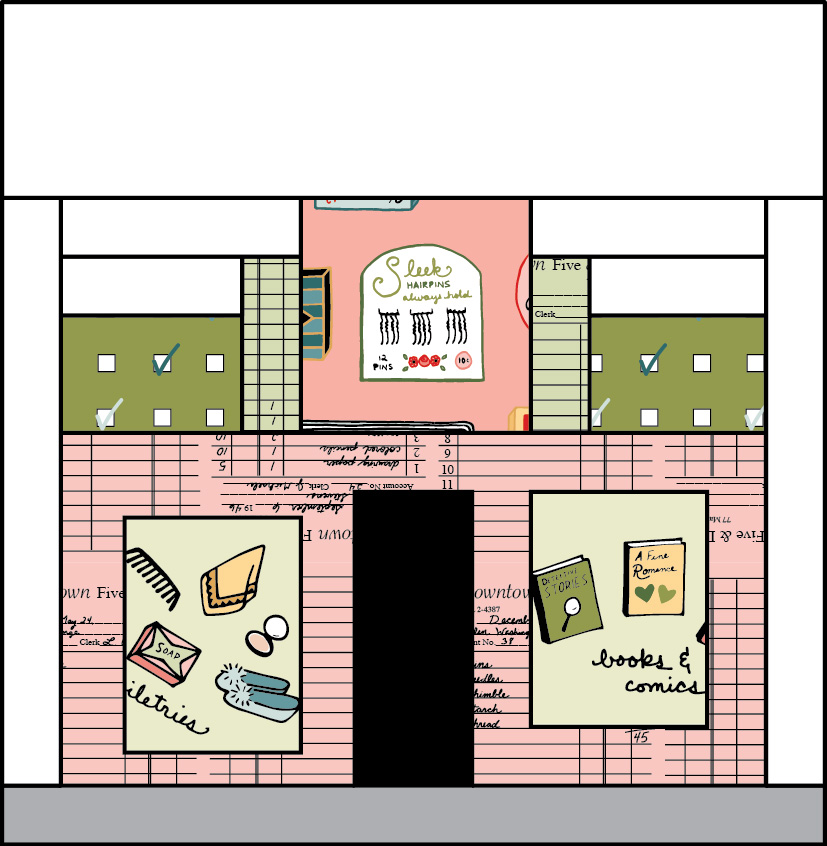
3. Finish the block
  • Sew a strip K to the left and right edges of the building unit.
  • Sew strip J to the lower edge of the building unit.
  • Sew rectangle L to the upper edge of the building unit.


Storefronts Block 4.jpg


Store #4 (make 2)


Part of Block
Letter
Size of Piece
Building
A
1 strip 1 1/2 x 12 1/2”
B
1 strip 1 1/2 x 5 1/2”
C
2 strips 1 1/2 x 4 1/2”
D
1 strip 1 1/2 x 9 1/2”
Window
E
1 rectangle 4 1/2 x 7 1/2”
Door
F
1 rectangle 2 1/2 x 5 1/2”
Roof
G
3 squares 2 1/2 x 2 1/2”
H
6 squares 1 1/2 x 1 1/2”
I
3 squares 2 1/2 x 2 1/2”
J
6 squares 1 1/2 x 1 1/2”
K
2 strips 1 1/2 x 12 1/2”
Sidewalk
L
1 strip 1 1/2 x 14 1/2”
Background
M
2 strips 1 1/2 x 10 1/2”
N
1 rectangle 3 1/2 x 14 1/2”


Piecing Instructions


1. Assemble the building.
  • Sew a strip C on either long side of rectangle E.
  • Sew strip D to the lower edge of the window unit.
  • Sew strip B to the left edge of rectangle F.
  • Sew the door unit to the left edge of the window unit.
  • Sew strip A to the upper edge of the building unit.
2. Assemble the roof.
  • Draw a diagonal line from corner to corner on the back side of each H and J square or simply press each square in half diagonally, creating that line with your iron.
  • With right sides together, place a J square in the upper right corner of a G square. Stitch across the diagonal line, trim a 1/4” seam allowance, and press the seam open. Repeat with another J square in the lower right corner of the G square. Trim the square to 2 1/2 x 2 1/2”.
  • Repeat the previous step with the remaining J and G squares, and then repeat again with the H and I squares, giving you 6 chevron units.
  • Sew the 6 chevron units together in a row.
  • Sew a strip K to the top and bottom edges of the row of squares.
  • Sew the lower edge of the roof unit to the upper edge of the building unit.
3. Finish the block
  • Sew a strip M to the left and right edges of the building unit.
  • Sew strip L to the lower edge of the building unit.
  • Sew rectangle N to the upper edge of the building unit.


Storefronts Block 5.jpg


Store #5 (make 2)


Part of Block
Letter
Size of Piece
Building
A
2 strips 1 1/2 x 4 1/2”
B
1 strip 1 1/2 x 9 1/2”
C
1 strip 1 1/2 x 5 1/2”
D
1 strip 1 1/2 x 12 1/2”
Window
E
1 rectangle 4 1/2 x 7 1/2”
Door
F
1 rectangle 2 1/2 x 5 1/2”
Roof
G
3 rectangles 2 1/2 x 4 1/2”
H
3 rectangles 2 1/2 x 4 1/2”
Sidewalk
I
1 strip 1 1/2 x 14 1/2”
Background
J
2 strips 1 1/2 x 10 1/2”
K
1 rectangle 3 1/2 x 14 1/2”


Piecing Instructions


1. Assemble the building.
  • Sew two A strips to either short side of E rectangle.
  • Sew B strip to the lower edge of the window unit.
  • Sew F rectangle to the right edge of the unit and C strip to the right edge of F.
  • Sew D strip to the upper edge of the unit.
2. Assemble the roof.
  • Match up the G and H rectangles into 3 pairs, alternating prints and keeping the rectangles vertical. Sew each pair together along the long edge between them.
  • Sew the pairs together, again along the long edges, forming a row of 6 vertical rectangles.
  • Sew the lower edge of the roof unit to the upper edge of the building unit.
3. Finish the block
  • Sew a strip J to the left and right edges of the building unit.
  • Sew strip I to the lower edge of the building unit.
  • Sew rectangle K to the upper edge of the building unit.


Storefronts Block 6.jpg


Store #6 (Make 2)


Part of Block
Letter
Size of Piece
Building
A
1 strip 1 1/2 x 12 1/2”
B
4 strips 1 1/2 x 4 1/2”
C
2 strips 1 1/2 x 5 1/2”
Windows
D
2 rectangles 3 1/2 x 4 1/2”
Door
E
1 rectangle 2 1/2 x 5 1/2”
Roof
F
2 strips 1 1/2 x 3 1/2”
G
2 rectangles 2 1/2 x 3 1/2”
Sign
H
1 square 4 1/2 x 4 1/2”
Sidewalk
I
1 strip 1 1/2 x 14 1/2”
Background
J
2 strips 1 1/2 x 10 1/2”
K
2 strips 1 1/2 x 3 1/2”
L
2 strips 1 1/2 x 4 1/2”
M
1 rectangle 3 1/2 x 14 1/2”


Piecing Instructions


1. Assemble the building.
  • Sew a strip B on either long side of each rectangle D, giving you 2 window units.
  • Sew a strip C to the lower edge of each window unit.
  • Sew a window unit to each of the long edges of rectangle E.
  • Sew strip A to the upper edge of the building unit.
2. Assemble the roof.
  • Sew a strip K to the upper long edge of each G rectangle.
  • Sew a strip F to the right edge of one roof unit and another strip F to the left edge of the other roof unit.
  • Sew a strip L to the upper edge of each roof unit.
  • Lay out in a row from left to right: roof unit with strip F on the right, square H, and roof unit with strip F on the left. Sew them together.
  • Sew the lower edge of the roof unit to the upper edge of the building unit.
3. Finish the block
  • Sew a strip J to the left and right edges of the building unit.
  • Sew strip I to the lower edge of the building unit.
  • Sew rectangle M to the upper edge of the building unit.`

Finish the Quilt


Part of Quilt
Letter
Size of Piece
Sashing for lower edge
A
1 rectangle 3 1/2 x WOF
1 rectangle 3 1/2 x 7”
Sashing for side edges
B
4 rectangles 3 1/2 x 30”
Batting
C
1 rectangle 51 x 62”
Backing
D
2 rectangles 26 x 62”
Binding
E
6 strips 2 1/4” x width of fabric


1. Arrange quilt blocks as desired (see diagram earlier in the pattern for suggestion). Sew   
   blocks together in 4 rows of 3 blocks each.
2. Sew the 4 rows together to create a grid of 12 blocks, 4 high and 3 wide.
3. Sew both A rectangles together to make a 3 1/2 x 48” rectangle. Sew this rectangle to the
   lower edge of the quilt top.
4. Sew 2 B rectangles together to make a 3 1/2 x 59 1/2” rectangle. Repeat with the other B
   rectangles. Sew these to the right and left edges of the quilt top.
5. Stack in this order from bottom to top: D (right side down), C, and quilt top (right side up).
   Baste with pins or adhesive basting spray and quilt as desired.
6. Trim off excess batting and backing. Sew the E strips together at the short ends to make a    
    long strip of quilt binding. Press seams open and press the strip in half lengthwise, wrong
    sides of the fabric together.
7. Use the binding to bind your quilt by hand or machine.

Remember, if you make one of these quilts or blocks, please share them on social media with the hashtag #storefrontsquilt and be sure to tag me @fabricmutt!

Saturday, August 5, 2017

Storefronts Quilt Pattern (Window Shopping at the Five & Dime)

Free Storefronts Quilt for Five & Dime fabric by Heidi Staples of Fabric Mutt for Penny Rose Fabrics

What a week it's been! Seeing Five & Dime arrive in shops, looking at beautiful photos of projects made with my fabric by talented friends -- I can't tell you how much I've enjoyed it all. Today is the last day of the tour, and to celebrate, I'm sharing a free pattern that I designed for this collection: the Storefronts Quilt.

NOTE: if you have trouble accessing the pdf file either through the link above or the link later on in this post, just click on this post instead for a non-pdf version. 

My love of vintage items doesn't stop at music, movies, ephemera, and packaging (as I explained in great detail in this post). I'm also a big fan of classic architecture. And what could be a better match for a fabric collection called Five & Dime than a quilt pattern featuring rows of retro shops? I actually studied storefronts from the early to mid-1900s before sketching the design for this quilt, and I absolutely love the way it turned out. Not only is it a relatively easy quilt to piece, but it's also incredibly fun to choose the fabrics you use for each block.

Free Storefronts Quilt for Five & Dime fabric by Heidi Staples of Fabric Mutt for Penny Rose Fabrics

I made two versions of this quilt. One uses my Five & Dime fabric. I loved using some of the Packaging labels as store signs and filling the windows with my Merchandise print in all three colorways.

Free Storefronts Quilt for Five & Dime fabric by Heidi Staples of Fabric Mutt for Penny Rose Fabrics

Keep in mind that the quilt in these pictures was made with strike-offs, so the colors are slightly different from the final color palette which turned out a bit softer. Truthfully, it makes this quilt even more special to me to know that it can't be reproduced; it's one of a kind. My dear friend Becca of Bryan House Quilts took time out from her own Spring Quilt Market prep and the million projects she has in the works, not to mention planning for her recent move to Europe, to quilt it for me last May. I really think she must be a super hero in disguise.

Free Storefronts Quilt for Five & Dime fabric by Heidi Staples of Fabric Mutt for Penny Rose Fabrics

The other version I made was actually the first one I created, my prototype. I stitched it together using pieces from my personal stash and enjoyed myself immensely picking fabrics according to what kind of store each block was going to be.

Free Storefronts Quilt for Five & Dime fabric by Heidi Staples of Fabric Mutt for Penny Rose Fabrics

This version includes shops that sell music, women's clothing, bridal gowns, candy, stationery, baked goods, children's clothing, sewing notions, party supplies, cookware, gardening products, and pets. I spent several months hand quilting each of the blocks whenever I had a free moment. It was truly a delight to sew from beginning to end.

Free Storefronts Quilt for Five & Dime fabric by Heidi Staples of Fabric Mutt for Penny Rose Fabrics

The pattern starts out with cutting instructions for an entire quilt, featuring prints from my Five & Dime collection and Riley Blake Designs Basics. There are six blocks which are each used twice in the quilt. However, I know that many of you are like me and enjoy using a single block for a pillow or bag or some other small project, so I give you cutting directions for each block by itself as well. I hope this will make the pattern more user friendly. At the moment I'm making a project featuring a half-size block of one of the storefronts, and I love it so much! I'll be sharing it with you soon.

Free Storefronts Quilt for Five & Dime fabric by Heidi Staples of Fabric Mutt for Penny Rose Fabrics

You can access a PDF version of the Storefronts pattern here and find a shop that carries Five & Dime here. Please do be sure to add the hashtags #fiveanddimefabric and/or #storefrontsquilt if you share photos of your projects on social media!

I have to give credit to my sweet friend Gina of Party of Eight: Our Story who helped me test this pattern and made a darling Storefronts quilt of her own. If you're not following her blog or her Instagram account, you are definitely missing out on some beautiful projects!

I want to extend so many thanks again to my wonderful friends Lauren, Elea, Suzy, Amy, and Minki who took time out of their busy schedules this week to make beautiful projects with Five & Dime (click on their names to see what each of them made). You girls continue to amaze me with your talent and generosity!

I also need to thank my unbelievably patient and supportive husband James, who not only took all the photos in this post for me in front of a wonderful vintage shop along the main street of Boerne, TX, but who also gave me a new computer with a fancy monitor and stylus for Mother's Day last year so that I could finally take a shot at my dream of designing fabric. I can't tell you how much I love this man who always believes in me more than I believe in myself. You're the best, sweetheart!

Free Storefronts Quilt for Five & Dime fabric by Heidi Staples of Fabric Mutt for Penny Rose Fabrics

And to you, my dear friends who are reading this post, thank you for all the encouraging notes and comments you've shared with me as you've watched this collection come to be. You have blessed me so much, and I'm thrilled to share these fabrics and this pattern with you at last. I hope they're as much fun for you to sew as they were for me to create.

Sunday, July 30, 2017

Five & Dime Blog Tour


All this week look for inspiration from some of my favorite bloggers who have been sweet enough to sew up amazing projects with my Five & Dime fabric collection! Here's the schedule:

7/31 - Lauren at Transient Art
8/1 - Elea at Elea Lutz Design
8/2 - Suzy at Suzy Quilts
8/3 - Amy at Diary of a Quilter
8/4 - Minki at Minki's Work Table
8/5 - Heidi at Fabric Mutt

I'm so excited to see what these talented ladies make with my fabric. You will definitely want to stop by their blogs for a peek!

Five & Dime is shipping to stores right now and should be available later this week. I've updated my list of shops and distributors that will be carrying the collection on this page, so be sure to check it out. It's not too late for your local quilt shop to order it also. Just ask them to contact Penny Rose Fabrics if they'd like to carry it. 

If you're sewing with Five & Dime, please share photos. Tag me @fabricmutt on social media and add the hashtag #fiveanddimefabric. I would love to see what you're making!

Have a beautiful week, friends!

Monday, July 10, 2017

Little Dolly Sewing Kit

Little Dolly Jet-Set Case from Sew Organized for the Busy Girl by Heidi Staples of Fabric Mutt

Everything my friend Elea Lutz makes is magical, and her latest collection, Little Dolly, is no exception.


Vintage florals, dapper birds, loopy swirls that belong on top of a chocolate cupcake -- it's all so incredibly sweet. And with the project book and adorable accessories that Elea has created to go with these prints, there's a very good chance that I'll be sewing some dolls for my daughters before the year's out.

Little Dolly Jet-Set Case from Sew Organized for the Busy Girl by Heidi Staples of Fabric Mutt

For my project, I decided to make a half size version of the Jet-Set Case from my book Sew Organized for the Busy Girl -- just perfect for a traveling sewing kit. I switched out the extra zipper pouch inside for a pincushion and made the exterior of the case out of patchwork squares. I also added a fun tape measure twill tape accent inside and changed the closure to a simple button and elastic. I'm so happy with how it all turned out!

Little Dolly Jet-Set Case from Sew Organized for the Busy Girl by Heidi Staples of Fabric Mutt

To give things an extra handmade touch, I quilted both the case exterior and the pincushion top by hand, using a thick craft & button thread from Coats to add more texture to the piece. I also stitched the binding on by hand to give the case a more finished look.

Little Dolly Jet-Set Case from Sew Organized for the Busy Girl by Heidi Staples of Fabric Mutt

Did I enjoy this project? Let's just say that my husband was quite amused to hear me repeating over and over while I worked, "I love this so much!"

Little Dolly Jet-Set Case from Sew Organized for the Busy Girl by Heidi Staples of Fabric Mutt

You won't want to miss a single stop on the Little Dolly tour:

7/10 Heidi Staples @fabricmutt
7/11 Casey Putney @sewstitchhappy
7/12 Jennie @cloverandviolet
7/13 Lauren Nash @transientart
7/14 Minki Kim @zeriano
7/15 Elea Lutz @elealutz

Happy sewing, friends!

Friday, July 7, 2017

Slow Sewing: the Uppercase Quilt

Uppercase Quilt by Heidi Staples for Fabric Mutt

Back when Janine Vangool, publisher of Uppercase magazine as well as a line of superb books all written "for the creative and the curious," first introduced her second collection with Windham Fabrics, I was taken with the mix of prints. The line (officially titled Uppercase: Dots, Dashes, and Diamonds) seemed just as much at home among modern designs as they were in my collection of vintage reproductions. She was kind enough to have a bundle of fabric sent to me in order to make what I originally intended to be another version of my Big Bear Cabin Quilt. I've learned over the years, though, that plans change, and sometimes the fabric takes you in a new direction. I had no idea that this project was going to alter my entire approach to quilting.

Uppercase Quilt by Heidi Staples for Fabric Mutt

When I started this quilt, I was coming to the end of the crazy schedule that always happens before Quilt Market in the spring and fall. I had been churning out projects for different fabric companies as well as sewing up samples with my own first fabric collection, Five & Dime. It was enjoyable work but stressful, as it always is when you're trying to make a lot of different things of as high a quality as you can manage while still meeting all your deadlines. By the time I picked up the stack of Uppercase fabric, I was riding the raw edge of burnout, feeling physically drained and creatively exhausted. Suddenly I craved nothing more than simplicity, a project that would be crafted with care over time.

I scrapped the Big Bear Cabin pattern in favor of starting a log cabin block in one corner of the quilt and building it out to the opposite edge, placing the prints in color order and alternating between darker and lighter fabrics. After basting the quilt, I spent a month of evenings hand quilting along each of the rows in black thread. Once that was finished, I framed it all in binding made from a black print peppered with tiny white diamonds.

Uppercase Quilt by Heidi Staples for Fabric Mutt

This was by far the largest quilt I have ever quilted entirely by hand, and it was the first time I've hand stitched the binding on the back of a quilt in at least four years. With the simple design and hand quilting, it looks as if I could have just pulled it out of a trunk full of vintage quilts. It feels so different from any quilt I've made before, and I really believe it all lies in the fact that I made this piece slowly by hand over a long stretch of time.

There's something almost mystical that happens when you hand quilt a project for weeks on end. It becomes part of you in a way that a quick project or even a machine quilted project just can't quite equal. You enjoy the hand stitching at first and then after a while it grows a bit tedious and perhaps even challenging but you keep going. And the more you sew those even stitches along the rows over and over again, the more of your heart goes into it. The tedium remarkably transforms itself back into enjoyment, and what seemed like monotony becomes a peaceful sort of contentment. Life happens around you while you're sewing, and that becomes a part of the quilt too. You have conversations with people and you watch favorite movies and you think...you think a lot. It becomes a part of your day that you look forward to, that quiet meditation with your hands that also quiets your heart. And the day comes when you sew those last few stitches and you feel a strange mixture of joy and sadness. It's so wonderful to have it done, but you'll miss it somehow, these nights with this particular quilt in your hands.

Uppercase Quilt by Heidi Staples for Fabric Mutt

I've been a champion for small, quick sewing projects for a long time now. I love sewing little things that can be made in an afternoon or weekend. But over time, I've watched myself neglect some of the projects that I wanted to make because my schedule was too full of commitments to projects that I had to make. There is a danger sometimes, I think, for us to turn handmade pursuits into our own version of a sweatshop. We produce item after item as quickly as we can, needing fresh material for our blogs or our social media accounts. We feel compelled to accept every invitation that comes our way for fear of offending someone or missing out on an opportunity that we'll later regret passing by. Yet I'm reminded again how important it is to have priorities, to make peace with the fact that sometimes I will have to say "no," to set aside time for projects that have no other purpose than to bring me joy -- especially the slow sewing and hand quilting which I've been too busy to attempt for too long.

My Uppercase quilt will always be a reminder to me that the journey of making is just as important as the finished creation. And I'm truly eager to begin my next adventure in the days ahead.

Saturday, July 1, 2017

The Story Behind Five & Dime

Five & Dime Fabric for Penny Rose Fabrics by Heidi Staples of Fabric Mutt

My first fabric collection, Five & Dime, comes out this month through the wonderful people at Penny Rose Fabrics. It seems like a million years ago now that I made those first sketches on paper for what would eventually become a happy set of prints centered around a 1940's dime store.

Five & Dime Fabric for Penny Rose Fabrics by Heidi Staples of Fabric Mutt

This collection comes from my deep love of vintage style and design, much of which was instilled in me by my parents and grandparents. Even though I was born in 1977, I grew up surrounded by movies and music of the 1930's, 40's, and 50's. I was enthralled by musicians like the Andrews Sisters, Glenn Miller, Frank Sinatra, and Ella Fitzgerald. My favorite movie stars included Cary Grant, Doris Day, Katharine Hepburn, John Wayne, and Bob Hope. And every afternoon, I was glued to our television set to watch Zorro, the original Mickey Mouse Club, and classic sitcoms like I Love Lucy or The Dick Van Dyke Show. My grandmother collected antiques, and she often took my sister and me along to visit her favorite shops in Southern California, always giving us each a few dollars to buy a vintage "treasure" of our own. Most of my hours, though, were spent buried in books from the town library and our own family shelves. I read voraciously, including favorites like the original Boxcar Children books and every copy of Nancy Drew and the Hardy Boys that I could get my hands on. So when it came time to work on my first fabric collection, I knew that I wanted it to be an illustrated version of this time period that I had come to love so much. 

As I was developing Five & Dime, I was specifically inspired by two of my favorite classic movies The Best Years of Our Lives and Sunset Boulevard, both of which feature scenes in drug stores (including the famous Schwab's Pharmacy featured in the latter). Drug stores and dime stores weren't the same thing, but there's a similar feel to both establishments. Technically speaking, the prices listed in my designs are not all historically accurate, since prices began to go up in the 1940's when stores had to raise them in order to make a profit. 
There's actually a vintage five & dime store building in Fredericksburg, TX which is still in operation -- at higher prices, of course! -- and my daughters loved visiting it with me as part of my research.

Believe it or not, I even put together a music playlist while I was working on this collection:

Sentimental Journey by the Les Brown Orchestra with Doris Day
Baby, Won’t You Please Come Home by Jo Stafford with Billy Butterfield (V-disc edition)
Song of the Volga Boatmen by Glenn Miller
Sweet Lorraine by Frank Sinatra
Opus No. 1 by Tommy Dorsey
It’s Only a Paper Moon by Ella Fitzgerald & the Delta Rhythm Boys
Straighten Up and Fly Right by the King Cole Trio
Tico Tico by the Andrews Sisters
On the Sunny Side of the Street by Benny Goodman & Peggy Lee

The links above will take you to recordings of these songs on YouTube. Every one of these titles is from the 1940s, and I listened to them constantly while I worked on this line. Nothing transported me faster to the time period than the music of these amazing artists!

It's been so interesting to approach fabric design as a quilter. I wanted to create the sort of prints that I look for in a collection when I purchase fabric. Color is always important to me, and I wanted to be sure that my collection included a full spectrum of colors (my color scheme was actually inspired by the cloth bindings of vintage books in our family library). I love text prints, low volume fabrics, and designs for fussy cutting, so I tried to include all of those options as well. Keep in mind that the fabrics shown in this post are all strike-offs, so the final colors will be slightly different in a few of the prints.

Five & Dime Fabric for Penny Rose Fabrics by Heidi Staples of Fabric Mutt

I did lots of research into the dime store phenomenon as well as 1940's packaging before I started illustrating. Vintage packaging absolutely fascinates me. I can't get enough of the colors, the styling, the typography. My illustrations hardly do them justice, but it was so much fun to immerse myself in artwork from authentic merchandise before I started sketching my Packaging print. 

Five & Dime Fabric for Penny Rose Fabrics by Heidi Staples of Fabric Mutt

I wanted a stripe of some kind for binding, so the Diamonds print was born, partially inspired by one of my favorite childhood movies, Bringing Up Baby with Cary Grant and Katharine Hepburn. It prominently features an old song called "I Can't Give You Anything But Love, Baby" containing a line that says "Diamond bracelets Woolworth's doesn't sell, baby." Woolworth's, of course, was the most famous dime store chain in history.

Five & Dime Fabric for Penny Rose Fabrics by Heidi Staples of Fabric Mutt

I am constantly using lists to keep myself on top of things in my personal life, so I had to include a Checklist print. It makes a wonderful supporting basic for the collection, and I know I'm going to be using this one in lots of upcoming projects.

Five & Dime Fabric for Penny Rose Fabrics by Heidi Staples of Fabric Mutt

The design team at Penny Rose suggested that I create the Merchandise print, so I spent an afternoon sketching out little groups of items that you would have found in a dime store. This was another print created with fussy cutting in mind, and I loved drawing these tiny sewing notions, toys, greeting cards, books, toiletries, and candies.

Five & Dime Fabric for Penny Rose Fabrics by Heidi Staples of Fabric Mutt

My first steady job when I was 17 years old was working at Howie's Market, a little grocery store in my home town of Sierra Madre, California. A gentleman used to hand letter all the written price ads in the store windows, and that was part of the inspiration behind the Price Tags design. I also modeled this after the hanging price signs in the drug store scenes of The Best Years of Our Lives (such a wonderful movie, by the way -- I highly recommend it). I absolutely love this print, especially in pink. Wouldn't it make the cutest reusable shopping bags?

Five & Dime Fabric for Penny Rose Fabrics by Heidi Staples of Fabric Mutt

It was so fun to put together the details on the Receipts print, coming up with stories behind each of the customers and their accompanying shopping list. This design was definitely inspired by my love for vintage paper ephemera. All the handwriting on these receipts is my own.

Five & Dime Fabric for Penny Rose Fabrics by Heidi Staples of Fabric Mutt

I had originally planned to do a colored floral print on a white background, but I when I started playing with the colors in Adobe Illustrator, I found that I loved the crisp look of white shapes on a colored background. You'll notice peaches, pears, and bluebonnets sprinkled among the flowers -- all a nod to my new home state of Texas.


This collection was an absolute delight to create and so very personal for me. Just for fun, I tucked the names of all four of my husband's and my grandmothers into the packaging and receipts prints. Jeanie Doll, for instance, was my grandfather's special nickname for my grandmother. It gives me so much joy to know that she's a part of this collection even though she's no longer here to see it.

I'll be adding a Fabric page on this blog soon and would love to include shops that are selling Five & Dime. If you're a shop owner who'll be carrying it, please email me or leave a comment on this post so that I can add a link to your website. And if you're sewing with Five & Dime, please be sure to tag me on Instagram @fabricmutt, using the hashtag #fiveanddimefabric. I am so excited to see what you make with these prints!

Thanks for letting me share with you today, sweet friends. Happy sewing!
Related Posts Plugin for WordPress, Blogger...