Monday, August 29, 2016

Lovely Little Patchwork Tour: Cross Stitch Sewing Book


I'm living in the land of secret projects these days. There are so many things I've been working on that I wish I could share but just can't yet. It's so hard to keep secrets!


Thankfully, today I can show you my project for the Lovely Little Patchwork blog tour. Kerri has written an adorable book full of patchwork sewing for the seasons. It was on my must-buy list even before she sent me a copy for this tour, and it's full of all the vintage colorful patchwork goodness that I love so much.


I chose the Cross Stitch Sewing Book for my project and decided to try making a simplified version, replacing the cross stitch panel on the front and the hexagon panel on the inside for pieces of my feature fabric print, Polly Goes to Paris. I also switched out the fabric ties for an elastic/button closure, one of my favorite options. Though I usually like to use a full spectrum of color for my projects, this time I stuck to a fairly strict palette of white, black, pink, and green (with a tiny hint of ice blue in that strawberry print on the front). It was a fun challenge for me, but I loved the simplicity of the Polly print and felt that a tight range of colors would let it shine.


The inside of the book is full of space for notions and works in progress. Just for fun, I used a print featuring rows of houses for the inner right lining panel, as if Polly was cycling through the streets of Paris. This book is just begging for a striped binding, and I went with classic black and white. I decided to gift this to my mother who is the queen of cross stitch. It will also be a perfect storage space for the occasional felt projects she sews.


There are so many other sweet projects in Kerri's book that I would love to try. The Strawberry Patchwork Bag and Back to School Pencil Pouch are at the top of my list.


There will be cuteness galore on this tour over the next month. Here's the lineup:

Date
Participant
Instagram
Blog
   27.08.2016     
28.08.2016
Amanda Niederhauser
Sarah Edgar
29.08.2016
Heidi Staples
30.08.2016
Megan Jimenez
02.09.2016
Cheri Lehnow
03.09.2016
Ange Hamilton
04.09.2016
Sedef Imer
05.09.2016
Kimberly Jolly
06.09.2016
Samantha Dorn
07.09.2016
Ayda Algın
08.09.2016
LeAnne Ballard
09.09.2016
Sharon Burgess
10.09.2016
Lauren Wright
11.09.2016
Kate May
12.09.2016
Debbie Homick
13.09.2016
Wynn Tan
14.09.2016
Kim Kruzich
15.09.2016
Jennie Pickett
16.09.2016
Veronica AM
17.09.2016
Nadra Ridgeway
18.09.2016
Amanda Woodruff
19.09.2016
Minki Kim
20.09.2016
Sharon Yeager
Instagram
21.09.2016
Peta Peace
22.09.2016
Sarah Scott
23.09.2016
Kristin Cobb
Instagram
24.09.2016
Erin Cox
25.09.2016
Kerri Horsley

Kerri will be giving away a copy of her book at that last stop, so be sure to stop by!

Happy sewing, friends!

Tuesday, August 16, 2016

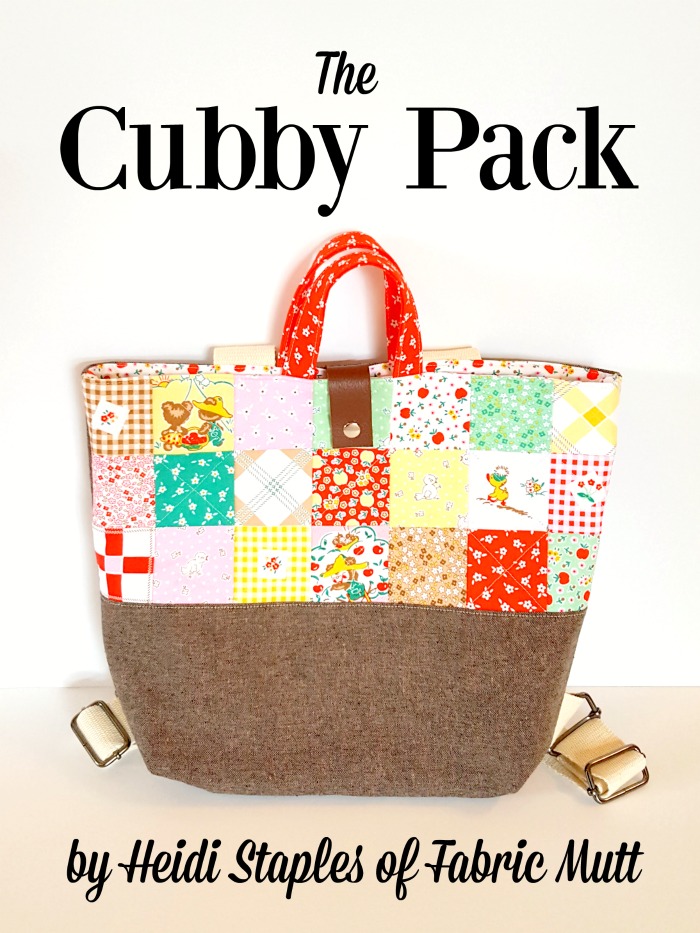
The Cubby Pack Tutorial

The Cubby Pack backpack tote sewing tutorial by Heidi Staples of Fabric Mutt

We had our first official day of school yesterday, and I'm so happy to slip back into our homeschooling routine again. No babies in this house any more -- everyone's in elementary school now, with my oldest entering fifth grade this year. There was a time when I missed my life in an actual classroom, feeling a bit lost and left behind here at home. Not any more. I think I feel more content with life than I ever have before. These days spent working, teaching, sewing, designing, helping, sharing -- they are so full, so good.

The Cubby Pack backpack tote sewing tutorial by Heidi Staples of Fabric Mutt

The beginning of a new school year has always been one of my favorite things, and what better way to celebrate than with a free tutorial? I've been promising a pattern for this combination backpack/tote bag for a while, and who better to model the Cubby Pack for you but my own little Bear. She was so excited to wear it for the first time today!

This pattern is meant for a child, but you could easily make it work for an adult by just making the straps longer. It's actually a surprisingly simple project to sew. The most complicated part is probably threading the backpack straps, and rather than reinvent the wheel, I just send you over to a brilliant tutorial by the clever folks at Colette Patterns who have explained things far more clearly than I ever could.

The Cubby Pack backpack tote sewing tutorial by Heidi Staples of Fabric Mutt

I'm giving you just the basic backpack pattern here, but this is so easy to customize. Add an inner pocket or zipper pouch for smaller items. Ditch the patchwork and use just one fabric for the exterior to make it a quicker finish. Add one or two more leather closures to the top to keep things buttoned up even more firmly. For me, a tutorial is a launching pad for even more great ideas. I love to see how people play with my patterns to make just what they need!

Wouldn't this be a fun project to sew for (or even with!) your favorite student? If you make one, be sure to share a picture with all of us on Instagram -- tag it #cubbypack and tag me too @fabricmutt!

Okay, here we go!

Materials and Measurements

Finished size: 9 1/2" wide x 10" tall x 3 1/2" deep

Fabric:
For:
Cutting:
21 cotton print scraps or 1 mini charm pack
Front exterior panel patchwork
21 squares 2 1/2 x 2 1/2”
1/2 yard linen
Front ext. panel
Back ext. panel
1 rectangle 7 x 14 1/2"
1 rectangle 13 x 14 1/2”
1/2 yard batting
Exterior interfacing
2 rectangles 13 x 14 1/2”
1/2 yard white apple print
Lining
2 rectangles 13 x 14 1/2”
1/4 yard red floral print
Tote handles
1 rectangle 3 x 16”
1/4 yard Pellon Craft Fuse fusible interfacing
Tote handles interfacing
1 rectangle 3 x 16”
1 1/2  yards 1 1/2” wide cotton webbing
Main straps
Buckle straps
2 pieces 24” long
2 pieces 3” long
Leather scrap
Bag closure
1 strip 1 x 2 3/4”
Findings: 4 metal slides (1 1/2” wide), 1 metal snap, adhesive basting spray, chopstick or turning tool, binding clips, ruler, rotary cutter

Sewing Notes

All seams are 1/4" unless otherwise stated.
Press seams toward the darker fabric or open if you prefer.
RST = right sides together
WST = wrong sides together

Tutorial Instructions


1. Sew the 21 patchwork squares together in 3 rows of 7 as shown in the photo above. Sew the 7 x 14 1/2" linen piece to the lower long edge of the patchwork piece to form the exterior front.

2. Use the adhesive basting spray to fuse the wrong side of the exterior front and back panels to the 13 x 14 1/2" batting pieces. Topstitch 1/8" below the seam between the patchwork and linen on the exterior panel. Quilt as desired.


3. Place the two lining panels RST and trim a 2 1/2" square from both of the lower 14 1/2" edge corners. Sew the two panels together along the sides and lower edge, but do not stitch along the open corners. Also be sure to leave an opening of 6-7" along the lower edge for turning later on. Cut 2 1/2" squares out of the lower edge corners of the exterior panels also, but do not sew them together just yet.


4. Box the corners of the lining. Push down on a side seam so that it lies directly on top of the seam that holds the lower edges together, creating a triangle of batting on that side. Use your ruler to measure off a 4" line down the side of that triangle facing the lining (the side seam should be resting at the 2" line). Use a pencil or fabric marker to trace that 3" line and then use your ruler to measure and cut a 1/4" seam just beyond that (which will measure 3 1/2" long). Check that your seams match up before stitching down the pencil line. Repeat on the other side of the lining.


5. Make the tote handles just as you would make double fold bias tape. Fuse the wrong side of the handle piece to the Craft Fuse interfacing (following the manufacturers instructions). Fold the piece in half lengthwise, press, and then unfold. Now fold the long sides of the rectangle in toward the center fold and press again. Fold along that center fold again, sandwiching those raw edges in the middle, and stitch 1/8-1/16" from the edge along both long ends of the resulting 3/4" wide handle. Cut the piece in half so that you have two pieces, each 8" long.


6. On the exterior front panel, place the raw ends of one handle piece along the top edge of the panel so that the inside edge of each end lines up with the right and left sides of the center patchwork square (see above photo). Baste in place 1/8" from the top edge. Repeat with the back panel and other handle, using the placement on the front panel as a guide.


7. Attach one half of the metal snap to a short end of the leather strap according to the manufacturer's instructions, centering it about 1/2" from the short end. Center the other short end of the strap on the top edge of the back exterior panel, RST, and baste in place 1/8" from the top edge. Save the other half of the metal snap for later.


8. Make the backpack straps using the Colette tutorial found here. (Even though this tutorial uses a longer length for the long strap, it will still work for this project.) Place the finished straps RST against the back exterior panel, tightening them up so that they are as short as possible while still lying flat against the panel and not wrinkling up the fabric (see photo above -- this will keep them out of the way while you sew). Baste the ends of the long straps in place on the top edge of the panel just to the right and left of the handles. Baste the ends of the short straps in place on the right and left sides of the panel, about 1/2" above the cut out square in each corner. (BTW the photo above is after I sewed together the panels in the next step but before I boxed the corners. I had forgotten to take a photo of the strap placement and wanted to make sure you could see it before I moved on!)


9. Sew the exterior panels together along the sides and lower edge, leaving the cut out squares open just as you did with the lining -- though without the opening in the lower edge for turning. Box the lower corners of the exterior as you did in step 4 above. Turn the exterior piece right side out.


10. Slip the exterior piece inside the lining piece with RST, matching up the side seams and holding them together around the top opening with binding clips. Sew all the way around the opening. Reach in through the gap in the lining and pull the exterior of the bag out through the lining, pushing out the corners gently with a chopstick and pressing them.


11. Tuck the raw edges inside the lining gap and stitch them closed 1/8-1/16" from the edge. Push the lining down into the bag and carefully press it one last time.


12. Center the other half of your metal snap about 1/2" from the lower edge of the top middle patchwork square on the exterior front panel and fasten it in place according to the manufacturer's instructions. Finish the bag by topstitching 1/8" from the upper edge all the way around the top opening. (I recommend that you start on the back behind the left strap so that you can make it all the way around without having to stop and move straps out of the way.) Fill up your Cubby Pack with school supplies and send your student off to class!

The Cubby Pack backpack tote sewing tutorial by Heidi Staples of Fabric Mutt

Happy sewing, my friends!

Thursday, August 11, 2016

Apple Farm Tour


It's so lovely to be working with another collection from my sweet friend Elea Lutz! Her Apple Farm line for Penny Rose Fabrics is simply adorable and just right for back-to-school projects. I've been promising you a tutorial for the child's backpack tote that I made as a sample for Spring Quilt Market, and this seemed like the perfect opportunity to write one while I worked on a sample for this blog tour. I'll have the tutorial up on the blog in the next few days.


This child sized backpack is really just a tote bag with extra straps -- really handy when you or your child would rather carry the bag at your side instead. I've included a leather fastener to keep the opening closed and a zipper pouch inside for holding the little things that might fall out the top if a child bends over while wearing the backpack. For this version, I added three rows of patchwork squares -- so much fun to fussy cut with this darling fabric!


Is there anything more useful than a zipper pouch? I never met one I didn't like!


Elea's fabric...what can I say? I love it so much. Her prints are always full of vintage sweetness and cheerful colors. They make me so happy, and I love to sew with them. Apple Farm reminds me of when my daughters were little. Every fall we would drive almost an hour away from our Southern California home to a farm in the hills where we could pick apples and pumpkins. The girls absolutely loved it, and we had so much fun there over the years. These prints bring back all those great memories.

There are so many amazing people on the Apple Farm tour. I've already been enjoying pictures of all the other stops this week on Instagram. Tomorrow be sure to visit Lindsey at Fort Worth Fabric and Ange at A Little Patchwork. Both of these super talented ladies will have gorgeous things to share, I have no doubt!

Monday, August 8, 2016

Pretty Playtime QAL: Butterfly Block

Pretty Playtime Butterfly Block sewn by Heidi Staples of Fabric Mutt

It's such a pleasure to be today's stop on the Pretty Playtime QAL. One of the things I love most about this sampler quilt is that so many of these blocks will stand alone beautifully on other projects like pillows and bags. I've been collecting Elea's fabric since her first release of Milk, Sugar & Flower, so I wanted to use a bit of all her collections for this block (except the Christmas one, of course). I was even able to sneak in a few Apple Farm prints since I'm on the collection blog tour this week (check back on Thursday to see my project for that -- I can't wait to share!). Since I only had charm squares of some prints, I decided to shrink the pattern down to half size and turn it into a sweet little pouch.

Pretty Playtime Butterfly Block sewn by Heidi Staples of Fabric Mutt

I am SO in love with this project! The rainbow of colors, the black and white Swiss dots in the background by Riley Blake Designs (probably my all-time favorite neutral print), that tiny butterfly on the side loop -- it's all just patchwork happiness. The finished pouch is only 6" square, small enough to fit inside my purse if needed. It would make a darling little case for basting hexagons on the go. 

Pretty Playtime Butterfly Block sewn by Heidi Staples of Fabric Mutt

The backing is a red floral print from Strawberry Biscuit. As always, I added a leather pull to the navy blue zipper. It's a great finishing touch, and it really does make it easier to use the zipper.

Pretty Playtime Butterfly Block sewn by Heidi Staples of Fabric Mutt

I lined the pouch with Elea's floral stripe print from Milk, Sugar & Flower. I almost always like to use low volume prints for my linings since a light background makes it simple to find what you're looking for inside the bag -- definitely a helpful feature for me.

Be sure to visit all the stops on the Pretty Playtime QAL tour, sponsored by my lovely friends at Fat Quarter Shop. I can't wait to see everyone's finished quilts!

Week 2 - Erin from Why Not Sew?
Week 3 - Wynn from Zakka Art
Week 4 - Anorian from Samelia's Mum
Week 5 - Amy from Diary of a Quilter
Week 6 - Renee from Sewn with Grace
Week 7 - Jemima from Tied with a Ribbon
Week 8 - Amanda from Jedi Craft Girl
Week 9 - Debbie from Happy Little Cottage
Week 10 - Tina from Emily Ann's Kloset
Week 11 - Erica from Kitchen Table Quilting
Week 12 - Kristyne from Pretty by Hand
Week 13 - Heidi from Fabric Mutt
Week 14 - Brigitte from The Family Hearth
Week 15 - Lorrie from Sew Mod Designs
Week 16 - Kristin from They Grow Up Too Fast

Happy sewing!

Monday, August 1, 2016

Candied Snowflake Pillow


Like so many of you, I was saddened to hear that Quilter's Newsletter was going out of print at the end of this year. Thankfully, I was able to get one project published in their special Christmas edition which comes out this month: my Candied Snowflake Pillow.


I love taking traditional blocks and updating them with more modern fabric choices. The design of this pillow is based on the Texas Treasure block, first published in the 1930's. Bright candy colors and a black and white dotty background give this pillow a mid-century vibe. It's a cheerful take on Christmas sewing that can stick around for a while after the tree comes down.


Look for the pattern in "Best Christmas Quilts from Quilter's Newsletter," in shops now through mid-October.

Wednesday, July 20, 2016

Holiday Wishes: Merry Gifts Pillow


There's something really gratifying about sewing for Christmas in the middle of summer. Not only is it a fun change of pace, but it makes me feel miles ahead of the game to get a few holiday projects finished months before I need them. When Fat Quarter Shop asked me to be a part of their Holiday Wishes blog hop, I jumped at the chance to add another handmade Christmas project to my stash.


Sherri Falls has written a sweet little book full of holiday projects that will work for both experienced and beginning quilters. The piecing is all very straightforward, though some of her quilts are more advanced due to the large number of pieces involved in each block. When I saw her Merry Gifts Quilt pattern, I immediately thought of turning one of those gift blocks into a pillow cover. A couch dotted with present pillows would be so sweet for Christmas!

Merry Gifts Pillow sewn by Heidi Staples from Holiday Wishes book

I paired a few prints from Cotton + Steel's Garland collection with Alexia Abegg's black and white Starry fabric from her new Print Shop line. I love the red, pink, white & black color scheme, and those little deer just melt my heart every time I look at them. I also adjusted the block pattern slightly, trimming it so that the cover would fit a 12 x 20" pillow.

Merry Gifts Pillow sewn by Heidi Staples from Holiday Wishes book

The pillow is backed in Ornamentals in Cotton Candy from Garland. I love this print in every colorway, but the pink might be my favorite.

Merry Gifts Pillow sewn by Heidi Staples from Holiday Wishes book

This pillow is cute and retro and such a fun addition to my collection of hand sewn Christmas decor. Summer vacation has been pretty fabulous, but after making this project, I'm feeling just a bit more eager to see the temperatures drop again...

Sunday, July 17, 2016

Scrappy Improv Runner

Scrappy Improv Runner by Heidi Staples of Fabric Mutt

I bought a copy of The Improv Handbook for Modern Quilters by Sherri Wood last month and was fascinated by her ideas about quilting. Rather than working from a pattern, she works from a "score," a set of guidelines for the quilt instead of specific measurements and precise directions. So when Mom asked if I would make a small runner for the top of her bedroom dresser, it seemed like the perfect opportunity to give these techniques a try.

Scrappy Improv Runner by Heidi Staples of Fabric Mutt

For my score, I decided to use rectangles cut by hand with scissors instead of a rotary cutter. For the color scheme, I alternated a rainbow of colors with low volume prints -- a look that I adore. I love playing with fabric to find the right balance of color and light in my projects. This has a cheerful look that's so bright and happy.

Scrappy Improv Runner by Heidi Staples of Fabric Mutt

I backed the runner in a woven aqua gingham print from the new Checkers line by Cotton + Steel. It's quilted in straight lines about half an inch apart and bound in a low volume text print by Zen Chic.

Scrappy Improv Runner by Heidi Staples of Fabric Mutt

I have to admit, improv quilting is fun. While I get a lot of pleasure from working with traditional patterns, there's nothing like sewing things together without worrying about matching points or perfect seams. That kind of freedom is so appealing, and I will definitely be doing this again.
Related Posts Plugin for WordPress, Blogger...