

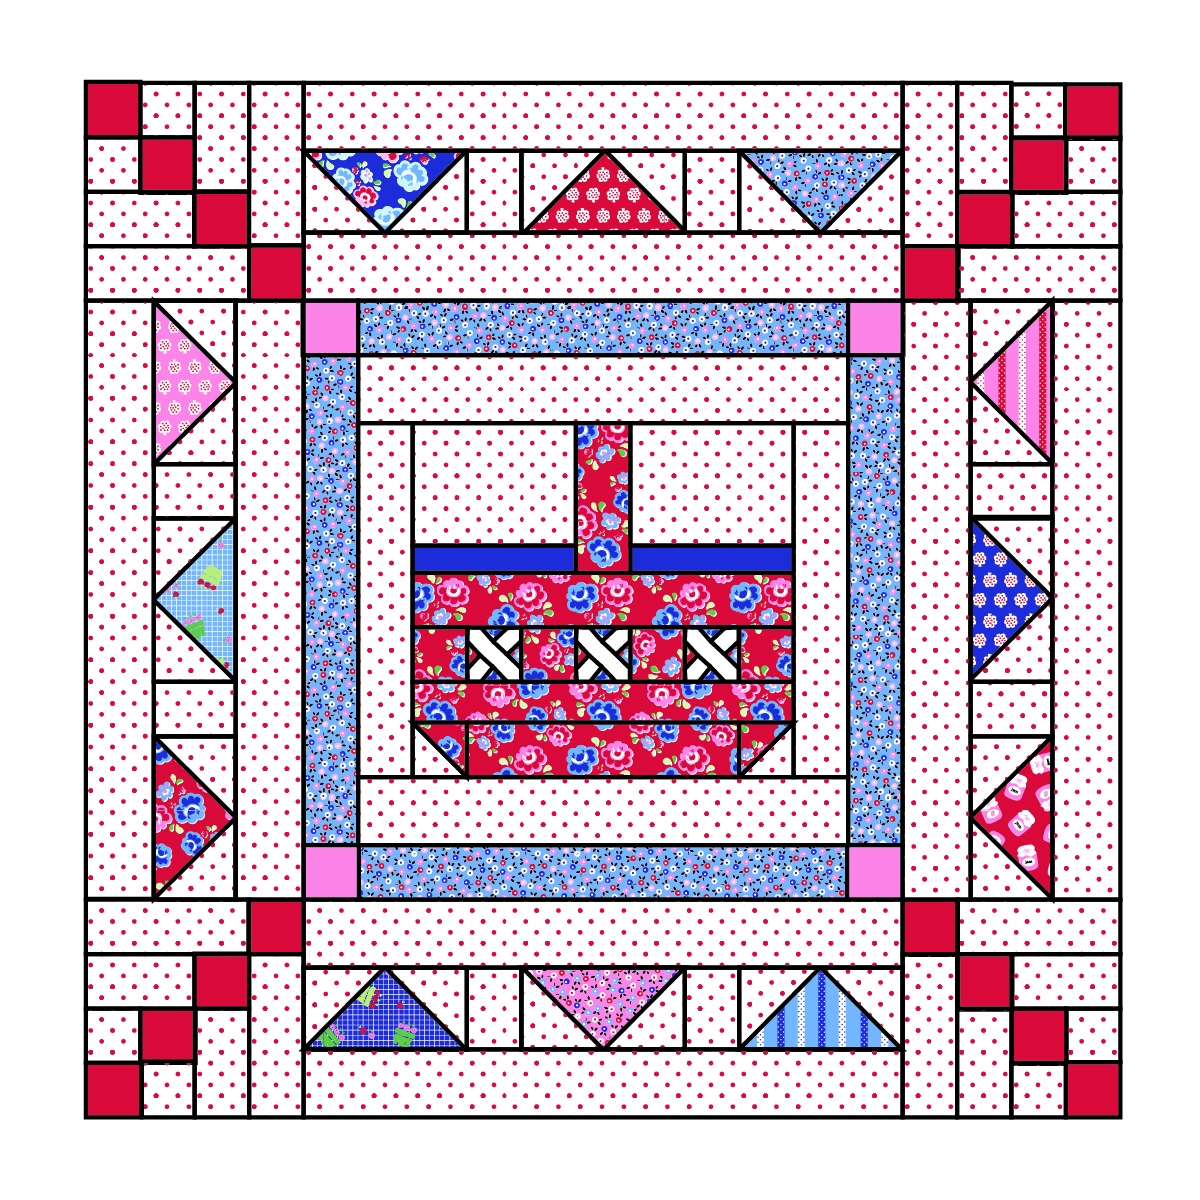
Last June while our family was on our amazing road trip back east, I was in touch with Riley Blake about the quilt pattern that I needed to design to go along with my Shortcake collection. There's not a doubt in my mind that I was heavily influenced by the textiles and art we saw in Williamsburg and Mt. Vernon when I finally sat down late one night with a pad of graph paper and my colored pencils in our hotel room and sketched out the diagram that would become my Picnic Medallion Quilt. It seems fitting that the quilt I designed to feature Shortcake, which as I shared in a previous post is really an ode to the joys of summer, was designed while our family was taking our first summer road trip. Just looking at this quilt brings back so many wonderful memories...

I sewed up a mini version of this pattern for my Quilt Market Booth last fall, which you can see in all the photos for this post, so I decided to give you the cutting directions for both a mini and a lap size quilt, since I like for you to have options. The mini makes such a cute wall hanging and is a great chance for smaller fussy cutting. As for the larger version...well, I just couldn't think of anything more perfect for a summer picnic quilt than one featuring napkins, plates, and a sweet little picnic basket in the center.

If you make one of these in either size, please share your pictures on social media! Use the hashtag #picnicmedallionquilt and don't forget to tag me @fabricmutt.
Here we go!
Picnic Medallion Quilt Pattern
By Heidi Staples of Fabric Mutt
Finished Quilt: 33” square (mini size) or 66” square (lap size)

Materials for Lap Size Quilt (less needed for mini quilt size)
1 fat quarter bundle of Shortcake
1 3/4 yd. Riley Blake Red Swiss Dot Reversed
1/2 yd. Main in Royal Blue
3/4 yd. Grove in Red
10” square Riley White Solid
1/4 yd. Riley Red Solid
1/4 yd. Rose Solid
1/4 yd. Petunia Solid
1/4 yd. Riley Royal Blue Solid
1/4 yd. Blueberry Solid
1/4 yd. Boy Blue Solid
4 yd. Berries in White (backing)
1/2 yd. Ribbons in White (binding)
Cutting Directions
Print
|
Part of Quilt
|
Mini Quilt
|
Lap Quilt
|
Main in Red
|
Basket cross blocks
Basket
Napkin
Plates
|
(12) 1” square (A)
(4) 1 1/2” square (B)
(1) 1 1/4” x 7 1/2” (C)
(1) 1 1/2” x 7 1/2” (D)
(1) 1 1/2” x 3 1/4” (E)
(1) 1 1/2” x 5 1/2” (F)
(1) 2” square (G)
(1) 2” x 3 1/2” (H)
(2) 3” square (I)
|
(12) 1 1/2” square (A)
(4) 2 1/2” square (B)
(1) 2” x 14 1/2” (C)
(1) 2 1/2” x 14 1/2” (D)
(1) 2 1/2” x 6” (E)
(1) 2 1/2” x 10 1/2” (F)
(1) 3” square (G)
(1) 3 1/2” x 6 1/2” (H)
(2) 6” square (I)
|
Riley Royal Blue Solid
|
Basket lids
Plate edging
|
(2) 1” x 3 1/2” (J)
(20) 3/4” x 3” (K)
(20) 1 3/4” square (L)
|
(2) 1 1/2” x 6 1/2” (J)
(20) 1” x 6” (K)
(20) 3” square (L)
|
Peachy in Blue
|
Borders
Napkin
Plate
|
(4) 1 1/2” x 9 1/2” (M)
(1) 2” x 3 1/2” (H)
(1) 3” square (I)
|
(4) 2 1/2” x 18 1/2” (M)
(1) 3 1/2” x 6 1/2” (H)
(1) 6” square (I)
|
Rose Solid
|
Cornerstones
Plate Edging
|
(4) 1 1/2” square (N)
(12) 3/4” x 3” (K)
(12) 1 3/4” square (L)
|
(4) 3” square (N)
(12) 1” x 6” (K)
(12) 3” square (L)
|
Riley Red Solid
|
Chain blocks
Plate edging
|
(16) 1 1/2” square (O)
(20) 3/4” x 3” (K)
(20) 1 3/4” square (L)
|
(16) 3” square (O)
(20) 1” x 6” (K)
(20) 3” square (L)
|
Main in Royal Blue
|
Napkin
Borders
Plates
|
(1) 2” x 3 1/2” (H)
(4) 1 1/2” x 19 1/2” (P)
(2) 3” square (I)
|
(1) 3 1/2” x 6 1/2” (H)
(4) 2 1/2” x 38 1/2” (P)
(2) 6” square (I)
|
Grove in Red
|
Napkin
Plate
Corner cross block
Outer border
|
(1) 2” x 3 1/2” (H)
(1) 3” square (I)
(4) 1 1/2” square (Q)
(2) 1 1/2” x 31 1/2” (R)
(2) 1 1/2” x 33 1/2” (KK)
|
(1) 3 1/2” x 6 1/2” (H)
(1) 6” square (I)
(4) 2 1/2” square (Q)
(2) 2 1/2” x 62 1/2” (R)
(2) 2 1/2” x 66 1/2” (KK)
|
Ribbons in Pink
|
Napkin
Plate
|
(1) 2” x 3 1/2” (H)
(1) 3” square (I)
|
(1) 3 1/2” x 6 1/2” (H)
(1) 6” square (I)
|
Jam in Royal Blue
|
Plate
|
(1) 3” square (I)
|
(1) 6” square (I)
|
Grove in Royal Blue
|
Napkin
Plate
|
(1) 2” x 3 1/2” (H)
(1) 3” square (I)
|
(1) 3 1/2” x 6 1/2” (H)
(1) 6” square (I)
|
Jam in Red
|
Napkin
Plate
|
(1) 2” x 3 1/2” (H)
(1) 3” square (I)
|
(1) 3 1/2” x 6 1/2” (H)
(1) 6” square (I)
|
Ribbons in Blue
|
Napkin
Plate
|
(1) 2” x 3 1/2” (H)
(1) 3” square (I)
|
(1) 3 1/2” x 6 1/2” (H)
(1) 6” square (I)
|
Peachy in Pink
|
Napkin
Plate
|
(1) 2” x 3 1/2” (H)
(1) 3” square (I)
|
(1) 3 1/2” x 6 1/2” (H)
(1) 6” square (I)
|
Berries in Royal Blue
|
Napkin
Plate
|
(1) 2” x 3 1/2” (H)
(1) 3” square (I)
|
(1) 3 1/2” x 6 1/2” (H)
(1) 6” square (I)
|
Berries in Blue
|
Napkin
Plate
Corner cross block
|
(1) 2” x 3 1/2” (H)
(1) 3” square (I)
(16) 2 1/2” square (S)
|
(1) 3 1/2” x 6 1/2” (H)
(1) 6” square (I)
(16) 4 1/2” square (S)
|
Grove in Pink
|
Napkin
Plate
|
(1) 2” x 3 1/2” (H)
(1) 3” square (I)
|
(1) 3 1/2” x 6 1/2” (H)
(1) 6” square (I)
|
Peachy in White
|
Plate
|
(1) 3” square (I)
|
(1) 6” square (I)
|
Main in White
|
Plate
|
(1) 3” square (I)
|
(1) 6” square (I)
|
Jam in White
|
Plate
|
(1) 3” square (I)
|
(1) 6” square (I)
|
Berries in White
|
Plate
|
(1) 3” square (I)
|
(1) 6” square (I)
|
Boy Blue Solid
|
Plate edging
Cornerstones
|
(12) 3/4” x 3” (K)
(12) 3/4” square (L)
(4) 1 1/2” square (T)
|
(12) 1” x 6” (K)
(12) 3” square (L)
(4) 2 1/2” square (T)
|
Blueberry Solid
|
Plate edging
|
(8) 3/4” x 3” (K)
(8) 1 3/4” square (L)
|
(8) 1” x 6” (K)
(8) 3” square (L)
|
Petunia Solid
|
Corner cross blocks
Plate edging
|
(4) 1 1/2” x 2 1/2” (U)
(8) 3/4” x 3” (K)
(8) 1 3/4” square (L)
|
(4) 2 1/2” x 4 1/2” (U)
(8) 1” x 6” (K)
(8) 3” square (L)
|
Riley White Solid
|
Basket cross blocks
|
(3) 7/8 x 1 7/8” (V)
(6) 7/8 x 1” (W)
|
(3)1 1/4” x 3 1/2” (V)
(6)1 1/4” x 1 3/4” (W)
|
Red Swiss Dot Reversed
|
Center background
Chain blocks background
Napkin background
Middle background
Plate background
Outer background
|
(1) 2” square (X)
(2) 2 3/4” x 3 1/2” (Y)
(2) 1 1/2” x 7” (Z)
(2) 1 3/4” x 9 1/2” (AA)
(8) 1 1/2” square (BB)
(8) 1 1/2” x 2 1/2” (CC)
(8) 1 1/2” x 3 1/2” (DD)
(24) 2” square (EE)
(8) 1 1/2” x 2” (FF)
(8) 1 3/4” x 11 1/2” (GG)
(64) 1 1/2” square (HH)
(24) 1 1/2” x 3 1/2” (II)
(8) 1 1/2” x 21 1/2” (JJ)
|
(1) 3” square (X)
(2) 5” x 6 1/2” (Y)
(2) 2 1/2” x 13 1/2” (Z)
(2) 3” x 18 1/2” (AA)
(8) 2 1/2” square (BB)
(8) 2 1/2” x 4 1/2” (CC)
(8) 2 1/2” x 6 1/2” (DD)
(24) 4” square (EE)
(8) 2 1/2” x 3 1/2” (FF)
(8) 3” x 22 1/2” (GG)
(64) 3” square (HH)
(24) 2 1/2” x 6 1/2” (II)
(8) 2 1/2” x 42 1/2” (JJ)
|
Piecing Directions
Remember, all seam allowances are 1/4”, and always press seams open or toward the darker fabric!
Sew the Center Ring

1. Place 1 of the V pieces, 2 of the W pieces, and 4 of the A squares as shown in the
diagram above. Sew the smaller pieces together in rows and then sew the rows together.
2. Rotate the block so that the cross becomes an X and trim it to 1 1/2” square for the mini
version of 2 1/2” square for the lap size version, being careful to center the X as you trim it.
(You may have slightly trimmed corners but those will be hidden in the seam allowance, so
don’t worry about it!)
3. Repeat with the remaining pieces for the other 2 basket cross blocks.
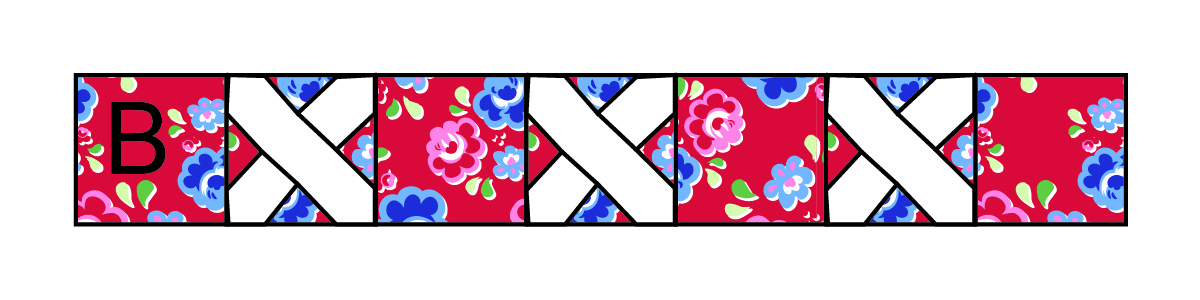
4. Alternate the 3 cross blocks with the 4 B squares as shown above and sew together in a
row.
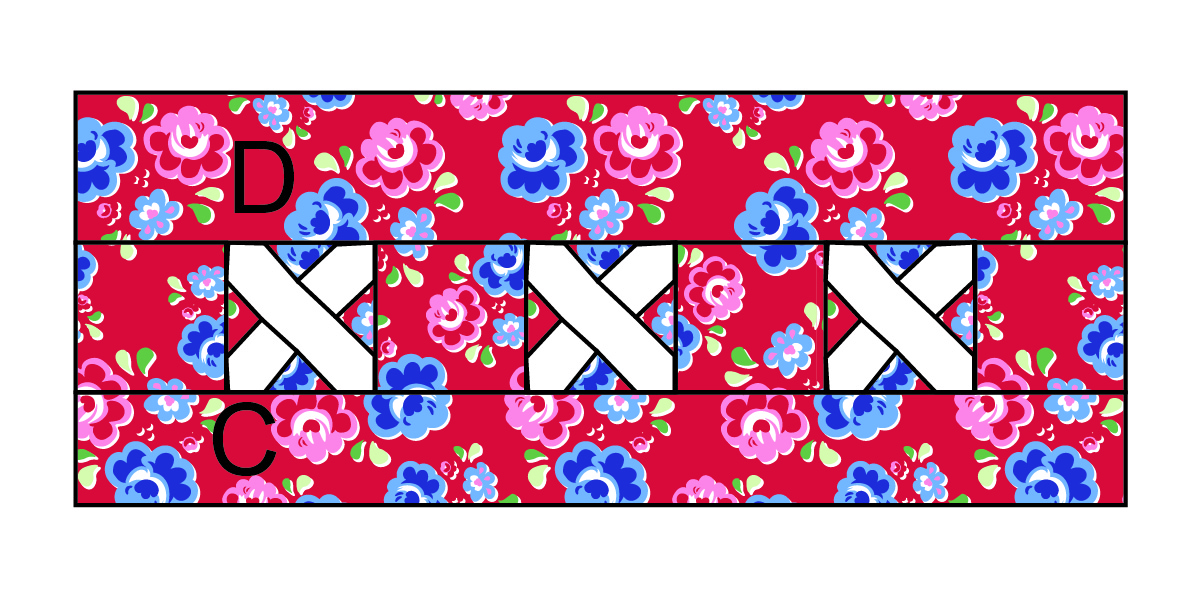
5. Sew the C strip to the lower edge of the block above and the D strip to the upper edge.

6. Sew each of the 2 J strips to the lower edges of each Y rectangle. Sew one of these units
to the left and right long edges of the E strip. Sew this unit to the upper edge of the unit from
step 5.
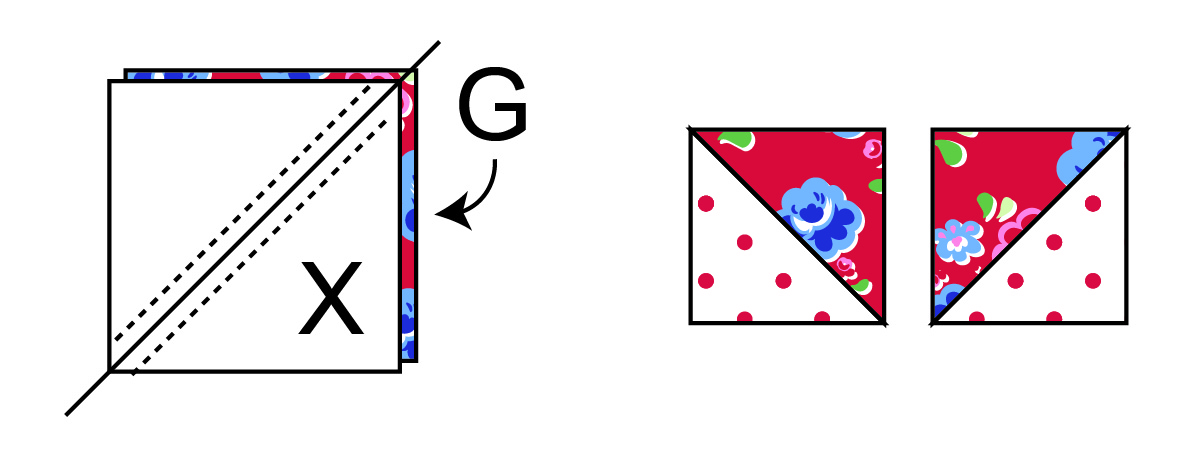
7. Use the G and X squares to make a pair of half square triangles following the diagram
above. Place the squares right sides together. Draw a diagonal line across the wrong side of
the X square and stitch 1/4” from each side of the line. Cut along the line, press both half
square triangles open, and trim to 1 1/2” square for the mini version or 2 1/2” square for the
lap size version.
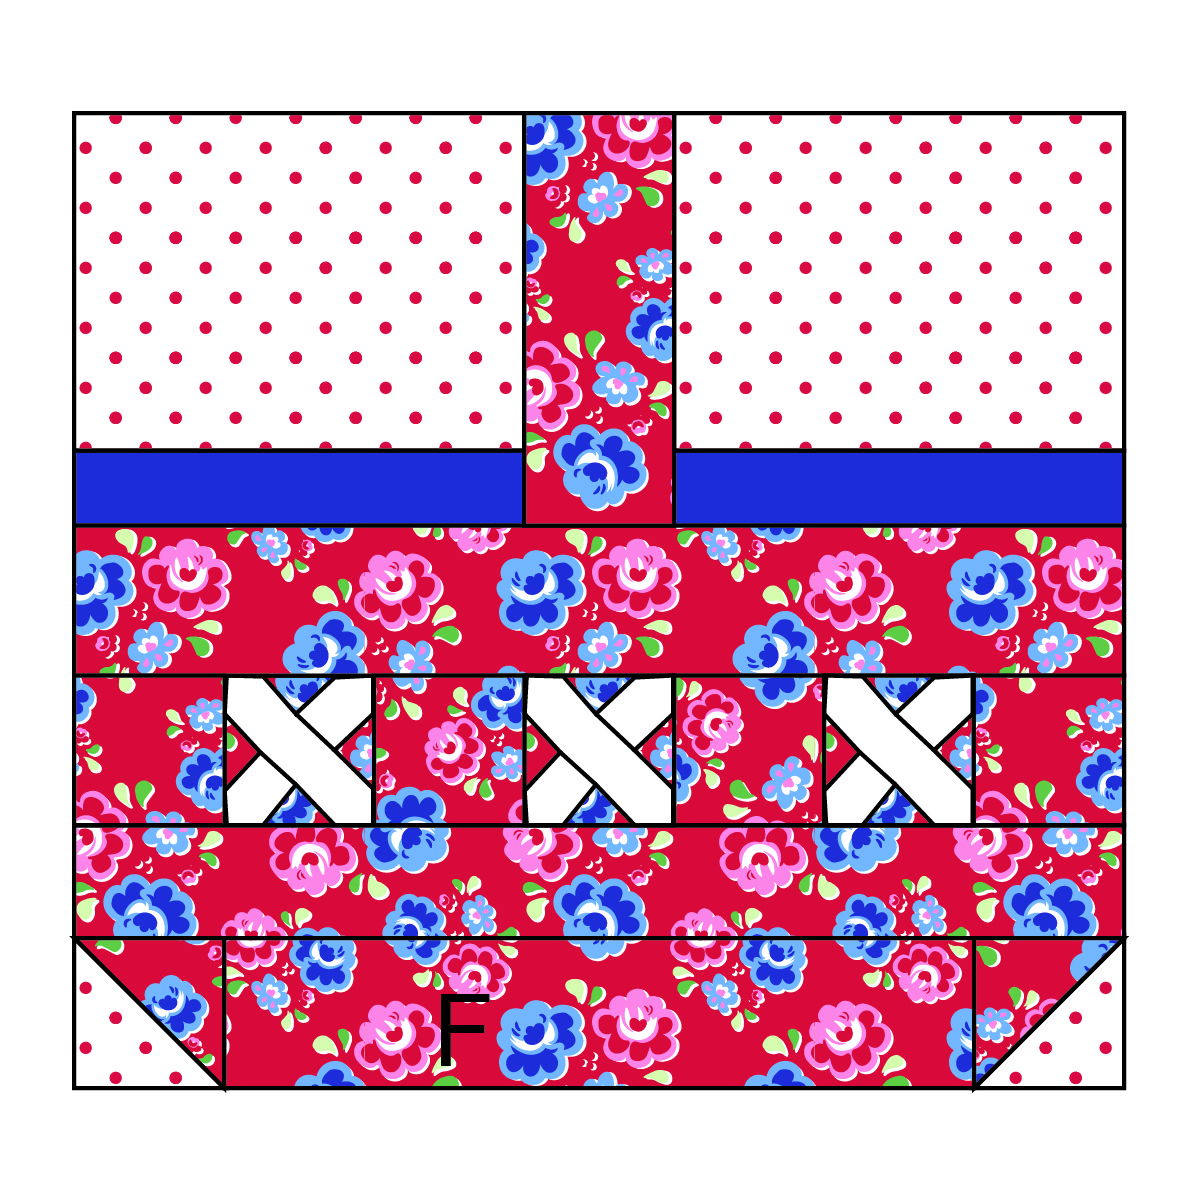
8. Sew the half square triangle units on the short ends of the F strip as shown above and
then stitch this unit to the lower edge of the unit from step 6.

9. Sew the Z strips to the right and left edges of the center block. Sew the AA strips to the
upper and lower edges of the center block.

10. Sew an M strip to the right and left edges of the center block. Sew the N squares to the
short ends of the remaining 2 M strips and then sew those units to the upper and lower
edges of the center block to complete the center ring.
Sew the Middle Ring

1. Make the flying geese units using the H rectangles and EE squares following the diagram
above. Place an EE square on the right side of an H rectangle, right sides together. Draw a
diagonal line from the upper inside corner to the lower outside corner and stitch along that
line, trimming to a 1/4 seam allowance, and press open. Repeat with the other EE square
on the other side of the rectangle. Repeat with the remaining EE and H pieces until you
have 12 flying geese units.
2. Sew the flying geese units into rows, alternating each unit with an FF strip (pay attention
to the orientation of the flying geese units in the diagram above) and sewing a GG strip to
both long edges of each row.

3. Make the chain blocks using the O, BB, CC, and DD pieces. Arrange the pieces as
shown in the diagram above and sew together. Repeat until you have 4 blocks total.
4. Sew a flying geese row to the right and left edges of the quilt. Sew the chain blocks to the
short ends of the remaining two flying geese rows and then sew each row to the upper and
lower edges of the quilt. Pay careful attention to directionality of the blocks as you go!

5. Sew an P strip to the right and left edges of the quilt. Sew the T squares to the short ends
of the remaining 2 P strips and then sew those units to the upper and lower edges of the
center block to complete the middle ring.
Sew the Outer Ring
1. Make the plate blocks. Arrange your K, L, I, and HH pieces in groups, using the diagrams
in this pattern as a guide to which solid color borders go around which plate centers. Each
block group should have 4 K strips, 4 L squares, 1 I square and 4 HH squares.
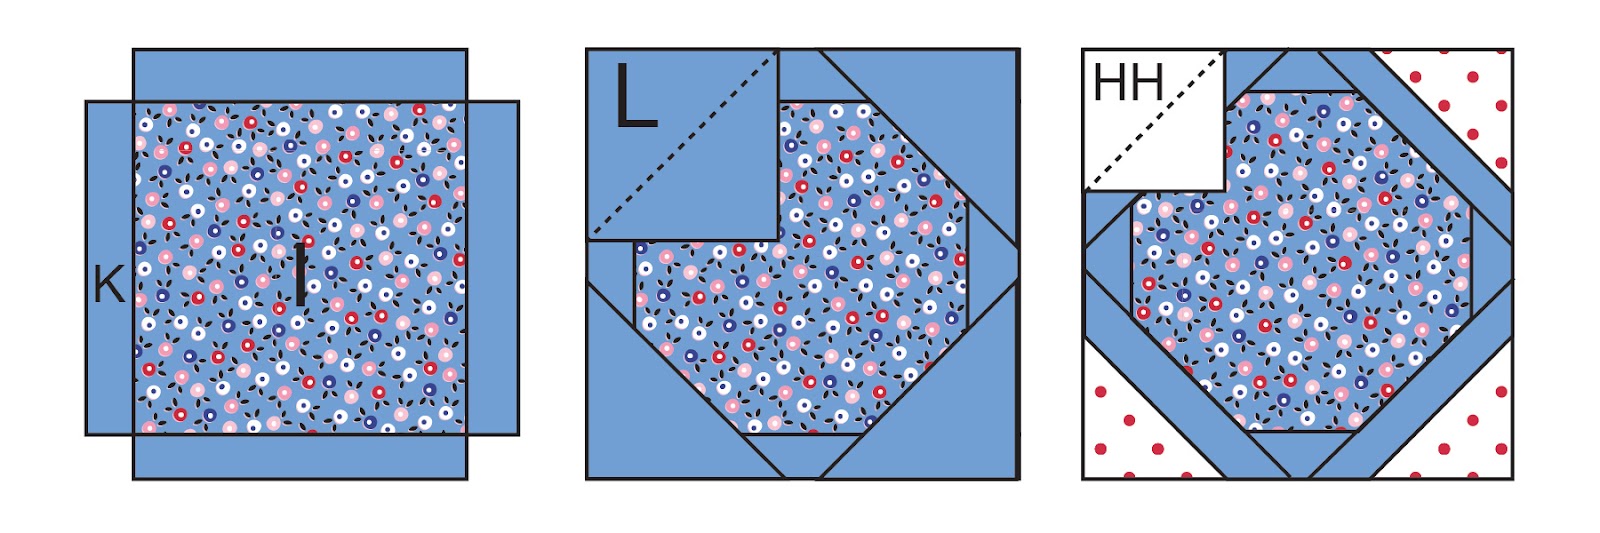
2. Sew a K strip to the right and left edges of the I square and then to the upper and lower
edges of the square, centering them on those edges. (Note: the K strips will not go all the
way to the corners, and this is okay.) Place an L square in one corner of the block, right
sides together, sewing a diagonal line to cut across the corner. Trim the seam to 1/4” and
press open. Repeat with the other L squares. Now repeat this same process with the HH
squares in every corner to finish the block. Do the same with the remaining 19 plate blocks.
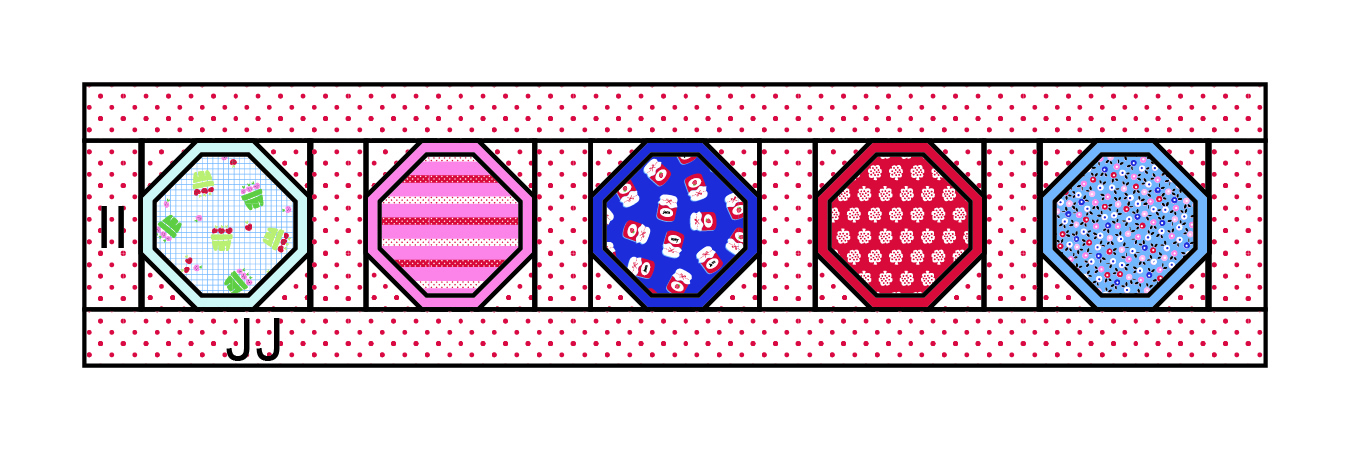
3. Sew a row of plate blocks. Alternate the blocks with II pieces, sewing them together as
shown above. Sew a JJ strip to either long side to finish.
4. Make the corner cross blocks. Arrange the U, S, and Q pieces as shown above for one
block. Sew the pieces together in 3 rows and then sew the rows together. Repeat to make 4
blocks total.

5. Sew a plate block row to the right and left sides of the quilt. Sew a corner cross block to
each of the short ends of the remaining plate block rows, and then sew them to the upper
and lower edges of the quilt. Sew an R strip to the right and left edges of the quilt, and then
sew a KK strip to the upper and lower edges of the quilt to finish the top.
6. Quilt and bind as desired.
I hope you have a wonderful time making this quilt. And don't forget to be on the lookout for
Shortcake fabric at your local quilt shop!

This is the sweetest quilt with the picnic basket and how you designed the plates. Perfect for the beautiful new fabric line that you designed. Thank you so much for the free pattern Heidi!
ReplyDeleteThis is adorable, Heidi! It compliments your fabric really well. Thank you for sharing the tutorial.
ReplyDeleteGreat design and yummiest fabric line.Thanks for the tutorial!!
ReplyDeleteI have read your excellent post. This is a great job. I have enjoyed reading your post first time. I want to say thanks for this post. Thank you... picnic fabric
ReplyDelete