Saturday, March 31, 2012

Abacus Baby Quilt Tutorial


Today I'm posting a tutorial for the quilt I showed you yesterday: Abacus. This baby quilt is a great project for a beginner, and it's a quick option when you need a last minute gift. For this quilt you will need:
  • 20 charm squares for the "beads"
  • 8 solid charm squares for the "sliders"
  • 7 strips of white fabric for sashing; mine were 3 x 33 inches, but you can adjust this if you like
  • approximately 1 yard of coordinating fabric for backing
  • approximately 1/3 yard of coordinating fabric for binding
  • matching thread

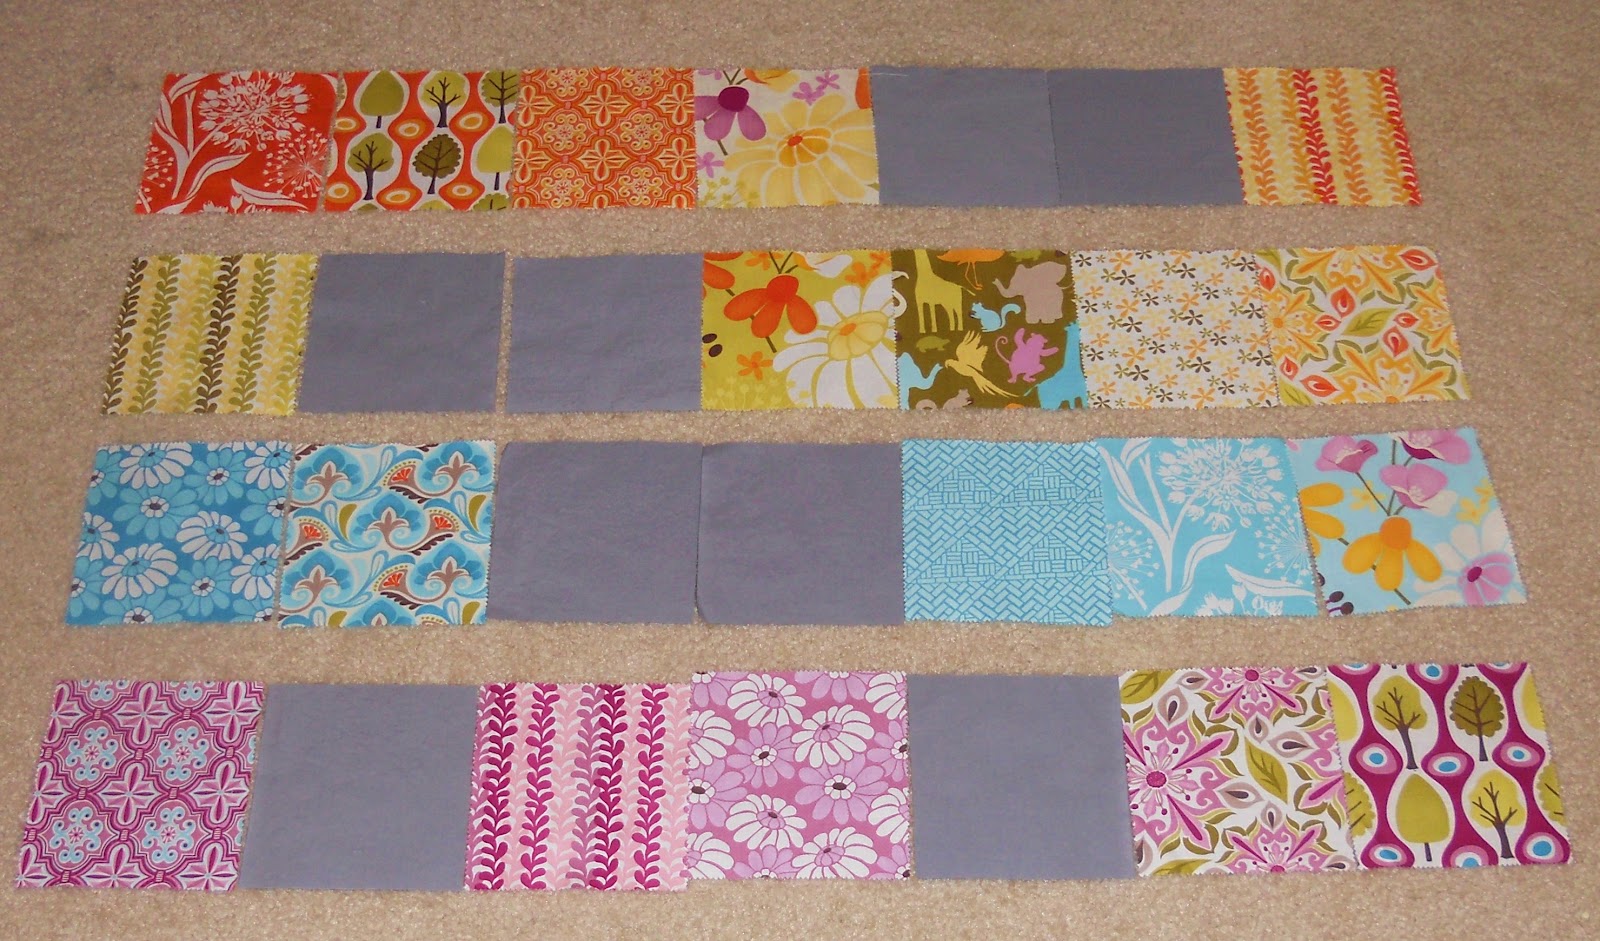
Start by arranging the layout of your charm squares in four rows, each having five beads and two sliders. I played with this quite a bit before deciding on my final layout. While I ended up putting each pair of solid charm squares together for ease of quilting later on, you could separate them if you like as you see in the picture above.


Sew each row of charm squares together. I used a quarter inch seam allowance for all of my sewing in this project, by the way. Press your seams in one direction along each row.


Once your rows are set, add your sashing between each of the rows. I attached one row to one piece of sashing until I had three pairs and one last charm square row; then I went back and sewed all of the pairs together. This helps me keep things a little straighter. Press your seams in one direction as you go.


Now add the outer border. Sew a strip of sashing onto the top and bottom of your quilt top, then add another strip to each right and left side. Continue to press those seams.


Once you've added the outside border, trim the edges so that you have a tidy rectangle.


The easiest way to add a backing to your quilt is to make it all one piece of fabric. I would have used one piece of Central Park print for mine if I had one, but instead I sewed white fabric on either side of my one quarter yard strip of print that I had on hand. Use your own creativity to make this the way you want it, but do be sure that your backing is a little larger than the quilt top on all sides to make up for any shifting that happens during quilting. There's nothing worse than finishing your quilting and realizing that your backing is a little short around the edges.


Make your quilt sandwich. Lay your quilt backing right side down and top it with your batting and then your quilt top, right side up. I use regular straight pins for this, but many people have other options. I like to start in the center and work my way out to smooth out any excess fabric as I go.


For the quilting, I stitched in the ditch along the edge of every single charm square row. I then stitched along the border between each of the printed charm squares as well as stitching a border just a quarter inch inside each printed charm square.
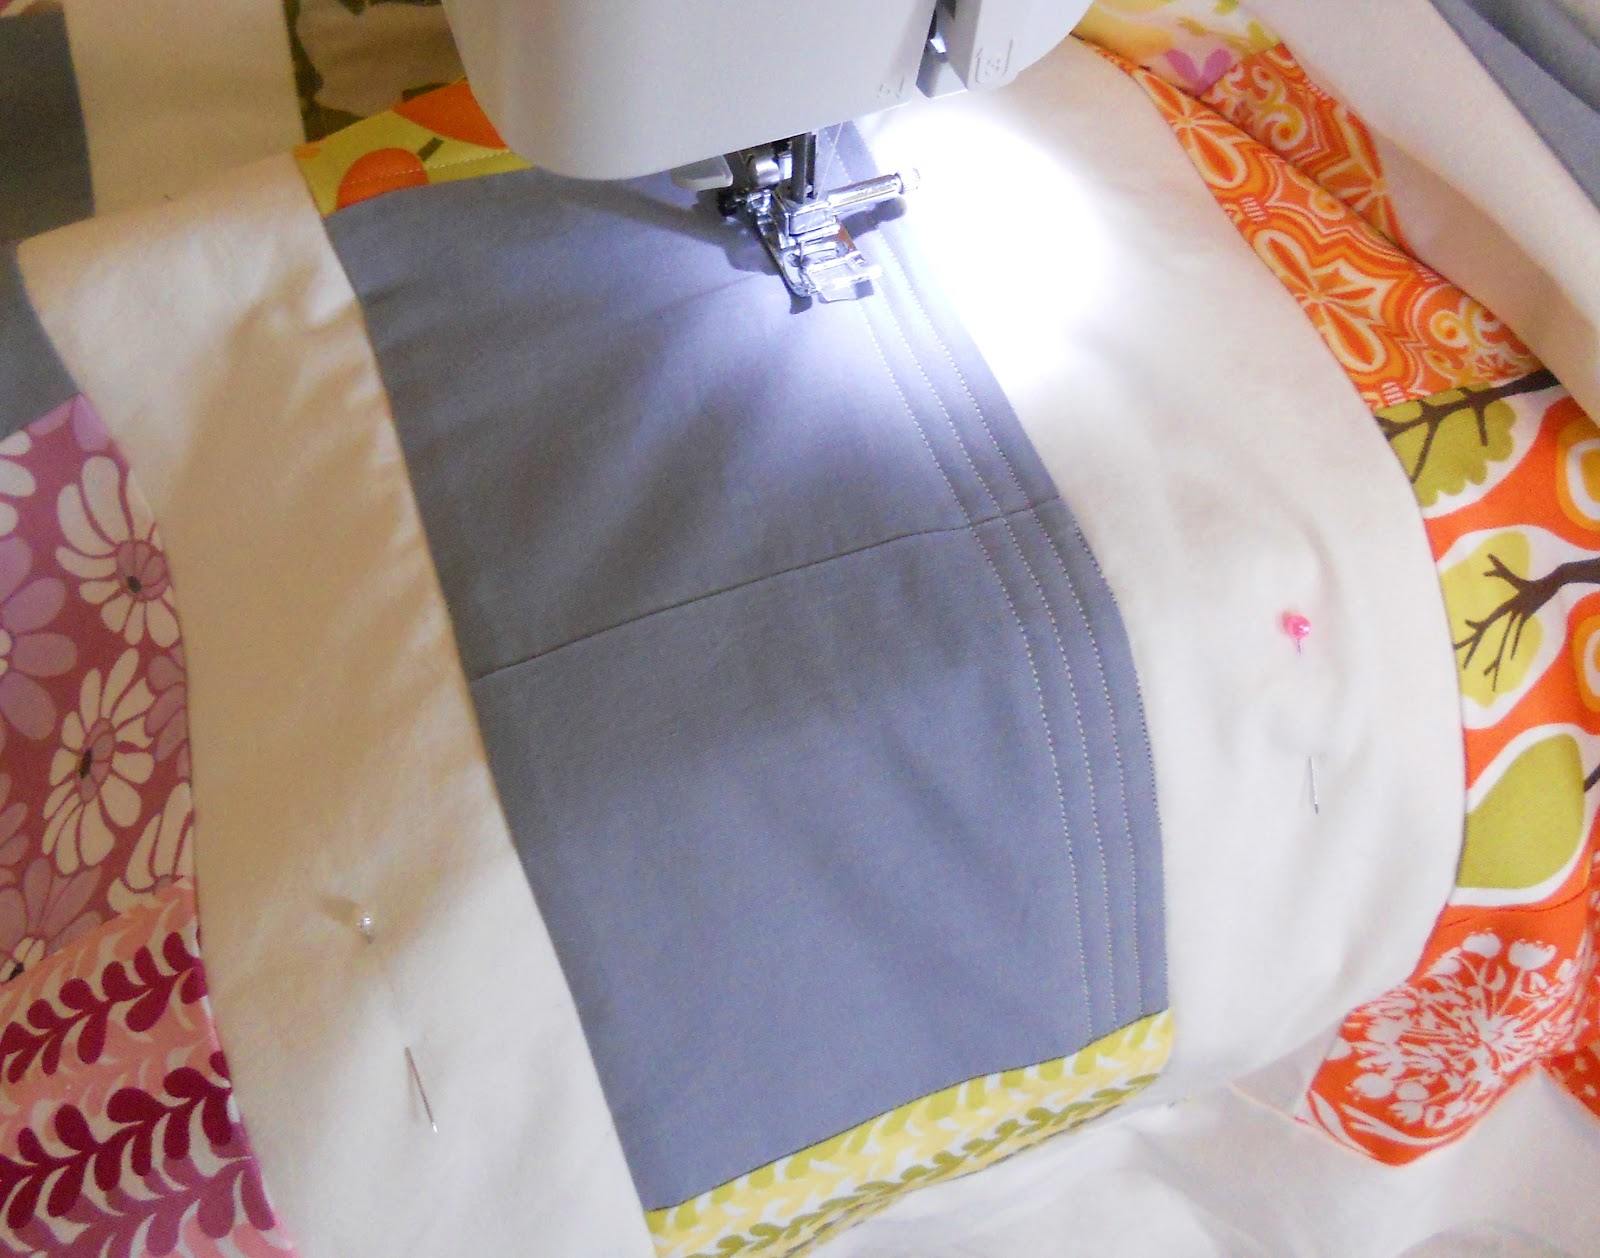

For the solid slider squares, I stitched horizontally in rows a quarter inch apart all along the inside. Refer to the pictures for clarification on this.


Once you have finished quilting, remove any leftover pins and trim the edges of the batting and backing so that they match up with the edges of the quilt top.


All you have left is the binding. If you are unfamiliar with how to make and attach your own binding, I refer you to Elizabeth Hartman's wonderful tutorial. I usually use straight grain binding. It has held up very well for my projects so far.


And that's it! Please let me know if this tutorial is helpful to you or if you find any glitches in it. I'm hoping to add more tutorials in the near future. Enjoy!

Friday, March 30, 2012

Abacus


A friend of mine from church is an expert seamstress with skill levels beyond anything I hope to achieve in the next decade. When she heard that I had started dabbling in the world of sewing, she was thrilled and has been showering me with encouragement ever since. A few weeks ago she brought me a "care package" full of goodies, not the least of which was a foot high stack of random charm squares. When I went through the stack, I was so excited to find more than two dozen pieces from Kate Spain's beautiful Central Park collection for Moda. I tried several different layouts before finally having a brainstorm one afternoon last weekend. The result is this baby quilt: Abacus.


The pattern is a modern take on a child's toy abacus.  Each charm square is a "bead" and the grey areas are densely quilted to show the sliding movement from left to right. The sashing is simple white muslin, and I added a quarter yard piece of Central Park to the back for a little extra color. The quilt is bound in a grey Sea Star print from Emily Herrick's Going Coastal collection for Michael Miller. I love that this quilt will not only make a wonderful blanket for my youngest daughter's pack-n-play crib, but that I can also use it as a math tool for teaching my older daughters about counting, adding, and subtraction.


I will be posting a tutorial for this quilt tomorrow. If any of you end up making something with it, please do let me know. I would love to see what you do with it! I'm hoping to post more tutorials in the next few months, so keep your eyes open...


Linking up to Finish It Up Friday, Sew & Tell Friday, and Confessions of a Fabric Addict.

Wednesday, March 28, 2012

Spring Break


It's been wonderful having my husband home for two weeks of spring break...I love his teaching schedule. It's given us time for lots of activities together as a family, and I've even gotten a little bit of extra sewing time here and there.

At long last I've buckled down and started work on the girls' new bed quilts. I've been saving a set of Castle Peeps fat quarters by Lizzy House for months now. Funny how hard it is to cut into fabric that you love; I have this terrible fear that I'm going to ruin it somehow. Still, considering how much use these quilts will get, I'm sure it won't be long before I'll be making them new ones anyway. I'm cutting each fat quarter into three pieces, and each set of fabric will be used to design a different quilt for each girl. I need to make them unique so that they'll be easy for the girls to recognize at a glance, and as a bonus, it will break up the monotony of doing three in a row of the same project. This picture shows a section from my first attempt. I'm hoping to have this one done by Friday...we'll see how much work the girls let me finish until then!

Linking up to Work In Progress Wednesday.

Monday, March 26, 2012

Mouse's Bag


The parade of bags ends today with this little number that I made for Mouse. Since she's not yet two years old, I opted against the crossbody style I used for the other girls -- no need to give her anything handy to wrap around her neck. It's been pouring rain outside, so I'm afraid the pictures will have to be indoor ones today. For the outside, I used the orange Birds and Flowers print by David Walker from his Get Together collection for Free Spirit. Inside I put one of my favorites...the rows of green geese from Lizzy House's Red Letter Day collection. I love that you can see one of the few blue ducks on the print as you look just inside the bag.


Here's the bag in use holding one of the first toys I ever sewed on our machine...a pink fleece "Mousie" for my Mouse. The orange chair, by the way, belonged to my mother when she was a little girl. I love having things in our home with that kind of family history.

It's been a busy weekend; my parents-in-law are visiting from Arizona, so we've had a whirlwind of activity around here. I've managed to sneak in some work on a few things over the weekend that I can't show yet, but hopefully I'll be posting about them soon. Hope you all had a wonderful weekend!

Linking up to Sew Modern Monday and Manic Monday.

Friday, March 23, 2012

Bear's Bag & a Giveaway Winner


After making a Rapunzel bag for my daughter Bunny, I knew it wouldn't be long before my other girls would be clamoring for bags of their own. Bear has been begging the loudest this week, so I sat down to sew one for her yesterday. The exterior is Tree Stripes from Monaluna's darling Circa 52 collection.

I lined the bag with some of Lizzy House's hedgehogs from Outfoxed, and I could not resist adding a small applique of Mr. Fox to the front of the bag as well. It's a small but sturdy bag, perfect for my little two-year-old. You can see it in action here with Tup the Meerkat enjoying the ride.


I was absolutely floored by the response to my St. Patrick's Day Blog Hop giveaway. Thanks so much to all of you who stopped by, chose to follow, and left a comment. You made my week! Random.org has chosen a winner...number 109:

I have to say I enjoy making art quilts the best :)

I've sent an email and am looking forward to getting this prize package in the mail!

Linking up to Finish It Up Friday, Sew & Tell Friday, and Confessions of a Fabric Addict.

Wednesday, March 21, 2012

Granny's Salt Water Taffy


The granny square lap quilt is done at last, and I'm so happy with the way it turned out. Rather than cutting the usually smaller squares for this pattern, I used five inch squares from the two charm packs of Salt Air by Cosmo Cricket that I've been saving for something special. I absolutely love the colors in this line of vintage beach inspired prints. They remind me of the barrels of salt water taffy I used to see at the Huntington Beach candy shop when I was a kid. After some debate, I chose a grey background for this quilt rather than the more typical white because it seemed to fit with the ocean theme as well.


I kept the quilting very simple, machine stitching across the sashing in the middle and then hand quilting around the edge of each granny square with a thread color matching the center prints. It was the first time I've done any quilting by hand, and I'm glad that I tried it. It takes so much longer, but I love the way it looks. The quilt is bound in Lizzy House's Pearl Bracelet in red, a wonderful print for binding. I will definitely have to order more at some point.


While I would love to keep this quilt, I'm happy that it's going to a good home...my grandmother's, appropriately enough. The granny square craze is happening for a reason; these blocks really are a lot of fun to make. I may have to tackle this pattern again in the next few months so I can have some of my own.

Linking up to Fabric TuesdayWork In Progress Wednesday.

Tuesday, March 20, 2012

Wishful Thinking


Well, I'd planned on having a finished quilt to show today, but time was against me. I've done so many mini quilts lately that I've forgotten how many hours I have to budget to finish a lap quilt...especially one with hand stitching on it. This sneak peek will have to suffice for now.

I'm hoping to have this one finished by tomorrow evening, though considering that we'll be spending most of the next day at Disneyland with the girls, that may just be more wishful thinking on my part...

Hope you all had a wonderful start to your week!
Related Posts Plugin for WordPress, Blogger...