Thursday, March 31, 2016

Creative Journal: 5 Favorite Sewing Books


A few weeks back I shared with you about setting up a sewing notebook, and one of the sections I included in that was a creative journal. I believe that taking time to think about what you’re doing can be just as important as doing it. It’s easy at times to be carried along with what’s trending in the sewing world, but you still need to pay attention to what matters most to you. How does all this work out in real life? What do you truly enjoy when it comes to design? The more you know yourself, the more comfortable you’ll be with the choices you make in your own creative journey.

If you don't feel like keeping a separate journal, these can be things that you write about on your blog, share on Instagram, or just think about while you sew your latest project. I'll be sharing creative journal questions or topics with you here at Fabric Mutt occasionally, along with my own answers. Feel free to share your own answer in the comments below, in a blog post (which you're welcome to link up below), or in a creative journal of your own.

List five of your favorite sewing books and explain why you love them.

It's easy to overthink this sort of question, but remember, this isn't a test -- just some thoughts to get you smiling about what you love and why. I took a quick spin through my sewing library, and here are the five books that jumped out at me today...


1. The Quilter's Album of Patchwork Patterns by Jinny Beyer


This book may not look flashy, but I refer to it more than anything else in my sewing library. It has diagrams for over 4050 quilt blocks along with notes on their names and origins. I constantly go back to these pages for inspiration when I'm designing a new quilting project. See all those blue sticky notes? Always a sign of a well loved book...


2. Patchwork, Please! by Ayumi Takahashi 


Ayumi is a friend of mine, but that's not the only reason why I love her book. Her style is the essence of modern Zakka, a Japanese term for useful items that beautify your home, appearance, or life. All of these projects are sweet and approachable, and I'm constantly learning from the way Ayumi mixes fabrics and colors. I use her book for personal inspiration and as a great source for handmade gifts.


3. Savor Each Stitch by Carolyn Friedlander


This book was like a revelation to me the first time I picked it up, and I found that I couldn't put it down. If you taught a college course on modern quilting, this would be the perfect textbook. Savor Each Stitch is a thoughtful look at the artistry of quilts. Design principles are explained in detail, and a project is included to illustrate each one. The Aerial Grove Quilt above is still on my Must Make list.


4. Sweet & Simple Patchwork Gifts by Hisako Arai and Yoko Sanjo


Another Zakka favorite of mine, this book pulls me back again and again for ideas. The authors have designed 6-7 projects each using four different piecing motifs: simple squares, hexagons, log cabins, and stars & polygons. It's a great example of how you can play with a block to come up with different results, and I love that there are so many small gift options in here.


5. Chloe Tells You How...to Sew by Chloe Owens 


I have to admit that I haven't sewn a single project from this book, but I'm still absolutely crazy about it. It reminds me of all the comics, kid's magazines, and craft books that I pored over as I child. Bright colored photos and darling illustrated characters tell fun stories that go with the projects. Technically for children, there's still plenty in here for adults to love. When my daughters aren't combing through the pages, I sneak off with this book myself for a little nostalgia mixed with the vintage style that I so love.

So what are your favorite sewing books for projects and/or inspiration? Do tell!

Friday, March 18, 2016

9 Steps to a Happy Cutting Table

9 Steps to a Happy Cutting Table by Heidi Staples of Fabric Mutt

The cutting table can be one of the most stressful places in your sewing room. This is where things can get dangerous (watch out for that blade!), frustrating (why didn't I double check the measurements?), and downright messy (hello, piles of fabric). It doesn't have to be that way, though. Here are nine steps to a happy cutting table...

1. Get the height right.

I’ve found that the height of my cutting table is directly related to how much pain reliever I have to take after a sewing session. For years I cut my fabric on a low desk, and my back paid the price in a big way. Being just under 6 feet tall, I found that it was impossible to avoid this problem without looking for a different piece of furniture. I finally invested in a 39” high pub table that I bought through Amazon, and the difference was incredible. If you’re experiencing a similar problem, try looking for other options. In my experience, if the top of the table comes to your waist or even a bit higher, it will probably be a good fit. It also doesn't hurt to keep an adjustable stool tucked away under the table for those moments when you want -- or need -- to sit down.

2. Lighten up.

Trying to cut your fabric in poor lighting is like driving at night without your headlights...a very bad idea. I've tried several lighting options, and my favorite by far is a simple task lamp. It's brighter than most table lamps and adjustable so that I can point it where I need it.

3. Invest in a few good rulers.

I used to do all my cutting with a single 8 1/2 x 12” ruler. While it’s possible to get by with just one, it’s worth investing in more. My 2 1/2 x 18” ruler is fantastic for cutting binding strips. I also recommend getting at least one small square ruler for fussy cutting. I’m a huge fan of non-slip versions. It can be helpful, depending on the type of projects you do, to add tools that will help you cut special blocks like flying geese, circles, or dresdens. You know if this is something you need or not.

9 Steps to a Happy Cutting Table by Heidi Staples of Fabric Mutt

4. Go big with your cutting mat.

There is nothing more frustrating than trying to cut fabric on a mat that's too small. I keep a 12 x 18" cutting mat right next to my sewing machine for trimming blocks, but all my preliminary work is done on an 18 x 24" mat, which is the largest size I can fit on my cutting table.

5. Take care of your tools.

Over time, even the best kept rulers can get chipped or cracked. If you notice damaged tools, be sure to replace them because they can affect your accuracy. There’s no concrete rule on how often you should replace your rotary cutter blade, since it all depends on how often you use it. When I find that I’m having to place an uncomfortable amount of pressure on the cutter to get the results I want, it’s probably time to switch blades.

9 Steps to a Happy Cutting Table by Heidi Staples of Fabric Mutt

6. Try a desktop organizer.

A typical desktop supply organizer makes a fabulous corral for cutting tools. I have an inexpensive wooden version with just three sections to it. The large compartment in the back holds my biggest rulers, the mid-sized section in front is for my smaller rulers, and the smallest slot is for my rotary cutter and extra blades. It couldn’t be more perfect if I’d designed it myself for the task.


7. Use a fabric weight.

It’s helpful to have a weight or two on your cutting table to hold fabric in place while you cut it. This also keeps the fabric from sliding or falling off the edge of the table when you’re working with a bigger piece of yardage. I use a small vintage iron, but anything heavy, from a paper weight to a mason jar full of sand, should do the job.

9 Steps to a Happy Cutting Table by Heidi Staples of Fabric Mutt


8. Know where everything goes.

The cutting table is usually where the mess begins in my sewing room, and it gets out of control fast. Having a place for everything to go when you’re done with it is the best way to head off the clutter before it begins. Fabric that lands on my cutting mat will wind up in one of five places:
  • my sewing table: fabric going into the project
  • the return basket: fabric going back into storage (I sort the contents of this basket back into my color coded fabric baskets whenever it gets full.)
  • the scrap basket: scraps and selvages
  • the pretty bowl: special pieces and thin strings that are just too pretty to throw away
  • the trash can: everything else
Whenever the cutting table scrap basket gets full, I hand it off to one of my daughters, who love to sort the pieces into my color coded scrap buckets.  

9 Steps to a Happy Cutting Table by Heidi Staples of Fabric Mutt


9. Fold it now. 

I have a rule that I never put fabric into the return basket without folding it first. Those 10 seconds spent folding now save me half an hour of folding a mountain of fabrics later on.

Do you have any special tips for the cutting table? Share them in the comments below!

Monday, March 7, 2016

Sewing in Real Life

Our first family picture after Mouse was born -- you all know how careful I am with my daughters' privacy, but for this post, I wanted to share a few pictures from the past.

I gave birth to three daughters in four years. We didn't plan it that way -- it's just how things worked out. And though I now love having our girls so close in age, it was really, really hard when they were little. 


Taken in our back yard, this was the photo we used for our last birth announcement.

I will never forget that first year after Mouse was born. My husband and parents would head off to work in the mornings, and I would sit in the upstairs back bedroom with my three little girls, the only room where I could contain them by myself without help while I was recovering from my c-section. I did it almost every day for months on end, exhausted and emotionally raw from the 2-3 hours of sleep I was getting each night due to Mouse's acid reflux condition. I cuddled toddlers, watched cartoons, rocked the baby's bouncy chair with my foot, played Solitaire on my computer...and wondered if I was going to survive. Maybe that was the hardest part of it all. Being a mother had always been one of my lifelong dreams, and it wasn't turning out the way I thought it would. I wasn't just struggling -- I was drowning. 


My three little pumpkins...

I often remember telling my family, "If I could just get enough sleep at night, I could deal with everything else." But it wasn't to be. All three of our daughters had sleep issues from the very beginning. I kept thinking it would go away, that they would grow out of it, but none of them did. My husband helped as much as he could, but I would only let him get up with the girls on weekends, since I felt the California freeways were dangerous enough without him trying to commute to work on too little sleep. I read every book and article I could find on getting your kids to sleep through the night, talked to other mothers, tried every new method I came across. Nothing worked. I would listen to other moms who said, “Oh, my baby started sleeping through the night at 2, 3, 4 months. She’s just so easy!” and I would want to cry over what felt like my own failure.
The girls grew older, and I was sure that we would get past this stage. "Wait till they stop taking naps," people told me. "Wait till they're in school. It will all be so different." But the years passed, and nothing changed. The girls were each still getting up one or more times every night. I can't tell you how many evenings I sat rocking a weeping child, tears running down my face as I silently begged God to fix this part of our lives that seemed like it would always be broken. Sometimes my mom would be up in the night when I was, and she would listen to me pour out my heart over the girls. I was so overwhelmed at times by how difficult it was to be a mother. "Maybe someday it will get easier," I would say. And Mom would shake her head no with a meaningful smile and reply, "It never gets easier."

I've been getting hand picked bouquets from my girls since they first started toddling around the front yard. 
  
It was during all these years of struggle that I discovered sewing, started my blog, and wrote my book.

I keep the focus mainly on my creative work here at Fabric Mutt, but every now and then I try to pull back the curtain and give you a glimpse of sewing in real life. There's such an irony to social media and blogging. We want to keep it real, but the truth is that you get a lot more "likes" on the pretty photos. After all, what's more inspiring -- a) pictures of me cleaning up after the dog while I holler at the kids to stop climbing under the table and eat their lunch already, or b) pictures of my latest patchwork project? (Trust me, the answer is b.) My ongoing battle with sleep deprivation has been a huge part of my life over the last decade, but sewing and blogging have helped me cope with it in a small way. It's true that not everything in my life is picture perfect, but this creative outlet has given me the push I needed to look beyond the craziness of life to find the little bits of lovely that are all around me. It's taught me to take time to enjoy them, and most of all, to share them -- with my precious family and with all of you. 


Sunday morning smiles from Spring 2013.

My girls are now 5, 6, and 9 years old, and for the past three months, I've enjoyed the closest thing to uninterrupted sleep I've had in 9 years. We've relapsed a few times with bad dreams or illness, but those few setbacks just remind me how far we've come. I'm grateful, more grateful than I can say, to be finally coming out into the light after so many years struggling through what felt like such a dark valley. It’s been one of the most difficult things in my life, but we're making it. My darling girls are the joy of my heart -- I wouldn't trade them for anything in the world. My husband and I have come through this, seeing each other at our worst and knowing we can still count on each other. My parents have been a fount of wisdom and sanity that I've come back to time and again. And while we looked back through our photos to choose some pictures for this post, my husband and I shared a few tears and lots of laughter. As hard as those days were, there were so many great moments mixed in with the tough ones.
More than anything, this journey has reminded me to have grace for other women who struggle with issues in their children that they can’t control. It's so typical in our culture today to point out what others are doing wrong, but most of us as moms don't need to hear it. We have a personal guilt recording playing in our head 24 hours a day that reminds us of all the ways we feel we're letting our kids down. You have no idea how much it means to a struggling mom when you come alongside her with love and encouragement to say, “You’re going to make it through this. You're doing better than you think. No one loves that child like you do.”

So to those of you dear readers who are still fighting your own battle, I beg you...don't give up hope. Keep doing your best. Keep loving your child. You will get through this. I promise.

Friday, March 4, 2016

Tiny Toffee Blog Hop


My friend Susi has been making the most unbelievable paper pieced hexagons for a while now. Some of her patterns are offered free on her blog, while others are sold in pattern sets in her Tiny Toffee Designs Etsy shop right here. She's hosting a blog hop to celebrate the release of her newest set (find all the participants on this post), and I'm so happy to be a part of it today.


The Dream Big Collection includes the adorable elephant above, a swan, a pencil, flying geese, mountains, a star, and a heart. The detail in these is absolutely incredible. I love them so much!


My assigned hexagon was this little trio of flying geese. I decided to pull out my small stash of Liberty prints for this one. Each of the triangles are made from the same floral print, though I highlighted different elements of the design in every one. Making these paper pieced hexies is both harder and easier than it looks. You have to be careful because if your fabrics shift even 1/8'', it can radically change the design, but on the other hand, it's still just standard paper piecing. And the beauty of it is, you don't need much fabric to do it!


I pulled another 6 squares of Liberty for the surrounding hexagons, creating a traditional flower pattern. Between you and me, I noticed a mistake on my center hexagon after I had sewed all these together, so I made another center and just stitched it down on top of the first one, giving the finished center an almost 3-D effect when you see it in person. The entire flower was stitched down onto a square of yarn-dyed linen. I added a crochet lace border using a treasured bit of trim that I received in a birthday package from my dear friend Annabel, and backed the mug rug in another piece of Liberty.


I love this little project. It's sweet and romantic and will look oh so pretty on my sewing table. And I enjoyed working with her pattern so much that I'm scoping out Susi's shop for another set. This one is probably going to be next on my list...just in time for spring.

Thursday, March 3, 2016

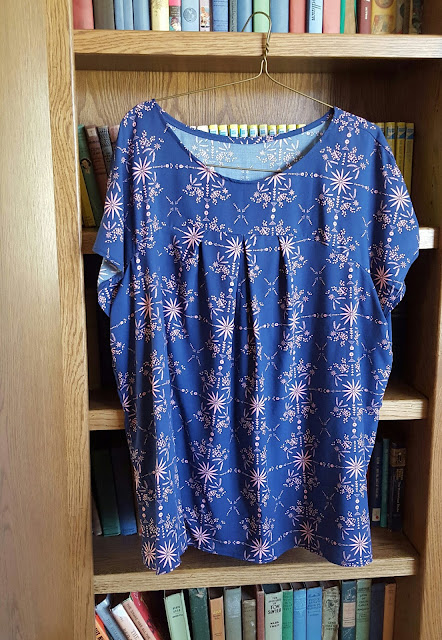
Mayflower Tunic

Mayflower Tunic by Heidi Staples for Fabric Mutt

Okay, so technically it's Tunic B from Simplicity Pattern 1620, but I can never remember that. I finally was able to connect the dots (using my former American history teacher brain) that the Pilgrims sailed to America on the Mayflower in 1620, and from then on, this top has always been the Mayflower Tunic for me.

Mayflower Tunic by Heidi Staples for Fabric Mutt

I've said before that I rarely make the same project twice, but I've found that, when it comes to clothes, you really have to make an item at least twice to get it the way you want it. This is my fourth time making this pattern, and I feel like I've finally figured out what works for me. Here's what I learned:

1. Use the right fabric. In my experience, nothing works like rayon. It hangs, feels, and looks like a store bought garment -- in the best sense, I mean. I made my first two tops using quilting cotton, but it just doesn't quite work for clothing. My last two tunics were made with Cotton + Steel rayon, and it's phenomenal. I'm sold for life.

2. Better to go big than go small. I'm such a novice when it comes to clothes making, but I can tell you one thing: it's a lot easier to fix a garment that's too big than one that's too small. If you're not sure about measurements, go big. You can always take it in later if the fit isn't right. Being both tall and plus sized, it took me a lot of experimentation to get the right width and length for this garment, but when I finally hit the right numbers, I was in love with the outcome.

3. Finished seams wear best. Seeing the ragged state of my seams after earlier garments went through the wash, pushed me to do French seams on this last tunic (do an online search if you don't know what these are). Wow, does it make a difference. This top is going to stand up to washing much better than the others did.

4. Get help. If you're new to clothes making, as I certainly am, sometimes you need a little more guidance when it comes to some techniques. There's a ton of free information at your fingertips online, even video tutorials that show you exactly what to do. Don't hesitate to take advice when you need it.

5. Give yourself grace. Every time I look at this top, I notice that the front print is just slightly off center, which both drives me crazy and reminds me to chill out. Do my skills have room for improvement? Sure. Is this garment wearable in public? Absolutely. Stop beating yourself up where you fall short and be thrilled that you're getting better every time you try again.


I have to do a quick shout-out to my friend Kim who makes these darling magnetic pin bowls and sells them here on Etsy. This bowl was such a fabulous tool to have on hand while I was pinning and cutting fabric!

For years I was terrified to attempt clothes, but I've been inching out of my comfort zone one step at a time. I'm planning to add a new tunic to my wardrobe at least once a month this year, and it's making me -- and my closet -- very happy.
Related Posts Plugin for WordPress, Blogger...