Pages
▼
Tuesday, September 11, 2012
Fall Patchwork Table Mat Tutorial
Several of you have asked me lately to talk more about how I choose the fabrics and colors that I use in a project, so I thought I would share a bit about that in my tutorial today. I've been wanting to make something for fall, and this table mat seemed like the perfect weekend project. This tutorial is meant to be a guide to the process; I don't give you any specific measurements only because I know that everyone is going to need a different size and shape for their table.
I've been poring over books by Suzuko Koseki lately, and I'm loving the simplicity of her patchwork projects. I knew that I wanted to make a simple table runner with three inch squares on one side and a single piece of fabric on the other. So I went to my stash and just started randomly pulling out any fabrics that felt like fall, either because of the colors or the print. The stack above is almost all of the prints I had out when I was finished.
I then sorted these even more, pulling out a print here and there, grouping things that looked good together, and trying to find a nice balance between low volume patterns (prints with a white or neutral background) and more colorful prints. I wanted a mix of dots, stripes, text, colors, and even a little linen thrown in -- my three Heather Ross prints are all linen blends, while the rest of the fabrics are cotton. Once I had a group of fabrics that I liked, I cut out six three-inch squares from each print. I wasn't sure exactly how large my runner would end up being, but I would rather do all the cutting up front than have to go back and cut more later. Extra pieces can always be used for other projects.
At the last minute, I switched out the pink Lizzy House print for a brown wood grain pattern from Aviary 2. While I loved the leaves, I felt that the pink threw off the color scheme just a bit for me, and I liked the way the brown warmed up the entire palette.
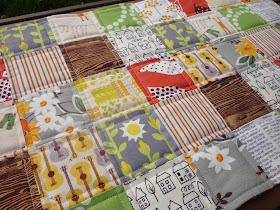
Once you're set on your prints, start lining up your squares. Take your time and play around with it. I chose to alternate low volume and darker prints to emphasize the patchwork look. I also like to make sure that the same prints aren't right next to each other so that there's a nice variety throughout the piece.
Start sewing the squares together. While this sounds simple, it's really easy to make mistakes. A difference of just an eighth of an inch can throw off your rows badly, so it's important to match up the seams carefully as you go. Rather than doing one long row at a time, it's a better idea to sew the squares together in groups of two or three and then sew the groups together, pressing and matching up all the seams as you go along. Have a seam ripper handy just in case.
Once you've sewn all your squares together in the shape and size you need, cut a piece of batting and a piece of backing fabric to complete your table mat. Stack them in this order from the bottom: batting, backing fabric (right side up), patchwork fabric (wrong side up).
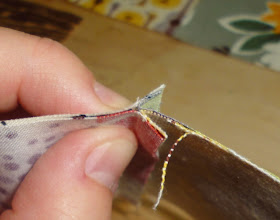
Pin the pieces together and start sewing a quarter inch all the way around your stack, leaving a 6-7 inch gap for turning on one side. Clip your corners and turn the piece right side out, pushing out the corners inside with a chopstick. Press the mat, turning the raw edges of your gap inside so that they match up with the rest of the finished edges.
Sew all around the mat again, a quarter inch from the edge. Now go back and quilt the piece. I chose to sew a quarter inch from either side of every patchwork seam on the top. Once you finish that, you can use and enjoy -- it doesn't even need any binding!
Please let me know if this tutorial is useful to you. While I love sharing projects that I enjoy making, I also want to give back to our quilting community by sharing tutorials that are helpful to all of you. If you make one of these -- or any project I've shared on the blog -- please join my Inspired by Fabric Mutt Flickr group and post a picture. I would love to share pictures of your projects in an upcoming post!
It's wonderful to see this fall runner on our table. It makes me so excited about the coming holidays. Even better, my father absolutely loves this table mat -- and when Dad likes a sewing project, that's a pretty high compliment in our house!
Linking up to Fabric Tuesday.


Great post Heidi - I enjoyed learning more about your process. And your father is right - that is a great runner.
ReplyDeletefab project and having that edge is better as a table mat than binding, and it looks great!
ReplyDeleteHeidi, I loved your tutorial! It's such an easy thing to whip out so I'm gonna have to try it! :) I have tons of fall fabrics, yaay! :) Your place mats are really pretty!
ReplyDeleteNice job. I love the process you showed for picking the fabrics, and I totally agree about trading the pink for the bark print in brown. It adds just the right feel! Love the mixture of lines and textures you chose!!!
ReplyDeleteVery cute. I need to make a table runner as well. I wanted to use a charm square pack since they were already cut up:) So excellent idea!
ReplyDeleteGreat tutorial! Thanks for sharing!
ReplyDeleteOh, I enjoyed this tutorial so much and I an pinning this as well. I just love how you quilt around each patch...just eye catching! Thank you for sharing this...I am new beginner quilter and you made my day!
ReplyDelete