Showing posts with label Christmas. Show all posts

Friday, December 23, 2022

Almost Christmas

Almost Christmas by Heidi Staples at Fabric Mutt

Confession: I really wasn't in the mood for Christmas this year.

When the end of November rolled around and it was time to start putting up decorations, I just didn't have the heart for it. Everything seemed so pointless. All that work, and it was coming down in a month anyway. The very thought of digging those boxes out again made me exhausted...

I went shopping for the small gifts I use for the girls' Advent calendar each year, and instead of getting excited as I walked through the aisles of the Christmas section at Target, I felt tired and overstimulated. It was all too noisy, too expensive, too much. What did any of this have to do with anything? I came home empty handed and flopped down on the couch, wondering aloud to my husband if he had any idea what the heck was wrong with me. I couldn't ever remember feeling this unexcited about my favorite season. 

Christmas Decor by Heidi Staples at Fabric Mutt

I spent a weekend in the doldrums over my unexpected lack of Christmas spirit, and then I decided that it was time to get over it, whether I felt like it or not. Decorations were set out, presents were wrapped, parties of all kinds were attended. Day by day, we've been ticking the usual December activities off our list: enjoying cookies and cocoa, watching favorite Christmas movies, and heading out to see the lights after dark. And while I haven't had any grand revelations like Ebenezer Scrooge, I've found that sometimes you just have to get started doing the right thing before the feelings come along after you. As a Christian, December 25th is a reminder each year that there's a God Who loves me and went to a whole lot of trouble to show it. His love is always there even when I'm not at my best, and that hope is what keeps me going every day of the year.

Christmas Advent Calendar by Heidi Staples at Fabric Mutt

Of course, once I settled down and finally started enjoying myself, I immediately came down with a case of strep throat that looked ready to derail the whole thing. But isn't it funny how things work out sometimes? This may have been the most relaxed I've ever been in the days leading up to the holiday. Instead of running around trying to make everything perfect at the last minute, I've suddenly been forced to sit back and take it all in. Sick or not, I've thoroughly enjoyed watching my dear girls take over the Christmas cooking (with delicious results!), laughing together with my family around the fireplace in the evenings, and sitting on the couch enjoying the twinkle lights that Mom and I spread all over the house this year. I'm hoping to even pick up a little hand quilting project later today if I feel up to it. 

So it's almost Christmas, and I'm going to enjoy it while it's here. I hope you do too, friends.

Merry Christmas.

Monday, December 17, 2018

Merry Maker Tree

Merry Maker Christmas Tree by Heidi Staples for Fabric Mutt

It all started when I saw a package of Shiny Brite vintage reproduction ornaments on sale at Macy's. I've been desperately wanting to get my hands on some of the originals, but they're way out of my wallet's league. So I decided to get these instead as a treat, thinking that they would look cute on a miniature tree in my sewing room. But by the time I got them home, I found out that the ornaments were too large for the small silver tinsel tree I had bought for them. The girls helped me hang the Shiny Brites on our big family tree instead, and I was left wondering what to do with my lonely little sewing room tree.

Why not, I suddenly thought, have a Merry Maker Tree to match my creative space? It was such a fun challenge to come up with tiny decorations that fit the sewing theme.

Merry Maker Christmas Tree by Heidi Staples for Fabric Mutt

Small white ric rac trim and a string of Lori Holt's colorful buttons strung on white Aurifil floss made perfect garlands.

Pixie Cup for Merry Maker Tree by Heidi Staples for Fabric Mutt

I used a mix of Christmas and everyday prints in shades of pink, red, and green to sew a wide, handles-free Pixie Cup for the base of the tree which I filled with snowy white batting to cover up the trunk.

Merry Maker Christmas Tree by Heidi Staples for Fabric Mutt

And a wooden spool of red and white baker's twine held in place with a single pin made the perfect tree topper.

Merry Maker Christmas Tree by Heidi Staples for Fabric Mutt

Putting this tree together was such a lovely way to spend a Sunday afternoon, and it makes me smile every time I see it on the cabinet next to my great grandfather's old typewriter. I may add more decorations in the next week, or maybe not. We'll see. Taking time to do something just for the fun of it was good for my soul. It seems like the perfect way to celebrate Christmas.

Saturday, September 2, 2017

Mini Quilted Tree Skirt

Craftsy Quilted Tree Skirt sewn by Heidi Staples of Fabric Mutt

My amazing friend Caroline has a new Craftsy class out called the Quilted Tree Skirt, a beautiful patchwork project featuring jelly roll strips, foundation piecing, and handmade tassels. I love taking Caroline's classes because she's so easy to follow, and I always pick up a few new sewing tips from her that I can carry over to other projects. Since our family already has a special tree skirt that we put on our large tree each year, I decided to make a miniature version of Caroline's project. Whether it's the children's tree that my daughters decorate every year by themselves, the tiny tree I bought for their dollhouse, or the dyed bottle brush trees that I love to display on my sewing cabinet, we have lots of little Christmas trees around our house every December.

Craftsy Quilted Tree Skirt sewn by Heidi Staples of Fabric Mutt

I took the paper pattern that comes with the class, taped it together at full size and then photocopied it at half size. Then I decided that I wanted to go even smaller and photocopied that smaller version at half size again. For my fabric panels, I sewed together 3 strips that were 2" wide. The print at the top ends up being smaller in the final version, but I didn't mind. I just made sure that my wedge piece was always aligned with the bottom strip whenever I was cutting.

Craftsy Quilted Tree Skirt sewn by Heidi Staples of Fabric Mutt

Making things miniature is always fun, but it can definitely be tricky, especially in projects like this. Because everything was smaller scale, the gap in the center for the tree is non-existent -- the pieces just sewed over each other with no open space. I also needed to use 7 pairs of blades instead of 8 or there would be no gap on the side for the skirt to open. Once I finished sewing the blades together, I carefully went in with my scissors to cut out a hole in the center which came out as a slightly wonky star shape. It's not as pretty as Caroline's full size version, but good enough for what I needed.

I alternated colors on each of the blades -- red/pink vs. blue/green -- with lots of low volume fabrics in between to keep things light and bright. Since the skirt is so small, I decided against the button fasteners and tassels that are on the original pattern. Simple works best on something this tiny.

Craftsy Quilted Tree Skirt sewn by Heidi Staples of Fabric Mutt

The skirt is backed in a pink and white print, and I quilted along all the horizontal seams in off-white thread.

Craftsy Quilted Tree Skirt sewn by Heidi Staples of Fabric Mutt

This was such a fun project, and I enjoyed doing something a little different from the things I normally sew. You can sign up for the Quilted Tree Skirt on Craftsy right here if you'd like to make one of your own. Caroline has put together a wonderful class, and you definitely need to take a look at all her different versions of the skirt. They're absolutely beautiful! I'm not sure if I'm ready for Christmas yet, but this all definitely has me ready for the pre-season excitement of fall...

Monday, November 14, 2016

Gingercake Holiday Gift Series


I love getting new ideas for handmade Christmas gifts, so when Virginia of Gingercake asked me to sew my own version of one of her patterns for her 2016 Holiday Gift Series, I was excited. Her Art Caddy Tote is such a great pattern as written, but the more I looked at it, the more I thought, "Wouldn't this make a fantastic makeup bag?!" Keep in mind that on most days, my makeup routine begins and ends with lip balm. I break out the rest of my beauty stash for special occasions or for church on Sundays, but I still need a place to store it during the week. A miniature version of Virginia's Art Caddy Tote is absolutely perfect for the job.


I followed the directions pretty closely, just trimming 3" off each measurement and eliminating the crayon pockets which I didn't need for this version. Because the bag was smaller, I didn't need the heavy interfacing that's required for the full size tote, just one layer of batting for the bag and some light interfacing for the widest pockets. It's a soft bag but still has plenty of structure to it, sitting up on my counter without any danger of falling over.


I broke out my Quilt Market Sample Spree stash for this project, using Melody Miller's new Jubilee collection for Cotton + Steel, which couldn't be more perfect for a makeup bag. The only exceptions were the handles (a striped print from Wonderland by Rifle Paper Co.) and the bottom of the bag (a floral canvas from Flower Shop by Alexia Abegg) -- both for Cotton + Steel as well. I love the color scheme for this project -- so happy and girly and retro!


I was amazed at how quickly this tote came together. I cut the fabrics one evening and sewed it together the next. It's wonderful to think that I now have two projects in one with Virginia's pattern!


The finished size of my miniature version is 6 x 7 1/2 x 2 1/2". It's so compact, but look how much fits inside! Not only does this keep all the clutter off my bathroom counter, but I feel like I'm all packed and ready to go the next time we take a trip!


Virginia is hosting a weekly Rafflecopter giveaway during this series, and this week she's giving away a set of books from C&T Publishing -- including hers and mine! You can access the giveaway at this link:

a Rafflecopter giveaway

Stop by her blog right here for all the details and check out the rest of the Gingercake Holiday Gift Series for more great ideas:


Happy sewing, friends!

Monday, August 1, 2016

Candied Snowflake Pillow


Like so many of you, I was saddened to hear that Quilter's Newsletter was going out of print at the end of this year. Thankfully, I was able to get one project published in their special Christmas edition which comes out this month: my Candied Snowflake Pillow.


I love taking traditional blocks and updating them with more modern fabric choices. The design of this pillow is based on the Texas Treasure block, first published in the 1930's. Bright candy colors and a black and white dotty background give this pillow a mid-century vibe. It's a cheerful take on Christmas sewing that can stick around for a while after the tree comes down.


Look for the pattern in "Best Christmas Quilts from Quilter's Newsletter," in shops now through mid-October.

Wednesday, July 20, 2016

Holiday Wishes: Merry Gifts Pillow


There's something really gratifying about sewing for Christmas in the middle of summer. Not only is it a fun change of pace, but it makes me feel miles ahead of the game to get a few holiday projects finished months before I need them. When Fat Quarter Shop asked me to be a part of their Holiday Wishes blog hop, I jumped at the chance to add another handmade Christmas project to my stash.


Sherri Falls has written a sweet little book full of holiday projects that will work for both experienced and beginning quilters. The piecing is all very straightforward, though some of her quilts are more advanced due to the large number of pieces involved in each block. When I saw her Merry Gifts Quilt pattern, I immediately thought of turning one of those gift blocks into a pillow cover. A couch dotted with present pillows would be so sweet for Christmas!

Merry Gifts Pillow sewn by Heidi Staples from Holiday Wishes book

I paired a few prints from Cotton + Steel's Garland collection with Alexia Abegg's black and white Starry fabric from her new Print Shop line. I love the red, pink, white & black color scheme, and those little deer just melt my heart every time I look at them. I also adjusted the block pattern slightly, trimming it so that the cover would fit a 12 x 20" pillow.

Merry Gifts Pillow sewn by Heidi Staples from Holiday Wishes book

The pillow is backed in Ornamentals in Cotton Candy from Garland. I love this print in every colorway, but the pink might be my favorite.

Merry Gifts Pillow sewn by Heidi Staples from Holiday Wishes book

This pillow is cute and retro and such a fun addition to my collection of hand sewn Christmas decor. Summer vacation has been pretty fabulous, but after making this project, I'm feeling just a bit more eager to see the temperatures drop again...

Wednesday, December 2, 2015

Handmade Holidays


Today I'm guest posting over at Ellison Lane for Jennifer's fabulous Handmade Holidays series. I'm sharing more versions of my new Pocket Mending Book Tutorial as well as three of my favorite online recipes for the holiday season.


Take a peek at the fabulous December giveaway she's hosting too. Yep, lots of good stuff going on here. Click on over to check it out!

Monday, November 30, 2015

The Joy of Making

Little Joys Christmas Tree Skirt by Heidi Staples for Fabric Mutt

Every year in our home, we have the tradition of the Children's Christmas Tree. This little white tree, which belonged to my grandmother before she passed away, is decorated with colored lights and tiny wooden ornaments by my girls -- no grown-up help allowed. It's the one job that is especially their own, and they can hardly wait for the Thanksgiving leftovers to hit the fridge so that the Christmas decorating can officially begin.


In the past I've used a scarf as a last minute tree skirt, but this year I knew it was time to make something more permanent. I pulled out the rest of my Little Joys bundle by Elea Lutz for Penny Rose Fabrics, added a few La Creme Dots from Riley Blake Fabrics, and used a red and white scallop print by Bonnie and Camille for the binding. The wedge shapes were cut using a dresden ruler that I've had for ages, sewn together with a 1/2" seam between wedges.

Little Joys Christmas Tree Skirt by Heidi Staples for Fabric Mutt

I was completely winging it with this project, and though I've had my share of sewing disasters while improvising, I'm happy to say that this one was a complete success. It reminds me again why I love to sew. What a joy it is to make something with your own hands, and to make it exactly the way you've imagined it to be. What a pleasure to share that handwork with the people you love, to see their eyes light up over the something special you made for them. But then to know that it will become a part of your family's legacy, that your children will take it out of storage someday and show it to their children and say, "When I was a little girl, your grandmother made this for us. This is part of our family. This is how we celebrate Christmas."

I can't think of anything better than that.

Friday, November 13, 2015

A Christmas Starlet

Little Joys Christmas Starlet Pillow by Heidi Staples from Sew Organized for the Busy Girl

Eleanor Roosevelt is credited with that famous quote, "Do one thing every day that scares you." I'm not sure if that would be wise -- or even manageable -- on a daily basis, but once in a while, it's probably not a bad idea. So this week, I decided to finally tackle one of my greatest creative fears: free-motion quilting.

I've been saving a bundle of Little Joys by Elea Lutz for a Christmas project this year, and I thought it would be fun to downsize the Starlet mini quilt pattern from my book for a 18" square pillow. After figuring out how to use the darning foot on my machine, studying the pages of Free-Motion Quilting by Angela Walters, and practicing some basic patterns on a few leftover fabric strips, I took a deep breath and plunged ahead.

Little Joys Christmas Starlet Pillow by Heidi Staples from Sew Organized for the Busy Girl

Christmas is a time for pulling out memories from the past, and I think this pillow is going to fit in well with that crowd. Every year, I'll be able to look at this pillow cover and smile over my first attempt at free-motion quilting -- not awful, but definitely with lots of room for improvement. I attempted a whole range of patterns on this project, including flowers, loops, and wishbones, with varying levels of success. Practice will do me good, and I'm looking forward to trying again in the months to come.

Little Joys Christmas Starlet Pillow by Heidi Staples from Sew Organized for the Busy Girl

But for today I'm pretty happy because, hey...finished a Christmas project? Check. Faced a fear? Check. Participated in Finish It Up Friday for the first time in months? Check.

Yep, it's all good.

Monday, August 31, 2015

Tinsel Gift Tag Runner (with Tag Block Tutorial)

Tinsel Gift Tag Runner by Heidi Staples for Fabric Mutt

Almost as soon as I finished my Luggage Tag Quilt, I immediately started pulling fabric for a smaller version, a Christmas Gift Tag Runner. I've been saving Cotton + Steel's adorable Tinsel collection for this year's Christmas sewing, and these prints couldn't be more perfect for this project.


For those of you who might be interested in making a "gift tag" project of your own, I made each of these blocks using one 3 x 4.5" rectangle and two 1" squares.


Just place the squares at the top corners of the rectangle (right sides of the fabric together) and sew diagonally across from the outside lower corner of the square to the inside upper corner. Trim the seam allowance and press the seam open.


And there you have it...a simple little tag block perfect for projects that feature luggage tags, gift tags, price tags -- you name it! If you make any projects with one of these, be sure to tag me @fabricmutt on Instagram.

Tinsel Gift Tag Runner by Heidi Staples for Fabric Mutt

I would have spaced these blocks apart a bit further, but I really wanted to use that lime green fabric for the sashing even though I didn't have much left. The runner is backed in a Tinsel washi tape print, and I bound it in a Stitched Circles print from Zen Chic's amazing new Modern Background collection. I used my favorite wavy stitch on my sewing machine for the quilting.

Tinsel Gift Tag Runner by Heidi Staples for Fabric Mutt

I don't think I've ever gotten such a head start on my Christmas sewing. It feels amazing to be so ahead of the game...for today anyway!

Monday, December 1, 2014

Merry Mug Rug Blog Hop


When my friend Jennifer asked if I would be a part of her Merry Mug Rug Blog Hop, I was so happy to join in the fun. A mug rug is just about the perfect holiday project: a quick finish that brings something special to your home in the middle of a busy season.


When I think of Christmas, I think of family photos. My grandmother, who passed away last spring, was constantly pulling out her Polaroid camera when I was a little girl. I was always mesmerized by watching those pictures appear like magic after a minute or two. Grandma loved to scribble notes on the white border at the bottom of the picture and put them up all over her house, especially in her kitchen. The one above was taken by my mom when I was almost four years old, and I love it so much. It's been over a year since I've played around with Polaroid quilt blocks, but I was eager to pull out Karen's great tutorial for my Christmas mug rug. These are so perfect for fussy cutting, and I had just the right fabric in mind: Merry Main Street by Alexander Henry. I love the retro nostalgia of this print!


My polaroids are framed in a white sketchy print by Carolyn Friedlander from Architextures, and the background is lime green linen Mochi Dots which I also used on the back of the mug rug. The piece is bound in a red and white scalloped print from Miss Kate by Bonnie and Camille.


I used red embroidery floss to stitch some scribbled notes at the bottom of each "picture" just as if they were pressed in a family album. The embroidery was all done without any tracing since I wanted it to look like someone really had just dashed off a few notes in a hurry.

This was such a fun project, and though I'd originally planned to give it away, I found that I just couldn't bear to part with it when it was finished. The mug rug is definitely going to be coming out with the Christmas decorations every year from now on!

Jennifer has a wonderful giveaway on her blog for a $30 gift certificate to Southern Fabric which you can enter through December 14. She'll also be sharing more fun mug rugs from other bloggers over the next two weeks, so be sure to check back for more Christmas inspiration. Now I'm off to find some tea and a few more of those cookies...

Monday, December 24, 2012

Merry Christmas


Christmas this year has been a little more blue than usual, only in the sense that we all seem to be constantly coming down with one thing after another. At the moment we have three colds, two cases of bronchitis, and one ear infection. On top of that, both of my poor mother's eardrums have burst in the past twenty-four hours due to the enormous pressure that built up from her terrible cough of the past few weeks. Thank goodness for antibiotics and pain relievers... In spite of all this, we are still so happy to be celebrating Christmas Eve together tomorrow. We were all talking about it today, how the trials of life are just part of the package, and we learn to deal with it and go on. They don't have to steal our joy unless we let them. We're trying hard not to let them...


My grandmother saw photos of my Weekender bag last month and became absolutely enchanted by Heather Ross's market piggy. So much so that she insisted that I make her a new lap quilt with that little character at the center of each block. I've been making hexagons out of scraps at night after the girls go to bed, and I pulled a bunch of these together to make four rosettes, each stitched to a square of yarn dyed linen.


I used some fat quarters from Pat Bravo's beautiful Summerlove collection along with a Denyse Schmidt print as an outer border, and I think that all the fabrics work together to give the quilt a sweet vintage look. Kona Navy makes a simple frame, and I used a Joel Dewberry print for the backing. Grandma loved the quilt, which makes me ever so happy. And I have plenty of hexagons left over from my evening sewing, so I expect there will soon be a hexagon pillow -- or two -- in the works.

I'll be taking a break from blogging for a few days so that I can spend the time with my family. I expect there will be plenty of baking, playing, laughing, singing, and "Christmas traveling" -- as my Bear likes to call our evening excursions to look at the neighborhood Christmas lights. It's my hope that all of you will have a truly wonderful holiday with the people you love. Merry Christmas!

Linking up to the Let's Get Acquainted Link-up.


Wednesday, November 28, 2012

O Christmas Tree


I always enjoy seeing magazine spreads on Christmas decorating. It's so fun to get new ideas, and once in a while, I see something that I can actually use. For our family, though, Christmas is steeped in traditions and memories that rarely change. We use an artificial tree in our home -- asthma, allergies, and other concerns make it a necessity for us. This one is particularly special to me because it's the one that my husband and I used at our December wedding reception seven years ago.


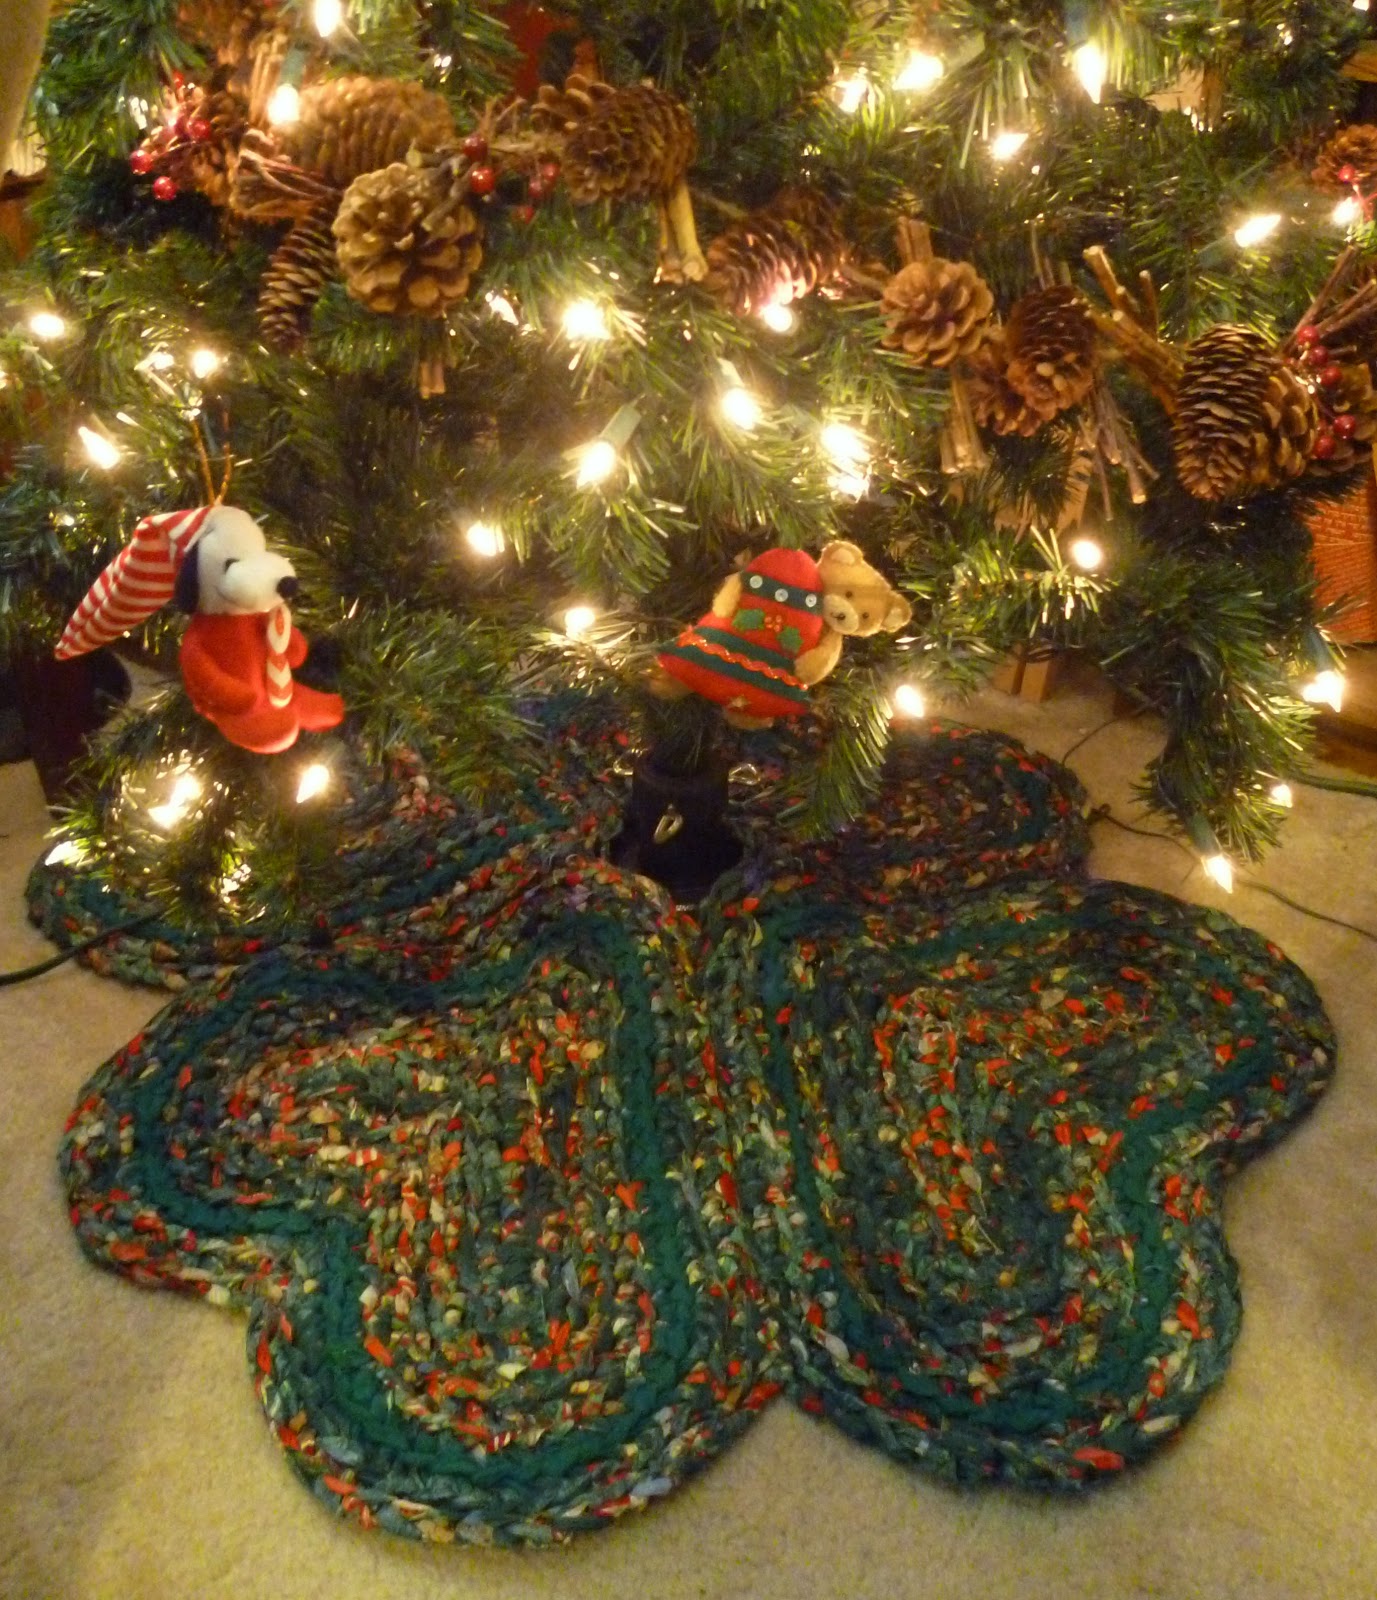
Over a decade ago, before Etsy mania took hold, my mother managed a small shop called Nana's Attic which sold handmade goods from all over the country. After my father became a pastor and she closed down the business, we saved some of our favorite holiday pieces including this Christmas tree skirt. The braided rag rug is actually a series of four upside down hearts sewn together to make a perfect circle.


These little dolls, also from the shop, are such a sweet decoration. My girls love them, and I think they look so cute on the tree.


As I've mentioned before, my mother is brilliant with cross stitch. This angel is one of several of her creations that we put on the tree each year. The little plastic apple was a Christmas gift from my sixth grade teacher, Ms. Bode. She was a tough teacher, but I respected her greatly. After she retired and I became a teacher myself, she gave her entire stash of bulletin board and teaching aides to me. Just a short while later, she passed away from a number of health issues, leaving behind no husband or children. I've always felt that it was important that someone remember her, and placing this little apple on my tree each year is my small way of doing that.


We have some fun little vintage treasures like this one. I don't know the history of every one, but they've become a part of the family collection over the years.


The angel at the top of the tree is one more find from Nana's Attic. I love putting it on top of that wreath of berries for a little extra color.


But the biggest Christmas tree tradition in our family is the bow at the top of the tree. My parents got engaged thirty-seven years ago this December. That year my mom told her mother that all she wanted for Christmas was my dad. So on Christmas morning when my dad came to visit, my grandmother tied this red bow and pinned it to my dad's collar before sending him over to see my mom. It's been at the top of our Christmas tree every year since. The creche always hangs below it to remind us Who should be at the center of the celebration.

I love this tree. I love everything it represents and all the people that it brings to mind. It may not be the flashiest or the most creative tree on the block, but there's love on every branch.

I wouldn't have it any other way.


Related Posts Plugin for WordPress, Blogger...