Pages

Monday, November 30, 2015

The Joy of Making

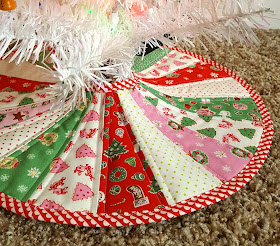
Little Joys Christmas Tree Skirt by Heidi Staples for Fabric Mutt

Every year in our home, we have the tradition of the Children's Christmas Tree. This little white tree, which belonged to my grandmother before she passed away, is decorated with colored lights and tiny wooden ornaments by my girls -- no grown-up help allowed. It's the one job that is especially their own, and they can hardly wait for the Thanksgiving leftovers to hit the fridge so that the Christmas decorating can officially begin.


In the past I've used a scarf as a last minute tree skirt, but this year I knew it was time to make something more permanent. I pulled out the rest of my Little Joys bundle by Elea Lutz for Penny Rose Fabrics, added a few La Creme Dots from Riley Blake Fabrics, and used a red and white scallop print by Bonnie and Camille for the binding. The wedge shapes were cut using a dresden ruler that I've had for ages, sewn together with a 1/2" seam between wedges.

Little Joys Christmas Tree Skirt by Heidi Staples for Fabric Mutt

I was completely winging it with this project, and though I've had my share of sewing disasters while improvising, I'm happy to say that this one was a complete success. It reminds me again why I love to sew. What a joy it is to make something with your own hands, and to make it exactly the way you've imagined it to be. What a pleasure to share that handwork with the people you love, to see their eyes light up over the something special you made for them. But then to know that it will become a part of your family's legacy, that your children will take it out of storage someday and show it to their children and say, "When I was a little girl, your grandmother made this for us. This is part of our family. This is how we celebrate Christmas."

I can't think of anything better than that.

Friday, November 27, 2015

Pocket Mending Book Tutorial

Pocket Mending Book Tutorial by Heidi Staples for Fabric Mutt

What better way to celebrate the start of another Christmas season than with a new tutorial! I've spent the past week sewing up a handful of these little books which I first shared with you here, and it's been so much fun. I warn you, though, they're completely addictive. Every time I make one, I start thinking about the next...

Pocket Mending Book Tutorial by Heidi Staples for Fabric Mutt

I'll be sharing more versions of this project in a guest blog post next week for Handmade Holidays at Ellison Lane Quilts. For now, though, here's everything you need to start making one of your own. If you share these on Instagram, please tag them #pocketmendingbook and tag me @fabricmutt too.

Have fun!

Supplies and Cutting Instructions

various feature prints -- 5 squares (1 1/2 x 1 1/2" each) for X block on cover
white dot print -- 8 squares (1 1/2 x 1 1/2" each), 2 strips (1 x 3 3/8"), and 2 strips (1 x 4 3/8") for X block background
blue print -- 1 rectangle (4 3/8 x 4 3/4") for exterior back
white text print -- 1 rectangle for inside of front cover (4 3/8 x 4 3/4") and 1 rectangle for inside of back cover (4 3/8 x 4 1/2")
floral print -- 1 rectangle (4 1/2 x 5") for inside pocket
batting -- 1 rectangle (4 3/8 x 8 7/8") for exterior and 1 rectangle (2 1/2 x 4 1/2") for pocket
felt - 1 rectangle (3 1/4 x 7") for needle insert
thread
adhesive basting spray

*Shortcut Option: Substitute 1 square (4 3/8 x 4 3/8") for the first two fabrics in the supply list to make a quicker, easier project.

Note: All seams 1/4" unless otherwise stated.

Make the Exterior


1. Arrange your feature squares to form the X in the center of the cover block, placing the white background squares around them.


Sew the squares together in rows.


Then sew the rows together.


Trim the block so that it measures 3 3/8" square.


2. Sew the 1 x 3 3/8" background strips to the top and bottom of the X block, and then sew the remaining background strips to the right and left sides of the block.


3. Sew the left side of the cover to a 4 3/8" side of the blue exterior back piece. Use adhesive basting spray to fuse the cover to the 4 3/8 x 8 7/8" piece of batting. Quilt the cover as desired and then trim the piece to a rectangle measuring 4 3/8 x 8 3/4".

Make the Lining

1. Fold the 4 1/2 x 5" floral rectangle in half, wrong sides of the fabric touching each other, so that the 4 1/2" ends meet. Slip the 2 1/2 x 4 1/2" piece of batting inside the folded piece of fabric and top stitch 1/8" from the fold.


Place the pocket on the back lining piece (4 3/8 x 4 1/2"), aligning it with the bottom and side edges of the fabric, and baste it in place 1/8" from the edge. Divide the pocket in two by stitching a line down the middle, backstitching at the top of the pocket.


2. Fold the felt in half so that the short ends meet. Place it on top of the front lining piece (the one with the pocket) so that the fold lines up with the right edge of the piece and baste it in place 1/8" from the edge.


3. Stack the front and back lining pieces on top of each other with the felt pages sandwiched between them, checking to make sure that when you open them, they'll be in the correct positions, and stitch 1/4" from the same side where you basted the felt pages in place. Press the lining open, being careful not to damage the felt.

Assemble the Book


1. Pin or clip the exterior and lining on top of each other, right sides together.


2. Sew 1/4" all the way around the outside of the 4 3/8 x 8 3/4" rectangle, backstitching at the start and finish. Leave an opening of about 3 1/2" on the short end next to the back exterior piece. Trim the corners without cutting through the stitching.


3. Carefully turn the book right side out through the opening on the short end, using a turning tool or chopstick to push the corners out, and give the book a good pressing with your iron. Tuck the edges back inside the opening, and topstitch 1/8" from the edge all the way around the outside of the book. Be sure not to catch the felt pages in your stitching. Close the book and press carefully around the binding to help your book stay closed properly.

4. Fill the book with pins, needles, buttons, thread, and embroidery scissors.

Enjoy!

Saturday, November 21, 2015

Pocket Mending Book

Pocket Mending Book by Heidi Staples for Fabric Mutt

"I'm the queen of little things," I told a friend once, and it's true. There's nothing I love more than a small patchwork project. This pocket mending book is definitely one of my tiniest projects to date, and I'm just crazy about it.

The book itself finishes at 4" square, small enough to actually slip into the pocket of my purse. The scraps making the patchwork X on the front finish at 1" square, and I added a little hand quilting with pink Aurifil thread just for fun. I love that I can feature tiny details in this design like that adorable kitty by Heather Ross!

Pocket Mending Book by Heidi Staples for Fabric Mutt

The inside of the book is lined with my favorite Tiger Lily print. I added two felt pages for needles, pins, and buttons.

Pocket Mending Book by Heidi Staples for Fabric Mutt

The back page of the book has two tiny pockets -- one for embroidery scissors and the other for thread. Trying to stuff a whole spool of thread in here would be difficult, so I wound a length of thread onto a piece of recycled card stock instead.

Pocket Mending Book by Heidi Staples for Fabric Mutt

The binding and back is all one piece of material, this great pink geometric print from Sidewalks by October Afternoon.

I made notes while I was working so that I could sew more of these, and I plan to try another one this weekend to see if I got all the numbers right. With all the trial and error of trying a new pattern, I don't always get everything recorded as I go along.

Pocket Mending Book by Heidi Staples for Fabric Mutt

But wouldn't these make adorable little gifts? I'm thinking stocking stuffers, swap extras, just-because-you're-the-awesomest-friend-ever presents...

Yep, it might just be time to set up my own pocket mending book factory in the sewing room.

Happy weekend, friends!

Friday, November 13, 2015

A Christmas Starlet

Little Joys Christmas Starlet Pillow by Heidi Staples from Sew Organized for the Busy Girl

Eleanor Roosevelt is credited with that famous quote, "Do one thing every day that scares you." I'm not sure if that would be wise -- or even manageable -- on a daily basis, but once in a while, it's probably not a bad idea. So this week, I decided to finally tackle one of my greatest creative fears: free-motion quilting.

I've been saving a bundle of Little Joys by Elea Lutz for a Christmas project this year, and I thought it would be fun to downsize the Starlet mini quilt pattern from my book for a 18" square pillow. After figuring out how to use the darning foot on my machine, studying the pages of Free-Motion Quilting by Angela Walters, and practicing some basic patterns on a few leftover fabric strips, I took a deep breath and plunged ahead.

Little Joys Christmas Starlet Pillow by Heidi Staples from Sew Organized for the Busy Girl

Christmas is a time for pulling out memories from the past, and I think this pillow is going to fit in well with that crowd. Every year, I'll be able to look at this pillow cover and smile over my first attempt at free-motion quilting -- not awful, but definitely with lots of room for improvement. I attempted a whole range of patterns on this project, including flowers, loops, and wishbones, with varying levels of success. Practice will do me good, and I'm looking forward to trying again in the months to come.

Little Joys Christmas Starlet Pillow by Heidi Staples from Sew Organized for the Busy Girl

But for today I'm pretty happy because, hey...finished a Christmas project? Check. Faced a fear? Check. Participated in Finish It Up Friday for the first time in months? Check.

Yep, it's all good.

Sunday, November 8, 2015

Favorite Things

Melody Miller Retro Nine Patch Quilt by Heidi Staples for Fabric Mutt

The longer I quilt, the more I know what I like. A whole lot of my favorite things ended up being part of this retro nine-patch quilt, things like...

Melody Miller Retro Nine Patch Quilt by Heidi Staples for Fabric Mutt

1. Melody Miller's fabric -- This designer can do no wrong in my eyes. She has a genius for walking the classy line between vintage and modern. I alternated 6" squares with the nine-patch blocks, perfect for featuring the large prints in her early Ruby Star collections. I love that both the designs as well as the mix of bright and subdued colors give this quilt a lovely retro feel.

Melody Miller Retro Nine Patch Quilt by Heidi Staples for Fabric Mutt

2. Linen sashing -- I'm madly in love with the contrast of yarn dyed linen against quilting cotton. It just looks fabulous every...single...time.

Melody Miller Retro Nine Patch Quilt by Heidi Staples for Fabric Mutt

3. Double gauze backing -- Wanna feel like a cozy little newborn baby swaddled in your favorite blankie? Use this stuff on the back of your next quilt. It gets softer each time you wash it and can be found in plenty of modern designs like this cheerful aqua version by Cotton + Steel.

Melody Miller Retro Nine Patch Quilt by Heidi Staples for Fabric Mutt

4. Colorful binding -- I discovered a little secret last spring about Melody's wildly popular viewfinder reels: they make an incredible binding. This is the second quilt I've bound in this print, and there will definitely be more.

The best part of making a project out of your favorite fabrics? You have a whole lot of fun while you sew.

And yeah, you're pretty fond of that finished quilt too...