Pages

Thursday, January 31, 2013

Hooked


My latest pattern test for my super talented friend Kristy of Quiet Play is hot off the press. I've loved every pattern I've ever tested for her, but right now anyway, this one is my favorite. You all know I'm a sucker for anything retro, and this is right up my alley. Check out her other designs in this incredible series below:

Sew Retro paper piecing patterns
Image courtesy of Quiet Play

Adorable, right? I had originally planned to turn this piece into a pot holder, but now I'm picturing a table runner for which I'll need a few more blocks. Maybe a lot of blocks. Stay tuned...

Wednesday, January 30, 2013

Triple-Zip Pouch


This has been a week for catching up on things I've been wanting to do for months. Today I finally made one of my friend Debbie's triple-zip pouches -- a genius pattern if there ever was one. Debbie is hosting a Triple-Zip Along too, which is a great excuse (if you really needed one) for trying out this amazing tutorial.


When I first saw Eric & Julie Comstock's new collection 2wenty Thr3e online, it was love at first sight, even though it's really not my normal choice of colors. Now that I've seen these prints in person, I'm officially smitten -- and so very glad that I pre-ordered a fat eighth bundle earlier this month. This charm pack arrived the other day, and I thought the triple-zip pouch was a great way to start using it along with some Sewing Guide in black from Mama Said Sew by Sweetwater and an orange and white stripe from Lizzy House's Hello Pilgrim collection for the lining.


I never realized how small this pouch was until I sat down with the tutorial -- just under eight inches long -- yet it's incredible how much you can fit inside it. I'm so excited to swap out the larger pouch I've been keeping in my purse for this efficient little beauty. Can you believe that all this stuff can fit inside with room to spare?

Make yourself a triple-zip pouch. You'll be glad you did.

Tuesday, January 29, 2013

Out to Sea


Last August when Sarah Jane released her latest line, Out to Sea, I immediately snapped up a bundle of fabric to make a little quilt for my girls' classroom reading spot. It's taken me longer than I had planned, but I finally got around to it this weekend -- just in time, too, since this was my January project for the Lovely Year of Finishes sew along.


Now that my girls are all in regular beds, we had no need for the toddler beds that my two older daughters used to sleep in at night. I gave one to my sister for her girls to grow into and kept the other to use as a special reading nook in our classroom. The funny thing about toddler beds is that, in order for the quilt to fit the top of the bed without wrinkling up badly along the guardrails, it needs to be fairly narrow. Fortunately, I joined the x and + along this month, and when I saw the directions posted for a 24" block, everything fell into place. Two of these blocks together with a small border made a perfect fit for the top of our toddler bed. I bound the quilt in Skinny Vines in charcoal from Valentina -- another gorgeous collection which I hope to be sewing with soon.


I love the map print that Sarah Jane created for this collection -- perfect for so many different projects. I used a small piece of it for the pillow you see above in the top photo, and a lot more of it for the backing of the quilt along with pieces of several others.


I toyed with several different quilting ideas, but in the end I decided to keep it minimal for this design since there's so much going on with the prints. My girls are just crazy about these fun little mermaids.


The accent pillow I made to go with the quilt is as simple as can be. After using a full picture of the map for the front, I pieced together a few large scraps for the back, stuffed it and sewed it closed. It took me fifteen minutes at the most -- I love an easy finish!


Here they are in use. I had no idea when I picked these fabrics that they would perfectly match the wooden kitchen that we gave the girls for Christmas two years ago. I love having the world map above with their artwork hung in front of it on pieces of heavy twine. It's so much easier than trying to cram everything onto the refrigerator.


There were enough pieces left to also make a pillow cover for the daughter of one of my husband's coworkers.  I added a pocket to the front which will be fun for storing a book or doll, and it made a great place to put the birthday card. I love the Sea Flowers print on the sides of the pocket. There's a part of me that really wants to cover the chair in Mouse's room in that fabric...


If you haven't bought any of this collection yet, I highly recommend it. I thoroughly enjoyed playing with these fabrics over the weekend, and I'm looking forward to using my leftovers in some more scrappy projects in the weeks to come.

Linking up to Fabric Tuesday, Made By Me, and A Lovely Year of Finishes.

Sunday, January 27, 2013

Road to California


It took me over a year, but yesterday I finally attended my first quilt show: Road to California. If Elaine hadn't tipped me off, I would have missed the whole thing, and what a shame that would have been. Over 150 vendors filled the exhibit hall -- a quilting shopper's paradise. For someone like me whose only contact with other quilters has been online, it was a pretty fantastic experience. I walked into the hall, took a deep breath, and said to myself, "Yes, these are my people..."


Please forgive the poor quality of these pictures -- indoor convention center lighting does not a pretty photo make. Though most of the quilts on display were not necessarily my style, I could certainly appreciate the talent behind them which is worlds beyond my personal skill set. There was really only one modern exhibit, featuring quilts from the book "We Love Color." I really enjoyed getting to see these in person. Below are a few more...


There were some wonderful shops. Nifty Thrifty Dry Goods was full of beautiful notions. All of them were assembled in the most adorable vintage packaging, and I had a hard time keeping my hands to myself. In the end, I just couldn't choose, but I also discovered that they have an online shop which I'll definitely be visiting this week.


Julie Herman of Jaybird Quilts was showing off her Hex N More ruler, Toes in the Sand quilt, and her Skip the Borders book. Every one of her quilts is more gorgeous than the last -- this woman has an abundance of talent.


Sewing Party was one of the few vendors featuring almost entirely modern fabric. It was fantastic to finally see so many of my favorite prints in person -- so different from looking at the pictures on my computer. I love the quilt in the center there that's made with Comma by Zen Chic -- if I didn't already have a charm pack of that collection coming in the mail, I would have definitely picked some up yesterday. I noticed that this shop will be at QuiltCon next month, so be sure to stop by if you're going.


Here's my stack of goodies from yesterday's shopping spree. I could have easily tripled the size of this pile, but I'm trying to be (mostly) responsible these days. If any of you live in Southern California, I highly recommend that you make it to this event next year if you can. It's definitely worth the drive.

Linking up to the Let's Get Acquainted Monday Link-Up.


Tuesday, January 22, 2013

Testing, testing...


Last August, Diane of From Blank Pages gave me the chance to test out her new paper pieced alphabet set. I've been holding onto the pictures of my project until she officially released My First Alphabet, and today is the day! I used leftover pieces from a charm pack of Sew Stitchy by Aneela Hoey to spell out the word "notion" on a simple zipper pouch. I love the grass green shade of Kona for the solid background. The embroidered words are a little joke between my husband and me -- every time I mention that I need to purchase sewing notions, he starts singing his own version of the Beach Boys' tune: "If everybody had a notion...across the USA..."


The back of the pouch is a mix of grass and cactus green Kona solids. Both of these were originally bought as a part of the Woodlands Inspired Kona Bundle at Sew Fresh Fabrics, which I have thoroughly enjoyed using on several different projects.


I lined the pouch with a white and grey scissors print from Half Moon Modern -- it was just too perfect to pass up. Though I had originally intended to use this bag for smaller items like thread and buttons, it's size (8.5 x 13") makes it absolutely ideal for storing my zippers.

I really love this bag. The paper piecing, embroidery, and prints were all fun to put together. Mostly, though, I will always remember how impressed my dad was when I first showed it to him. His eyes lit up as he reached for the bag and turned it around in his hands. "I like this one," he said with a smile.

And when it comes to compliments for a sewing project from my dad, that's praise indeed.

Sunday, January 20, 2013

Let's Get Acquainted


Welcome! For those of you who are new to my blog, my name is Heidi, and I love sharing my latest sewing projects here at Fabric Mutt. You can stop by my about me page if you'd like to know more. I was absolutely delighted when my dear friend Beth asked me to be her guest host for this week's Let's Get Acquainted Monday Link-Up. If you don't know Beth, you'll want to rush right over to her darling blog, Plum & June, to look at the wonderfully colorful and creative projects she posts about every week. Her "Let's Get Acquainted" series, including last year's blog hop and the weekly Monday link-up, has been a wonderful opportunity for both new and experienced bloggers to meet and share ideas.


My big accomplishment this week was finishing the expansion of my sewing area in the girls' classroom downstairs. When I first moved into the room, I wound up with about a quarter of the total space -- not really enough to have a permanent setup, and I ended up doing most of my work in the kitchen, leading to clutter galore. Now I'm thrilled to have a place where I can leave my ironing board and cutting table up and ready to go at a moment's notice.


The secretary desk and closet are still wonderful for fabric storage, though I definitely need to do some serious rearranging inside that white closet. It's not a pretty sight in there at the moment...


The glass cupboard is a perfect place to keep my scrap tins as well as any collections that I want to keep together. I have a few stacks here that are ready to be used for projects in the next month or two, including my precious Heather Ross stash.


I absolutely love using glass canning jars for just about anything, from gift containers to storage of all kinds. Scraps and cutting tools fit nicely into these two jars next to my newest pincushion. I made a small pillow out of this Denyse Schmidt print and stuffed it into a wooden frame. I absolutely love having a pincushion that doesn't slip around while in use! A small lamp on the table gives me a little extra light in the evenings.


I whipped up a quick cushion for my chair from one of Anna Maria Horner's new velveteen Field Study prints. I'm not usually wild about the color pink, but that coordinate print really grabbed me. The World War II women's recruitment poster has always been one of my favorites. I love seeing that row of brave women up on my wall -- it lets the petty issues of my life fall into their proper place.


This is my wall of inspiration. I really enjoy having fabric swatches, quotes, magazine clippings, and artwork around to give me ideas while I'm working. It's so fun to indulge in my love of all things vintage and retro too. The chalkboard was purchased from Ikea almost ten years ago, and I bought the hanging wire file basket at Home Goods this week. A length of heavy twine and some clothes pins makes a great place to hang just about anything. I have several pieces of twine hung up on the other half of this wall on top of a world map where I display my daughters' artwork and school papers. I'll share pictures of that part of the room in another post later this month.


I'm so excited about my new fabric storage area. The wire cart was purchased from Target several years back to be used as a mail station for our house, but now it makes a perfect home for my half yards and fat quarters. The wooden unit on top of that was originally made for storing photos. I'm using it to store my fat eighths and all those little pieces that are too small for the lower drawers but too big for the scrap bins. It's also the perfect size for my charm square packs. Instead of putting photographs in the windows, I cut 4 x 6" pieces of my beloved Melody Miller prints for decoration. The little chalkboard tin buckets on top are from the dollar section at Target, and I love having quick access to notions when I need them.

Is there anything better than having a friendly, cozy place to sew? It makes me happy to just sit and look at this room. Now I need to do some actual sewing...

So what have you been working on this week? Share with us! Here's how...

Plum and June

1. Link up any recent sewing/quilting posts.

2. In your post or on your blog, please include either a text link or a button letting people know about this link up.

3. Visit at least the two bloggers who link up before you and everyone who visits you from this post.

4. When the link tool asks for your name, write down your favorite fabric designer!

Wednesday, January 16, 2013

Happening

It's been a funny sort of week. The kind where there's lots of sewing and creating going on, but nothing that you can really share about just yet for one reason or another. It leaves one in an odd place when it comes to writing blog posts, but here's a little taste of what I've been up to lately...

hand sewing my cathedral windows

newly sorted fabric drawers...I seem to be rather fond of blue...
knitting my first scarf
just add binding
Bear's new schoolbooks -- she officially starts preschool at home today

Progress. It's happening.

What's happening with you?

Linking up to WIP Wednesday.

Friday, January 11, 2013

Another Valentine (with Tutorial)


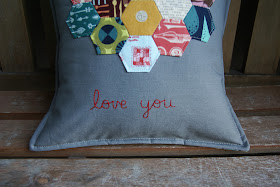
My first Valentine pillow wasn't enough - I needed another. And I decided, while I was at it, to put together a tutorial for those of you who might want to make one of your own. This pillow makes a great weekend project -- one afternoon to make the hexagons and another to put together the pillow, though those of you blessed with more free time than I have could probably finish it in one long stretch. With Valentine's Day coming up next month, I figured that I would share this with you now rather than later since there are still a good number of weekends to come before February 14th.

While I could write a tutorial on how to make hexagons, there are so many other great ones out there that I'm going to step aside and send you to the experts. My current favorite is at The Sometimes Crafter -- fantastic photographs and clear steps lead you through the entire process. For those of you who have never tried hexagons, this is your big chance...don't let them scare you! I was so intimidated by these little guys for months before I did my first hexagon project, and then I couldn't believe I had waited so long. Even if you end up deciding that hexagons aren't your thing, you can at least be proud of yourself that you tried them.


The pillow I made for my husband was slightly larger than the one I'm going to demonstrate for you here, which fits perfectly on a 12 x 12" pillow form. It's very easy to adjust the size of this pillow to make it larger or smaller by adjusting the number of hexagons as well as the size of the background fabric. You could even make it into a pincushion if your hexagons are small enough!

Materials
13 one-inch hexagons
13.5" square of fabric for the pillow front
13.5" square of batting
13.5" square of fabric for the backing on the pillow front sandwich
13.5 x 8.5" and 13.5 x 10.5" pieces of fabric for the pillow back
Fabric glue stick
Embroidery thread and needle


Lay out your hexagons in vertical rows of 2, 3, 3, 3, 2 (see photo above), balancing the colors and designs to suit your liking.


Stitch the vertical rows together first.


Then stitch the rows together to form the entire heart.


Remove the threads and papers from your hexagons and press carefully to preserve the shape of each piece. 


Place the hexagon heart on the square of fabric you're using for the pillow front. Be sure to center it horizontally. If you plan to embroider a message beneath the heart, leave enough room -- I made certain that the bottom hexagon was five inches above the bottom edge of the square. Use a fabric glue stick on the back of the outer edges of the heart to glue it in place so that it won't slip while you're attaching it to the square.


Using your sewing machine, stitch about an 1/8" inside the heart all the way around to secure it to the pillow top.


If you like, embroider a message beneath the heart, centering it as much as possible. When I embroider words, I usually write the words out on a piece of paper and copy it as closely as possible. Remember, this is a handmade project, so your letters don't need to be perfectly formed. Imperfections just add to the charm. Really.


Take your two backing fabrics for the envelope closure and fold one of the long sides in 5/8", press, fold again, and press again on both pieces. Top stitch along the folded end twice -- 1/4" and 1/2" from the edge.


Make a stack of your fabrics, carefully matching the edges and corners in the following order from bottom to top: square backing of sandwich for pillow top, batting, pillow top (right side up), larger piece of envelope closure (right side down and positioned on the top half of the pillow with folded edge toward the center), and the smaller piece of envelope closure (right side down and positioned on the bottom half of the pillow with folded edge toward the center).


Pin the corners and along the side where the envelope closure pieces overlap. Stitch 1/2" from the edge all the way around the pillow, removing the pins as you go. Trim the corners to cut down on bulk, turn the pillow inside out, and press out the corners and edges of the pillow with a chopstick. Give it a good pressing.


Top stitch 3/8" from the outer edge of the pillow, and you're done. If you make one of these, please do share a picture or two in the Inspired by Fabric Mutt flickr group. I would absolutely love to see your creations!


Is there anything better than a valentine that you can hug?

Linking up to Finish It Up Friday.